
- 1MATLAB-数学建模-求解线性规划-2-LINGO_动态规划问题matlab lingo代码
- 2C++后续:QT学习(Qt概述,创建QT项目)_c++ qt
- 3逻辑思维类面试题汇集(1)_有三个箱子,一个红色,一个蓝色,一个绿色。每个箱子都有一张说明的符号,分别是“金
- 4python timestamp转化为datetime对象_python timestamp转换成date
- 5r、s sm2签名值_1st CHARGEBACKS
- 6[Jvava] List的add底层实现原理_list保留数字add
- 7jq+css实现 进度条动画——从0到指定位置——基础积累_css进度条动画
- 8CrossOver2023虚拟机软件安装双系统教程_crosshai…2023
- 9零基础直观理解深度学习(零)_深度学习模型处理0到1的数字更加得心应手
- 10python中sample函数用法_在Pytorch中使用样本权重(sample_weight)的正确方法
JDK1.8 新特性(全)_jdk 1.8特性
赞
踩
JDK1.8 新特性
本文主要介绍了JDK1.8版本中的一些新特性,乃作者视频观后笔记,仅供参考。
jdk1.8新特性知识点:
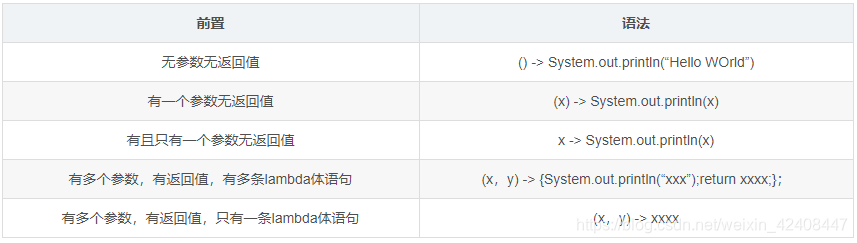
1.Lambda表达式
2.函数式接口
3.方法引用和构造器调用
4.Stream API
5.接口中的默认方法和静态方法
6.新时间日期API
在jdk1.8中对hashMap等map集合的数据结构优化。hashMap数据结构的优化
原来的hashMap采用的数据结构是哈希表(数组+链表),hashMap默认大小是16,一个0-15索引的数组,如何往里面存储元素,首先调用元素的hashcode
方法,计算出哈希码值,经过哈希算法算成数组的索引值,如果对应的索引处没有元素,直接存放,如果有对象在,那么比较它们的equals方法比较内容
如果内容一样,后一个value会将前一个value的值覆盖,如果不一样,在1.7的时候,后加的放在前面,形成一个链表,形成了碰撞,在某些情况下如果链表
无限下去,那么效率极低,碰撞是避免不了的
加载因子:0.75,数组扩容,达到总容量的75%,就进行扩容,但是无法避免碰撞的情况发生
在1.8之后,在数组+链表+红黑树来实现hashmap,当碰撞的元素个数大于8时 & 总容量大于64,会有红黑树的引入
除了添加之后,效率都比链表高,1.8之后链表新进元素加到末尾
ConcurrentHashMap (锁分段机制),concurrentLevel,jdk1.8采用CAS算法(无锁算法,不再使用锁分段),数组+链表中也引入了红黑树的使用
1.Lambda表达式
lambda表达式本质上是一段匿名内部类,也可以是一段可以传递的代码
先来体验一下lambda最直观的优点:简洁代码
//匿名内部类
  Comparator<Integer> cpt = new Comparator<Integer>() {
      @Override
      public int compare(Integer o1, Integer o2) {
          return Integer.compare(o1,o2);
      }
  };

  TreeSet<Integer> set = new TreeSet<>(cpt);

  System.out.println("=========================");

  //使用lambda表达式
  Comparator<Integer> cpt2 = (x,y) -> Integer.compare(x,y);
  TreeSet<Integer> set2 = new TreeSet<>(cpt2);
- 1
- 2
- 3
- 4
- 5
- 6
- 7
- 8
- 9
- 10
- 11
- 12
- 13
- 14
- 15
只需要一行代码,极大减少代码量!!
这样一个场景,在商城浏览商品信息时,经常会有条件的进行筛选浏览,例如要选颜色为红色的、价格小于8000千的….
// 筛选颜色为红色
public  List<Product> filterProductByColor(List<Product> list){
    List<Product> prods = new ArrayList<>();
    for (Product product : list){
        if ("红色".equals(product.getColor())){
            prods.add(product);
        }
    }
    return prods;
 }

// 筛选价格小于8千的
public  List<Product> filterProductByPrice(List<Product> list){
    List<Product> prods = new ArrayList<>();
    for (Product product : list){
        if (product.getPrice() < 8000){
            prods.add(product);
        }
    }
    return prods;
 }

- 1
- 2
- 3
- 4
- 5
- 6
- 7
- 8
- 9
- 10
- 11
- 12
- 13
- 14
- 15
- 16
- 17
- 18
- 19
- 20
- 21
我们发现实际上这些过滤方法的核心就只有if语句中的条件判断,其他均为模版代码,每次变更一下需求,都需要新增一个方法,然后复制黏贴,假设这个过滤方法有几百行,那么这样的做法难免笨拙了一点。如何进行优化呢?
优化一:使用设计模式
定义一个MyPredicate接口
public interface MyPredicate <T> {
    boolean test(T t);
}
- 1
- 2
- 3
如果想要筛选颜色为红色的商品,定义一个颜色过滤类
public class ColorPredicate implements MyPredicate <Product> {

     private static final String RED = "红色";

     @Override
     public boolean test(Product product) {
         return RED.equals(product.getColor());
     }
- 1
- 2
- 3
- 4
- 5
- 6
- 7
- 8
定义过滤方法,将过滤接口当做参数传入,这样这个过滤方法就不用修改,在实际调用的时候将具体的实现类传入即可。
public List<Product> filterProductByPredicate(List<Product> list,MyPredicate<Product> mp){
        List<Product> prods = new ArrayList<>();
        for (Product prod : list){
            if (mp.test(prod)){
                prods.add(prod);
            }
        }
        return prods;
    }
- 1
- 2
- 3
- 4
- 5
- 6
- 7
- 8
- 9
例如,如果想要筛选价格小于8000的商品,那么新建一个价格过滤类既可
public class PricePredicate implements MyPredicate<Product> {
    @Override
    public boolean test(Product product) {
        return product.getPrice() < 8000;
    }
}
- 1
- 2
- 3
- 4
- 5
- 6
这样实现的话可能有人会说,每次变更需求都需要新建一个实现类,感觉还是有点繁琐呀,那么再来优化一下。
优化二:使用匿名内部类
定义过滤方法:
public List<Product> filterProductByPredicate(List<Product> list,MyPredicate<Product> mp){
        List<Product> prods = new ArrayList<>();
        for (Product prod : list){
            if (mp.test(prod)){
                prods.add(prod);
            }
        }
        return prods;
    }
- 1
- 2
- 3
- 4
- 5
- 6
- 7
- 8
- 9
调用过滤方法的时候:
// 按价格过滤
public void test2(){
    filterProductByPredicate(proList, new MyPredicate<Product>() {
        @Override
        public boolean test(Product product) {
            return product.getPrice() < 8000;
        }
    });
}

 // 按颜色过滤
 public void test3(){
     filterProductByPredicate(proList, new MyPredicate<Product>() {
         @Override
         public boolean test(Product product) {
             return "红色".equals(product.getColor());
         }
     });
 }
- 1
- 2
- 3
- 4
- 5
- 6
- 7
- 8
- 9
- 10
- 11
- 12
- 13
- 14
- 15
- 16
- 17
- 18
- 19
使用匿名内部类,就不需要每次都新建一个实现类,直接在方法内部实现。看到匿名内部类,不禁想起了Lambda表达式。
优化三:使用lambda表达式
定义过滤方法:
public List<Product> filterProductByPredicate(List<Product> list,MyPredicate<Product> mp){
        List<Product> prods = new ArrayList<>();
        for (Product prod : list){
            if (mp.test(prod)){
                prods.add(prod);
            }
        }
        return prods;
    }
- 1
- 2
- 3
- 4
- 5
- 6
- 7
- 8
- 9
使用lambda表达式进行过滤
@Test
public void test4(){
      List<Product> products = filterProductByPredicate(proList, (p) -> p.getPrice() < 8000);
      for (Product pro : products){
          System.out.println(pro);
      }
  }
- 1
- 2
- 3
- 4
- 5
- 6
- 7
在jdk1.8中还有更加简便的操作 Stream API
优化四:使用Stream API
甚至不用定义过滤方法,直接在集合上进行操作
// 使用jdk1.8中的Stream API进行集合的操作
@Test
public void test(){
    // 根据价格过滤
    proList.stream()
           .fliter((p) -> p.getPrice() <8000)
           .limit(2)
           .forEach(System.out::println);

    // 根据颜色过滤
    proList.stream()
           .fliter((p) -> "红色".equals(p.getColor()))
           .forEach(System.out::println);

    // 遍历输出商品名称
    proList.stream()
           .map(Product::getName)
           .forEach(System.out::println);
}
- 1
- 2
- 3
- 4
- 5
- 6
- 7
- 8
- 9
- 10
- 11
- 12
- 13
- 14
- 15
- 16
- 17
- 18
- 19
Lmabda表达式的语法总结: () -> ();
口诀:左右遇一省括号,左侧推断类型省
注:当一个接口中存在多个抽象方法时,如果使用lambda表达式,并不能智能匹配对应的抽象方法,因此引入了函数式接口的概念
2.函数式接口
函数式接口的提出是为了给Lambda表达式的使用提供更好的支持。
什么是函数式接口?
简单来说就是只定义了一个抽象方法的接口(Object类的public方法除外),就是函数式接口,并且还提供了注解:@FunctionalInterface
常见的四大函数式接口
(1)Consumer 《T》:消费型接口,有参无返回值
    @Test
    public void test(){
        changeStr("hello",(str) -> System.out.println(str));
    }

    /**
     *  Consumer<T> 消费型接口
     * @param str
     * @param con
     */
    public void changeStr(String str, Consumer<String> con){
        con.accept(str);
    }
- 1
- 2
- 3
- 4
- 5
- 6
- 7
- 8
- 9
- 10
- 11
- 12
- 13
(2)Supplier 《T》:供给型接口,无参有返回值
    @Test
    public void test2(){
        String value = getValue(() -> "hello");
        System.out.println(value);
    }

    /**
     *  Supplier<T> 供给型接口
     * @param sup
     * @return
     */
    public String getValue(Supplier<String> sup){
        return sup.get();
    }
- 1
- 2
- 3
- 4
- 5
- 6
- 7
- 8
- 9
- 10
- 11
- 12
- 13
- 14
(3)Function 《T,R》::函数式接口,有参有返回值
    @Test
    public void test3(){
        Long result = changeNum(100L, (x) -> x + 200L);
        System.out.println(result);
    }

    /**
     *  Function<T,R> 函数式接口
     * @param num
     * @param fun
     * @return
     */
    public Long changeNum(Long num, Function<Long, Long> fun){
        return fun.apply(num);
    }
- 1
- 2
- 3
- 4
- 5
- 6
- 7
- 8
- 9
- 10
- 11
- 12
- 13
- 14
- 15
(4)Predicate《T》: 断言型接口,有参有返回值,返回值是boolean类型
public void test4(){
        boolean result = changeBoolean("hello", (str) -> str.length() > 5);
        System.out.println(result);
    }

    /**
     *  Predicate<T> 断言型接口
     * @param str
     * @param pre
     * @return
     */
    public boolean changeBoolean(String str, Predicate<String> pre){
        return pre.test(str);
    }
- 1
- 2
- 3
- 4
- 5
- 6
- 7
- 8
- 9
- 10
- 11
- 12
- 13
- 14
在四大核心函数式接口基础上,还提供了诸如BiFunction、BinaryOperation、toIntFunction等扩展的函数式接口,都是在这四种函数式接口上扩展而来的,不做赘述。
总结:函数式接口的提出是为了让我们更加方便的使用lambda表达式,不需要自己再手动创建一个函数式接口,直接拿来用就好了。
3.方法引用
若lambda体中的内容有方法已经实现了,那么可以使用“方法引用”
也可以理解为方法引用是lambda表达式的另外一种表现形式并且其语法比lambda表达式更加简单
(a) 方法引用
三种表现形式:
- 对象::实例方法名
- 类::静态方法名
- 类::实例方法名 (lambda参数列表中第一个参数是实例方法的调用 者,第二个参数是实例方法的参数时可用)
 public void test() {
        /**
        *注意:
        *   1.lambda体中调用方法的参数列表与返回值类型,要与函数式接口中抽象方法的函数列表和返回值类型保持一致!
        *   2.若lambda参数列表中的第一个参数是实例方法的调用者,而第二个参数是实例方法的参数时,可以使用ClassName::method
        *
        */
        Consumer<Integer> con = (x) -> System.out.println(x);
        con.accept(100);

        // 方法引用-对象::实例方法
        Consumer<Integer> con2 = System.out::println;
        con2.accept(200);

        // 方法引用-类名::静态方法名
        BiFunction<Integer, Integer, Integer> biFun = (x, y) -> Integer.compare(x, y);
        BiFunction<Integer, Integer, Integer> biFun2 = Integer::compare;
        Integer result = biFun2.apply(100, 200);

        // 方法引用-类名::实例方法名
        BiFunction<String, String, Boolean> fun1 = (str1, str2) -> str1.equals(str2);
        BiFunction<String, String, Boolean> fun2 = String::equals;
        Boolean result2 = fun2.apply("hello", "world");
        System.out.println(result2);
    }
- 1
- 2
- 3
- 4
- 5
- 6
- 7
- 8
- 9
- 10
- 11
- 12
- 13
- 14
- 15
- 16
- 17
- 18
- 19
- 20
- 21
- 22
- 23
- 24
- 25
(b)构造器引用
格式:ClassName::new
public void test2() {

        // 构造方法引用  类名::new
        Supplier<Employee> sup = () -> new Employee();
        System.out.println(sup.get());
        Supplier<Employee> sup2 = Employee::new;
        System.out.println(sup2.get());

        // 构造方法引用 类名::new (带一个参数)
        Function<Integer, Employee> fun = (x) -> new Employee(x);
        Function<Integer, Employee> fun2 = Employee::new;
        System.out.println(fun2.apply(100));
 }
- 1
- 2
- 3
- 4
- 5
- 6
- 7
- 8
- 9
- 10
- 11
- 12
- 13
©数组引用
格式:Type[]::new
public void test(){
        // 数组引用
        Function<Integer, String[]> fun = (x) -> new String[x];
        Function<Integer, String[]> fun2 = String[]::new;
        String[] strArray = fun2.apply(10);
        Arrays.stream(strArray).forEach(System.out::println);
}
- 1
- 2
- 3
- 4
- 5
- 6
- 7
4.Stream API
Stream操作的三个步骤
(1)创建stream
(2)中间操作(过滤、map)
(3)终止操作
stream的创建:
    // 1,校验通过Collection 系列集合提供的stream()或者paralleStream()
    List<String> list = new ArrayList<>();
    Strean<String> stream1 = list.stream();

    // 2.通过Arrays的静态方法stream()获取数组流
    String[] str = new String[10];
    Stream<String> stream2 = Arrays.stream(str);

    // 3.通过Stream类中的静态方法of
    Stream<String> stream3 = Stream.of("aa","bb","cc");

    // 4.创建无限流
    // 迭代
    Stream<Integer> stream4 = Stream.iterate(0,(x) -> x+2);

    //生成
    Stream.generate(() ->Math.random());
- 1
- 2
- 3
- 4
- 5
- 6
- 7
- 8
- 9
- 10
- 11
- 12
- 13
- 14
- 15
- 16
- 17
Stream的中间操作:
/**
   * 筛选 过滤  去重
   */
  emps.stream()
          .filter(e -> e.getAge() > 10)
          .limit(4)
          .skip(4)
          // 需要流中的元素重写hashCode和equals方法
          .distinct()
          .forEach(System.out::println);


  /**
   *  生成新的流 通过map映射
   */
  emps.stream()
          .map((e) -> e.getAge())
          .forEach(System.out::println);


  /**
   *  自然排序  定制排序
   */
  emps.stream()
          .sorted((e1 ,e2) -> {
              if (e1.getAge().equals(e2.getAge())){
                  return e1.getName().compareTo(e2.getName());
              } else{
                  return e1.getAge().compareTo(e2.getAge());
              }
          })
          .forEach(System.out::println);
- 1
- 2
- 3
- 4
- 5
- 6
- 7
- 8
- 9
- 10
- 11
- 12
- 13
- 14
- 15
- 16
- 17
- 18
- 19
- 20
- 21
- 22
- 23
- 24
- 25
- 26
- 27
- 28
- 29
- 30
- 31
- 32
- 33
Stream的终止操作:
 /**
         *      查找和匹配
         *          allMatch-检查是否匹配所有元素
         *          anyMatch-检查是否至少匹配一个元素
         *          noneMatch-检查是否没有匹配所有元素
         *          findFirst-返回第一个元素
         *          findAny-返回当前流中的任意元素
         *          count-返回流中元素的总个数
         *          max-返回流中最大值
         *          min-返回流中最小值
         */

        /**
         *  检查是否匹配元素
         */
        boolean b1 = emps.stream()
                .allMatch((e) -> e.getStatus().equals(Employee.Status.BUSY));
        System.out.println(b1);

        boolean b2 = emps.stream()
                .anyMatch((e) -> e.getStatus().equals(Employee.Status.BUSY));
        System.out.println(b2);

        boolean b3 = emps.stream()
                .noneMatch((e) -> e.getStatus().equals(Employee.Status.BUSY));
        System.out.println(b3);

        Optional<Employee> opt = emps.stream()
                .findFirst();
        System.out.println(opt.get());

        // 并行流
        Optional<Employee> opt2 = emps.parallelStream()
                .findAny();
        System.out.println(opt2.get());

        long count = emps.stream()
                .count();
        System.out.println(count);

        Optional<Employee> max = emps.stream()
                .max((e1, e2) -> Double.compare(e1.getSalary(), e2.getSalary()));
        System.out.println(max.get());

        Optional<Employee> min = emps.stream()
                .min((e1, e2) -> Double.compare(e1.getSalary(), e2.getSalary()));
        System.out.println(min.get());
- 1
- 2
- 3
- 4
- 5
- 6
- 7
- 8
- 9
- 10
- 11
- 12
- 13
- 14
- 15
- 16
- 17
- 18
- 19
- 20
- 21
- 22
- 23
- 24
- 25
- 26
- 27
- 28
- 29
- 30
- 31
- 32
- 33
- 34
- 35
- 36
- 37
- 38
- 39
- 40
- 41
- 42
- 43
- 44
- 45
- 46
- 47
还有功能比较强大的两个终止操作 reduce和collect
reduce操作: reduce:(T identity,BinaryOperator)/reduce(BinaryOperator)-可以将流中元素反复结合起来,得到一个值
         /**
         *  reduce :规约操作
         */
        List<Integer> list = Arrays.asList(1,2,3,4,5,6,7,8,9,10);
        Integer count2 = list.stream()
                .reduce(0, (x, y) -> x + y);
        System.out.println(count2);

        Optional<Double> sum = emps.stream()
                .map(Employee::getSalary)
                .reduce(Double::sum);
        System.out.println(sum);
- 1
- 2
- 3
- 4
- 5
- 6
- 7
- 8
- 9
- 10
- 11
- 12
- 13
collect操作:Collect-将流转换为其他形式,接收一个Collection接口的实现,用于给Stream中元素做汇总的方法
        /**
         *  collect:收集操作
         */

        List<Integer> ageList = emps.stream()
                .map(Employee::getAge)
                .collect(Collectors.toList());
        ageList.stream().forEach(System.out::println);
- 1
- 2
- 3
- 4
- 5
- 6
- 7
- 8
5.并行流和串行流
在jdk1.8新的stream包中针对集合的操作也提供了并行操作流和串行操作流。并行流就是把内容切割成多个数据块,并且使用多个线程分别处理每个数据块的内容。Stream api中声明可以通过parallel()与sequential()方法在并行流和串行流之间进行切换。
jdk1.8并行流使用的是fork/join框架进行并行操作
6.ForkJoin框架
Fork/Join 框架:就是在必要的情况下,将一个大任务,进行拆分(fork)成若干个小任务(拆到不可再拆时),再将一个个的小任务运算的结果进行 join 汇总。
关键字:递归分合、分而治之。
采用 “工作窃取”模式(work-stealing):
当执行新的任务时它可以将其拆分分成更小的任务执行,并将小任务加到线
程队列中,然后再从一个随机线程的队列中偷一个并把它放在自己的队列中
相对于一般的线程池实现,fork/join框架的优势体现在对其中包含的任务的
处理方式上.在一般的线程池中,如果一个线程正在执行的任务由于某些原因
无法继续运行,那么该线程会处于等待状态.而在fork/join框架实现中,如果
某个子问题由于等待另外一个子问题的完成而无法继续运行.那么处理该子
问题的线程会主动寻找其他尚未运行的子问题来执行.这种方式减少了线程
的等待时间,提高了性能。
/**
 * 要想使用Fark—Join,类必须继承
 * RecursiveAction(无返回值)
 * Or
 * RecursiveTask(有返回值)
*
*/
public class ForkJoin extends RecursiveTask<Long> {

    /**
     * 要想使用Fark—Join,类必须继承RecursiveAction(无返回值) 或者
     * RecursiveTask(有返回值)
     *
     * @author Wuyouxin
     */
    private static final long serialVersionUID = 23423422L;

    private long start;
    private long end;

    public ForkJoin() {
    }

    public ForkJoin(long start, long end) {
        this.start = start;
        this.end = end;
    }

    // 定义阙值
    private static final long THRESHOLD = 10000L;

    @Override
    protected Long compute() {
        if (end - start <= THRESHOLD) {
            long sum = 0;
            for (long i = start; i < end; i++) {
                sum += i;
            }
            return sum;
        } else {
            long middle = (end - start) / 2;
            ForkJoin left = new ForkJoin(start, middle);
            //拆分子任务,压入线程队列
            left.fork();
            ForkJoin right = new ForkJoin(middle + 1, end);
            right.fork();

            //合并并返回
            return left.join() + right.join();
        }
    }

    /**
     * 实现数的累加
     */
    @Test
    public void test1() {
        //开始时间
        Instant start = Instant.now();

        //这里需要一个线程池的支持
        ForkJoinPool pool = new ForkJoinPool();

        ForkJoinTask<Long> task = new ForkJoin(0L, 10000000000L);
        // 没有返回值     pool.execute();
        // 有返回值
        long sum = pool.invoke(task);

        //结束时间
        Instant end = Instant.now();
        System.out.println(Duration.between(start, end).getSeconds());
    }

    /**
     * java8 并行流 parallel()
     */
    @Test
    public void test2() {
        //开始时间
        Instant start = Instant.now();

        // 并行流计算    累加求和
        LongStream.rangeClosed(0, 10000000000L).parallel()
                .reduce(0, Long :: sum);

        //结束时间
        Instant end = Instant.now();
        System.out.println(Duration.between(start, end).getSeconds());
    }

    @Test
    public void test3(){
        List<Integer> list = Arrays.asList(1, 2, 3, 4, 5);
        list.stream().forEach(System.out::print);

        list.parallelStream()
            .forEach(System.out::print);
    }
- 1
- 2
- 3
- 4
- 5
- 6
- 7
- 8
- 9
- 10
- 11
- 12
- 13
- 14
- 15
- 16
- 17
- 18
- 19
- 20
- 21
- 22
- 23
- 24
- 25
- 26
- 27
- 28
- 29
- 30
- 31
- 32
- 33
- 34
- 35
- 36
- 37
- 38
- 39
- 40
- 41
- 42
- 43
- 44
- 45
- 46
- 47
- 48
- 49
- 50
- 51
- 52
- 53
- 54
- 55
- 56
- 57
- 58
- 59
- 60
- 61
- 62
- 63
- 64
- 65
- 66
- 67
- 68
- 69
- 70
- 71
- 72
- 73
- 74
- 75
- 76
- 77
- 78
- 79
- 80
- 81
- 82
- 83
- 84
- 85
- 86
- 87
- 88
- 89
- 90
- 91
- 92
- 93
- 94
- 95
- 96
- 97
- 98
展示多线程的效果:
@Test
    public void test(){
        // 并行流 多个线程执行
        List<Integer> numbers = Arrays.asList(1, 2, 3, 4, 5, 6, 7, 8, 9);
        numbers.parallelStream()
                .forEach(System.out::print);

        //
        System.out.println("=========================");
        numbers.stream()
                     .sequential()
                     .forEach(System.out::print);
    }
- 1
- 2
- 3
- 4
- 5
- 6
- 7
- 8
- 9
- 10
- 11
- 12
- 13
Optional容器
使用Optional容器可以快速的定位NPE,并且在一定程度上可以减少对参数非空检验的代码量。
/**
     *      Optional.of(T t); // 创建一个Optional实例
     *      Optional.empty(); // 创建一个空的Optional实例
     *      Optional.ofNullable(T t); // 若T不为null,创建一个Optional实例,否则创建一个空实例
     *      isPresent();    // 判断是够包含值
     *      orElse(T t);   //如果调用对象包含值,返回该值,否则返回T
     *      orElseGet(Supplier s);  // 如果调用对象包含值,返回该值,否则返回s中获取的值
     *      map(Function f): // 如果有值对其处理,并返回处理后的Optional,否则返回Optional.empty();
     *      flatMap(Function mapper);// 与map类似。返回值是Optional
     *
     *      总结:Optional.of(null)  会直接报NPE
     */

Optional<Employee> op = Optional.of(new Employee("zhansan", 11, 12.32, Employee.Status.BUSY));
        System.out.println(op.get());

        // NPE
        Optional<Employee> op2 = Optional.of(null);
        System.out.println(op2);
@Test
    public void test2(){
        Optional<Object> op = Optional.empty();
        System.out.println(op);

        // No value present
        System.out.println(op.get());
    }
@Test
    public void test3(){
        Optional<Employee> op = Optional.ofNullable(new Employee("lisi", 33, 131.42, Employee.Status.FREE));
        System.out.println(op.get());

        Optional<Object> op2 = Optional.ofNullable(null);
        System.out.println(op2);
       // System.out.println(op2.get());
    }
    @Test
    public void test5(){
        Optional<Employee> op1 = Optional.ofNullable(new Employee("张三", 11, 11.33, Employee.Status.VOCATION));
        System.out.println(op1.orElse(new Employee()));
        System.out.println(op1.orElse(null));
    }

    @Test
    public void test6(){
        Optional<Employee> op1 = Optional.of(new Employee("田七", 11, 12.31, Employee.Status.BUSY));
        op1 = Optional.empty();
        Employee employee = op1.orElseGet(() -> new Employee());
        System.out.println(employee);
    }

    @Test
    public void test7(){
        Optional<Employee> op1 = Optional.of(new Employee("田七", 11, 12.31, Employee.Status.BUSY));
        System.out.println(op1.map( (e) -> e.getSalary()).get());
    }
- 1
- 2
- 3
- 4
- 5
- 6
- 7
- 8
- 9
- 10
- 11
- 12
- 13
- 14
- 15
- 16
- 17
- 18
- 19
- 20
- 21
- 22
- 23
- 24
- 25
- 26
- 27
- 28
- 29
- 30
- 31
- 32
- 33
- 34
- 35
- 36
- 37
- 38
- 39
- 40
- 41
- 42
- 43
- 44
- 45
- 46
- 47
- 48
- 49
- 50
- 51
- 52
- 53
- 54
- 55
- 56
接口中可以定义默认实现方法和静态方法
在接口中可以使用default和static关键字来修饰接口中定义的普通方法
public interface Interface {
    default  String getName(){
        return "zhangsan";
    }

    static String getName2(){
        return "zhangsan";
    }
}
- 1
- 2
- 3
- 4
- 5
- 6
- 7
- 8
- 9
在JDK1.8中很多接口会新增方法,为了保证1.8向下兼容,1.7版本中的接口实现类不用每个都重新实现新添加的接口方法,引入了default默认实现,static的用法是直接用接口名去调方法即可。当一个类继承父类又实现接口时,若后两者方法名相同,则优先继承父类中的同名方法,即“类优先”,如果实现两个同名方法的接口,则要求实现类必须手动声明默认实现哪个接口中的方法。
7.新的日期API LocalDate | LocalTime | LocalDateTime
新的日期API都是不可变的,更使用于多线程的使用环境中
    @Test
    public void test(){
        // 从默认时区的系统时钟获取当前的日期时间。不用考虑时区差
        LocalDateTime date = LocalDateTime.now();
        //2018-07-15T14:22:39.759
        System.out.println(date);

        System.out.println(date.getYear());
        System.out.println(date.getMonthValue());
        System.out.println(date.getDayOfMonth());
        System.out.println(date.getHour());
        System.out.println(date.getMinute());
        System.out.println(date.getSecond());
        System.out.println(date.getNano());

        // 手动创建一个LocalDateTime实例
        LocalDateTime date2 = LocalDateTime.of(2017, 12, 17, 9, 31, 31, 31);
        System.out.println(date2);
        // 进行加操作,得到新的日期实例
        LocalDateTime date3 = date2.plusDays(12);
        System.out.println(date3);
        // 进行减操作,得到新的日期实例
        LocalDateTime date4 = date3.minusYears(2);
        System.out.println(date4);
    }
- 1
- 2
- 3
- 4
- 5
- 6
- 7
- 8
- 9
- 10
- 11
- 12
- 13
- 14
- 15
- 16
- 17
- 18
- 19
- 20
- 21
- 22
- 23
- 24
- 25
    @Test
    public void test2(){
        // 时间戳  1970年1月1日00:00:00 到某一个时间点的毫秒值
        // 默认获取UTC时区
        Instant ins = Instant.now();
        System.out.println(ins);

        System.out.println(LocalDateTime.now().toInstant(ZoneOffset.of("+8")).toEpochMilli());
        System.out.println(System.currentTimeMillis());

        System.out.println(Instant.now().toEpochMilli());
        System.out.println(Instant.now().atOffset(ZoneOffset.ofHours(8)).toInstant().toEpochMilli());
    }
- 1
- 2
- 3
- 4
- 5
- 6
- 7
- 8
- 9
- 10
- 11
- 12
- 13
    @Test
    public void test3(){
        // Duration:计算两个时间之间的间隔
        // Period:计算两个日期之间的间隔

        Instant ins1 = Instant.now();

        try {
            Thread.sleep(1000);
        } catch (InterruptedException e) {
            e.printStackTrace();
        }
        Instant ins2 = Instant.now();
        Duration dura = Duration.between(ins1, ins2);
        System.out.println(dura);
        System.out.println(dura.toMillis());

        System.out.println("======================");
        LocalTime localTime = LocalTime.now();
        try {
            Thread.sleep(1000);
        } catch (InterruptedException e) {
            e.printStackTrace();
        }
        LocalTime localTime2 = LocalTime.now();
        Duration du2 = Duration.between(localTime, localTime2);
        System.out.println(du2);
        System.out.println(du2.toMillis());
    }
- 1
- 2
- 3
- 4
- 5
- 6
- 7
- 8
- 9
- 10
- 11
- 12
- 13
- 14
- 15
- 16
- 17
- 18
- 19
- 20
- 21
- 22
- 23
- 24
- 25
- 26
- 27
- 28
- 29
@Test
    public void test4(){
        LocalDate localDate =LocalDate.now();

        try {
            Thread.sleep(1000);
        } catch (InterruptedException e) {
            e.printStackTrace();
        }

        LocalDate localDate2 = LocalDate.of(2016,12,12);
        Period pe = Period.between(localDate, localDate2);
        System.out.println(pe);
    }
- 1
- 2
- 3
- 4
- 5
- 6
- 7
- 8
- 9
- 10
- 11
- 12
- 13
- 14
    @Test
    public void test5(){
        // temperalAdjust 时间校验器
        // 例如获取下周日  下一个工作日
        LocalDateTime ldt1 = LocalDateTime.now();
        System.out.println(ldt1);

        // 获取一年中的第一天
        LocalDateTime ldt2 = ldt1.withDayOfYear(1);
        System.out.println(ldt2);
        // 获取一个月中的第一天
        LocalDateTime ldt3 = ldt1.withDayOfMonth(1);
        System.out.println(ldt3);

        LocalDateTime ldt4 = ldt1.with(TemporalAdjusters.next(DayOfWeek.FRIDAY));
        System.out.println(ldt4);

        // 获取下一个工作日
        LocalDateTime ldt5 = ldt1.with((t) -> {
            LocalDateTime ldt6 = (LocalDateTime)t;
            DayOfWeek dayOfWeek = ldt6.getDayOfWeek();
            if (DayOfWeek.FRIDAY.equals(dayOfWeek)){
                return ldt6.plusDays(3);
            }
            else if (DayOfWeek.SATURDAY.equals(dayOfWeek)){
                return ldt6.plusDays(2);
            }
            else {
                return ldt6.plusDays(1);
            }
        });
        System.out.println(ldt5);
    }
- 1
- 2
- 3
- 4
- 5
- 6
- 7
- 8
- 9
- 10
- 11
- 12
- 13
- 14
- 15
- 16
- 17
- 18
- 19
- 20
- 21
- 22
- 23
- 24
- 25
- 26
- 27
- 28
- 29
- 30
- 31
- 32
- 33
    @Test
    public void test6(){
        // DateTimeFormatter: 格式化时间/日期
        // 自定义格式
        LocalDateTime ldt = LocalDateTime.now();
        DateTimeFormatter formatter = DateTimeFormatter.ofPattern("yyyy年MM月dd日");
        String strDate1 = ldt.format(formatter);
        String strDate = formatter.format(ldt);
        System.out.println(strDate);
        System.out.println(strDate1);

        // 使用api提供的格式
        DateTimeFormatter dtf = DateTimeFormatter.ISO_DATE;
        LocalDateTime ldt2 = LocalDateTime.now();
        String strDate3 = dtf.format(ldt2);
        System.out.println(strDate3);

        // 解析字符串to时间
        DateTimeFormatter df = DateTimeFormatter.ofPattern("yyyy-MM-dd HH:mm:ss");
        LocalDateTime time = LocalDateTime.now();
        String localTime = df.format(time);
        LocalDateTime ldt4 = LocalDateTime.parse("2017-09-28 17:07:05",df);
        System.out.println("LocalDateTime转成String类型的时间:"+localTime);
        System.out.println("String类型的时间转成LocalDateTime:"+ldt4);
    }
- 1
- 2
- 3
- 4
- 5
- 6
- 7
- 8
- 9
- 10
- 11
- 12
- 13
- 14
- 15
- 16
- 17
- 18
- 19
- 20
- 21
- 22
- 23
- 24
- 25
    // ZoneTime  ZoneDate       ZoneDateTime
    @Test
    public void test7(){
        LocalDateTime now = LocalDateTime.now(ZoneId.of("Asia/Shanghai"));
        System.out.println(now);

        LocalDateTime now2 = LocalDateTime.now();
        ZonedDateTime zdt = now2.atZone(ZoneId.of("Asia/Shanghai"));
        System.out.println(zdt);

        Set<String> set = ZoneId.getAvailableZoneIds();
        set.stream().forEach(System.out::println);
    }
- 1
- 2
- 3
- 4
- 5
- 6
- 7
- 8
- 9
- 10
- 11
- 12
- 13
补充:
表示日期的LocalDate
表示时间的LocalTime
表示日期时间的LocalDateTime
- 1
- 2
- 3
新的日期API的几个优点:
 * 之前使用的java.util.Date月份从0开始,我们一般会+1使用,很不方便,java.time.LocalDate月份和星期都改成了enum
 * java.util.Date和SimpleDateFormat都不是线程安全的,而LocalDate和LocalTime和最基本的String一样,是不变类型,不但线程安全,而且不能修改。
 * java.util.Date是一个“万能接口”,它包含日期、时间,还有毫秒数,更加明确需求取舍
 * 新接口更好用的原因是考虑到了日期时间的操作,经常发生往前推或往后推几天的情况。用java.util.Date配合Calendar要写好多代码,而且一般的开发人员还不一定能写对。
- 1
- 2
- 3
- 4
- 5
LocalDate
public static void localDateTest() {

        //获取当前日期,只含年月日 固定格式 yyyy-MM-dd    2018-05-04
        LocalDate today = LocalDate.now();

        // 根据年月日取日期,5月就是5,
        LocalDate oldDate = LocalDate.of(2018, 5, 1);

        // 根据字符串取:默认格式yyyy-MM-dd,02不能写成2
        LocalDate yesteday = LocalDate.parse("2018-05-03");

        // 如果不是闰年 传入29号也会报错
        LocalDate.parse("2018-02-29");
    }
- 1
- 2
- 3
- 4
- 5
- 6
- 7
- 8
- 9
- 10
- 11
- 12
- 13
- 14
LocalDate常用转化
    /**
     * 日期转换常用,第一天或者最后一天...
     */
    public static void localDateTransferTest(){
        //2018-05-04
        LocalDate today = LocalDate.now();
        // 取本月第1天: 2018-05-01
        LocalDate firstDayOfThisMonth = today.with(TemporalAdjusters.firstDayOfMonth());
        // 取本月第2天:2018-05-02
        LocalDate secondDayOfThisMonth = today.withDayOfMonth(2);
        // 取本月最后一天,再也不用计算是28,29,30还是31: 2018-05-31
        LocalDate lastDayOfThisMonth = today.with(TemporalAdjusters.lastDayOfMonth());
        // 取下一天:2018-06-01
        LocalDate firstDayOf2015 = lastDayOfThisMonth.plusDays(1);
        // 取2018年10月第一个周三 so easy?:  2018-10-03
        LocalDate thirdMondayOf2018 = LocalDate.parse("2018-10-01").with(TemporalAdjusters.firstInMonth(DayOfWeek.WEDNESDAY));
    }
- 1
- 2
- 3
- 4
- 5
- 6
- 7
- 8
- 9
- 10
- 11
- 12
- 13
- 14
- 15
- 16
- 17
LocalTime
 public static void localTimeTest(){
        //16:25:46.448(纳秒值)
        LocalTime todayTimeWithMillisTime = LocalTime.now();
        //16:28:48 不带纳秒值
        LocalTime todayTimeWithNoMillisTime = LocalTime.now().withNano(0);
        LocalTime time1 = LocalTime.parse("23:59:59");
    }
- 1
- 2
- 3
- 4
- 5
- 6
- 7
LocalDateTime
public static void localDateTimeTest(){
        //转化为时间戳  毫秒值
        long time1 = LocalDateTime.now().toInstant(ZoneOffset.of("+8")).toEpochMilli();
        long time2 = System.currentTimeMillis();

        //时间戳转化为localdatetime
        DateTimeFormatter df= DateTimeFormatter.ofPattern("YYYY-MM-dd HH:mm:ss.SSS");

        System.out.println(df.format(LocalDateTime.ofInstant(Instant.ofEpochMilli(time1),ZoneId.of("Asia/Shanghai"))));
    }
- 1
- 2
- 3
- 4
- 5
- 6
- 7
- 8
- 9
- 10

