
热门标签
热门文章
- 1CMake Error: Could not find CMAKE_ROOT 解决办法_cmake error: could not find cmake_root !!!
- 2软件设计师——题目以及解析记录(单选)_候选码判断例题
- 3pytorch计算余弦相似度_pytorch cosine similarity
- 4云原生 | Docker - [Dockerfile]_syntax=docker/dockerfile:1
- 5数学建模 | 关于随机森林你必须知道的20个知识点_随机森林一般选多少棵树
- 6Linux系统盘出现问题处理思路_linux磁盘修复
- 7微信小程序的springboot高校新生报道管理系统
- 8一篇就够:uniapp-Mqtt系列问题详细攻略(解决掉线、真机调试错误等问题)_uniapp mqtt
- 9golang使用energy开发GUI桌面程序,CEF,LCL_golang energy
- 10【STM32外设系列】JW01三合一空气质量检测模块_jw01co2传感器需要几个外部引脚
当前位置: article > 正文
flask+Python+Vue实现前后端分离的web项目并部署至云服务器_python flask加载vue项目
作者:算法研究专家 | 2024-01-31 08:28:35
赞
踩
python flask加载vue项目
1 后台+算法模型
1.1 训练机器学习模型
准备数据,选择合适的机器学习模型,本文以一个基于XGBoost模型进行数据分类的项目来分析。
- 1
import numpy as np
import pandas as pd
from xgboost import XGBClassifier
from sklearn.model_selection import train_test_split
from sklearn.metrics import accuracy_score
from sklearn.preprocessing import LabelEncoder
import pickle


# 读取并划分数据集
def read_data(path):
    dataset = pd.read_csv(path, index_col=0)
    # 划分出数据和标签
    data = dataset.iloc[:, :-1]
    label = dataset.iloc[:, -1]
    # 分层抽样,用随机数种子保证每次抽样一致
    train_x, test_x, train_y, test_y = train_test_split(data, label, test_size=0.3, random_state=6, stratify=label)
    return train_x, train_y, test_x, test_y


def train(train_x, train_y):
    # 建模
    model = XGBClassifier()
    model.fit(train_x, train_y)
    # 保存模型
    pickle.dump(model, open('XGBoost_model.pkl', 'wb'))
    return model


def test(test_x, test_y, model):
    num = 0
    for i, j in zip(test_x, test_y):
        y_pred = model.predict(i)
        # print(f'实际值:{j},预测值:{y_pred[0]}')
        if j == y_pred[0]:
            num += 1
    print(f'测试集准确率为{num/len(test_y)}')


if __name__ == '__main__':
    train_x, train_y, test_x, test_y = read_data('dataset.csv')
    model = train(train_x, train_y)
    test(test_x, test_y, model)

- 1
- 2
- 3
- 4
- 5
- 6
- 7
- 8
- 9
- 10
- 11
- 12
- 13
- 14
- 15
- 16
- 17
- 18
- 19
- 20
- 21
- 22
- 23
- 24
- 25
- 26
- 27
- 28
- 29
- 30
- 31
- 32
- 33
- 34
- 35
- 36
- 37
- 38
- 39
- 40
- 41
- 42
- 43
1.2 基于Flask框架搭建后台接口
在Python项目的根目录下新建app.py文件,并用安装flask依赖 pip install flask,可指定运行端口并运行app.py文件,(可借助接口测试工具进行接口测试)
- 1
注意:前后端跨域问题,可引入CORS解决,具体如代码:
from flask import Flask, render_template, url_for, request
import pickle
import flask
from flask_cors import CORS
from flask import jsonify
from flask_cors import cross_origin

# instantiate the app
app = Flask(__name__)
# 解决跨域问题,vue请求数据时用,重要!!!
cors = CORS(app)

# 导入算法模型
model = pickle.load(open('XGBoost_model.pkl', 'rb'))

# 接口路径
# @app.route('/')
def getData():
    # 接收前端传来的json数据
    data = request.get_json(silent=True)
    # print(data['age'])
    test_data = data['age']  # 此处按自己的数据标签进行更改
    y_pred = model.predict(test_data)
    # 处理完毕,向前端返回数据
    response = flask.jsonify({'label': str(label)})
    # 若跨域存在问题,可加上这个请求头
    response.headers.add('Access-Control-Allow-Origin', '*')
    return response

if __name__ == '__main__':
	# port为指定端口,也可不指定
    app.run(host='0.0.0.0', port=5000, debug=True)
- 1
- 2
- 3
- 4
- 5
- 6
- 7
- 8
- 9
- 10
- 11
- 12
- 13
- 14
- 15
- 16
- 17
- 18
- 19
- 20
- 21
- 22
- 23
- 24
- 25
- 26
- 27
- 28
- 29
- 30
- 31
- 32
2 前端搭建
本项目采用Vue+ElementUI,页面问题不进行赘述。此处注意前后端跨域问题即可。可引入axios进行解决。在项目中添加vue.config.js文件,并在main.js文件中添加内容
- 1
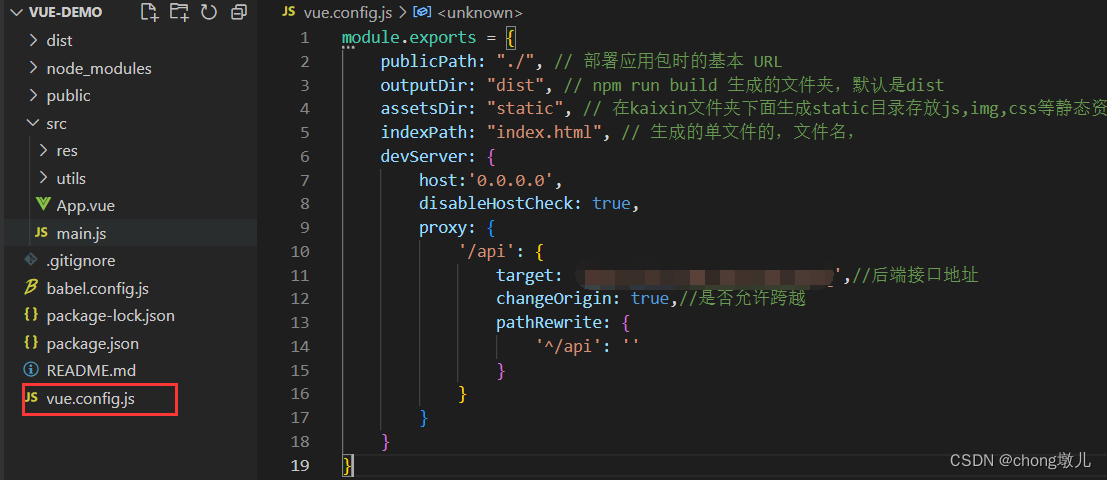
module.exports = {
    publicPath: "./", // 部署应⽤包时的基本 URL
    outputDir: "dist", // npm run build ⽣成的⽂件夹,默认是dist
    assetsDir: "static", // 在kaixin⽂件夹下⾯⽣成static⽬录存放js,img,css等静态资源
    indexPath: "index.html", // ⽣成的单⽂件的,⽂件名,
    devServer: {
        host:'0.0.0.0',
        disableHostCheck: true,
        proxy: {
            '/api': {
                target: '0.0.0.0:5000',//后端接口地址,按自己的改
                changeOrigin: true,//是否允许跨越
                pathRewrite: {
                    '^/api': ''
                }
            }
        }
    }
}
- 1
- 2
- 3
- 4
- 5
- 6
- 7
- 8
- 9
- 10
- 11
- 12
- 13
- 14
- 15
- 16
- 17
- 18
- 19
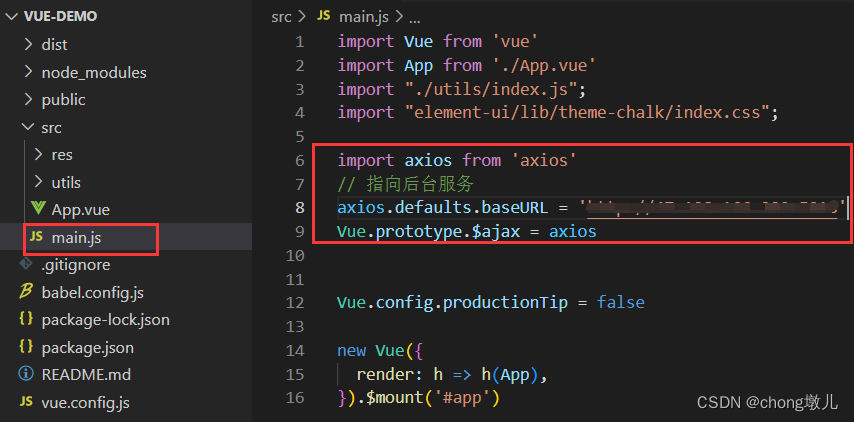
import axios from 'axios'
// 指向后台服务
axios.defaults.baseURL = '0.0.0:5000'
Vue.prototype.$ajax = axios
- 1
- 2
- 3
- 4
3 云服务器部署
本项目是将前端和后台代码部署至同一个服务器。服务器系统为centos7。使用宝塔面板进行服务器管理(有点好用)。
- 1
详细设置教程可参考linux CentOS 宝塔面板安装设置教程
安装Nginx和python项目管理器,后续可在面板上操作,完成项目打包上传并部署。
声明:本文内容由网友自发贡献,不代表【wpsshop博客】立场,版权归原作者所有,本站不承担相应法律责任。如您发现有侵权的内容,请联系我们。转载请注明出处:https://www.wpsshop.cn/article/detail/50009
推荐阅读

相关标签

