
- 1学习笔记:深度学习(3)——卷积神经网络(CNN)理论篇_打卤面 cnn(卷积神经网络) csdn
- 2S7-200SMART_MODBUS RTU通信轮询中实现插队写入或条件写入的具体方法示例(2)_modbus自动轮询插入写指令
- 3查看libunity.so崩溃信息
- 4git 常用命令 Push_git push命令
- 5AIGC实战——深度学习 (Deep Learning, DL)
- 6Dubbo的一致性hash负载均衡_dubbo一致性hash负载均衡
- 7Windows server——部署DNS服务(2)_windows server dns
- 8【鸿蒙(HarmonyOS)】UI开发的两种范式:ArkTS、JS(以登录界面开发为例进行对比)_鸿蒙js开发
- 9【动态规划】C++ 算法458:可怜的小猪
- 105分钟搭建开源运维监控工具Uptime Kuma并实现无公网IP远程访问
人工智能,丹青圣手,全平台(原生/Docker)构建Stable-Diffusion-Webui的AI绘画库教程(Python3.10/Pytorch1.13.0)_stable diffusion webui docker
赞
踩
世间无限丹青手,遇上AI画不成。最近一段时间,可能所有人类画师都得发出一句“既生瑜,何生亮”的感叹,因为AI 绘画通用算法Stable Diffusion已然超神,无需美术基础,也不用经年累月的刻苦练习,只需要一台电脑,人人都可以是丹青圣手。
本次我们全平台构建基于Stable-Diffusion算法的Webui可视化图形界面服务,基于本地模型来进行AI绘画操作。
本地安装Stable-Diffusion-Webui
如果系统之前安装过Python3.10或者使用过Pytorch深度学习框架,那么推荐直接本地安装Stable-Diffusion-Webui,因为Stable-Diffusion的核心依赖库也是Pytorch。
首先拉取官方的项目:
git clone https://github.com/AUTOMATIC1111/stable-diffusion-webui.git
- 1
随后进入项目的目录:
cd stable-diffusion-webui
- 1
官方文档建议直接在目录中运行shell脚本:
./webui.sh
- 1
但事实上,shell脚本很容易在过程中报错,该项目的核心代码其实是launch.py,所以理论上,我们只需要正常运行launch.py文件即可。
首先确保本机的Python版本号大于等于3.10.9
关于Python3.10的安装,请移玉步至:一网成擒全端涵盖,在不同架构(Intel x86/Apple m1 silicon)不同开发平台(Win10/Win11/Mac/Ubuntu)上安装配置Python3.10开发环境 ,这里不再赘述。
另外确保Pytorch的版本号大于等于13.1.0,关于Pytorch,请移步:闻其声而知雅意,M1 Mac基于PyTorch(mps/cpu/cuda)的人工智能AI本地语音识别库Whisper(Python3.10)
随后安装相关的依赖库:
pip3 install -r requirements.txt
pip3 install -r requirements_versions.txt
- 1
- 2
依赖文件中,有一个库可能会出问题,就是GFPGAN,它是腾讯开源的人脸识别模块,这里推荐使用GFPGAN官方网站(https://github.com/TencentARC/GFPGAN)的安装方式:
# Install basicsr - https://github.com/xinntao/BasicSR
# We use BasicSR for both training and inference
pip install basicsr

# Install facexlib - https://github.com/xinntao/facexlib
# We use face detection and face restoration helper in the facexlib package
pip install facexlib

pip install -r requirements.txt
python setup.py develop

# If you want to enhance the background (non-face) regions with Real-ESRGAN,
# you also need to install the realesrgan package
pip install realesrgan
- 1
- 2
- 3
- 4
- 5
- 6
- 7
- 8
- 9
- 10
- 11
- 12
- 13
- 14
安装成功后,最好验证一下:
➜  ~ python3
Python 3.10.9 (main, Dec 15 2022, 17:11:09) [Clang 14.0.0 (clang-1400.0.29.202)] on darwin
Type "help", "copyright", "credits" or "license" for more information.
>>> import gfpgan
>>>
- 1
- 2
- 3
- 4
- 5
所有依赖安装成功后,就可以直接运行launch.py文件即可:
python3 launch.py
- 1
程序返回:
Python 3.10.9 (main, Dec 15 2022, 17:11:09) [Clang 14.0.0 (clang-1400.0.29.202)]
Commit hash: 0cc0ee1bcb4c24a8c9715f66cede06601bfc00c8
Installing requirements for Web UI
Launching Web UI with arguments: --upcast-sampling --use-cpu interrogate
Warning: caught exception 'Torch not compiled with CUDA enabled', memory monitor disabled
No module 'xformers'. Proceeding without it.
==============================================================================
You are running torch 1.13.0.
The program is tested to work with torch 1.13.1.
To reinstall the desired version, run with commandline flag --reinstall-torch.
Beware that this will cause a lot of large files to be downloaded, as well as
there are reports of issues with training tab on the latest version.

Use --skip-version-check commandline argument to disable this check.
==============================================================================
Loading weights [6ce0161689] from /Users/liuyue/wodfan/work/stable-diffusion-webui/models/Stable-diffusion/v1-5-pruned-emaonly.safetensors
Creating model from config: /Users/liuyue/wodfan/work/stable-diffusion-webui/configs/v1-inference.yaml
LatentDiffusion: Running in eps-prediction mode
DiffusionWrapper has 859.52 M params.
Applying cross attention optimization (InvokeAI).
Textual inversion embeddings loaded(0):
Model loaded in 8.2s (create model: 0.6s, apply weights to model: 5.0s, apply half(): 1.9s, move model to device: 0.5s).
Running on local URL:  http://127.0.0.1:7860
- 1
- 2
- 3
- 4
- 5
- 6
- 7
- 8
- 9
- 10
- 11
- 12
- 13
- 14
- 15
- 16
- 17
- 18
- 19
- 20
- 21
- 22
- 23
Stable-Diffusion-Webui服务会运行在系统的7860端口上。
需要注意的是,如果本地系统不支持cuda模式,需要修改运行命令:
python3 launch.py --skip-torch-cuda-test --upcast-sampling --use-cpu interrogate
- 1
这里使用CPU来进行模型训练。
另外如果是M系列的Mac,其实是支持MPS模式的,但Stable Diffusion目前的最新版并不支持MPS,所以需要单独设置环境变量,关闭MPS模式:
export PYTORCH_ENABLE_MPS_FALLBACK=1
- 1
最后访问http://127.0.0.1:7860即可,本地构建Stable-Diffusion-Webui服务就完成了。
Docker构建Stable-Diffusion-Webui
如果不想太折腾,也可以使用Docker容器来构建Stable-Diffusion-Webui,同样地,需要拉取线上的Docker配置文件项目:
git clone https://github.com/AbdBarho/stable-diffusion-webui-docker.git
- 1
随后进入项目的目录:
stable-diffusion-webui-docker
- 1
接着运行命令下载相关的依赖镜像:
docker compose --profile download up --build
- 1
下载完成后,运行命令构建容器:
docker compose --profile auto up --build
- 1
这里需要注意的是,模型数据和输出文件夹会以/data和/output的形式挂载到容器中,如果想在宿主机往容器内传入模型或者其他图片,需要写入项目中的data目录。
过程中,可能会报错:
Found no NVIDIA driver on your system
- 1
这是因为容器内找不到NVIDIA的显卡驱动。
这里需要单独再启动一个容器服务:
docker run -ti --runtime=nvidia -e NVIDIA_DRIVER_CAPABILITIES=compute,utility -e NVIDIA_VISIBLE_DEVICES=all allennlp/allennlp
- 1
总的来说,安装过程简单,但是调试比较费劲,一旦启动出问题,就得进入容器内部修改代码,或者反复修改Dockerfile文件,所以Docker比较适合封装业务改动频繁的容器,而不是依赖环境繁多并且版本需要反复调整的场景。
Stable-Diffusion-Webui图像绘制
配置好Stable-Diffusion-Webui环境之后,访问http://127.0.0.1:7860:
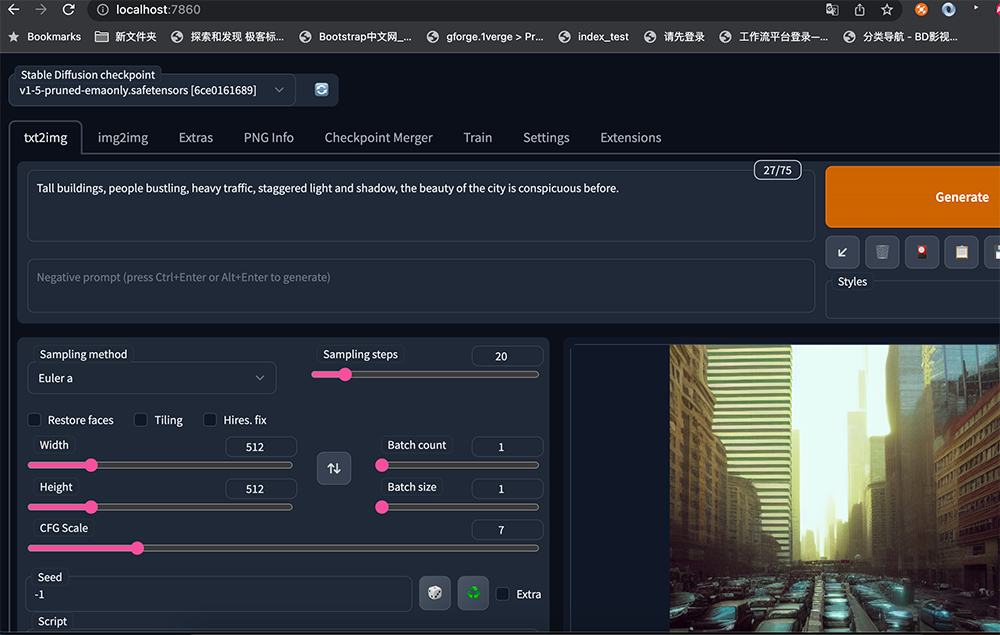
在Prompt文本框中填入引导词:
Tall buildings, people bustling, heavy traffic, staggered light and shadow, the beauty of the city is conspicuous before.
- 1
随后点击右侧Generate生成按钮即可,这里引导词的意思是:高楼林立,人群熙熙攘攘,车水马龙,光影交错,城市之美尽显眼前。
注意引导词需要使用逗号分隔。
后端开始进行训练:
To create a public link, set `share=True` in `launch()`.
100%|██████████████████████████████████████████████████████████████████████████████████████████████| 20/20 [00:24<00:00,  1.25s/it]
Total progress: 100%|██████████████████████████████████████████████████████████████████████████████| 20/20 [00:19<00:00,  1.00it/s]
100%|██████████████████████████████████████████████████████████████████████████████████████████████| 20/20 [00:34<00:00,  1.72s/it]
Total progress: 100%|██████████████████████████████████████████████████████████████████████████████| 20/20 [00:22<00:00,  1.11s/it]
100%|██████████████████████████████████████████████████████████████████████████████████████████████| 20/20 [00:22<00:00,  1.10s/it]
Total progress: 100%|██████████████████████████████████████████████████████████████████████████████| 20/20 [00:20<00:00,  1.00s/it]
100%|██████████████████████████████████████████████████████████████████████████████████████████████| 20/20 [00:22<00:00,  1.10s/it]
Total progress: 100%|██████████████████████████████████████████████████████████████████████████████| 20/20 [00:22<00:00,  1.13s/it]
100%|██████████████████████████████████████████████████████████████████████████████████████████████| 20/20 [00:22<00:00,  1.12s/it]
Total progress: 100%|██████████████████████████████████████████████████████████████████████████████| 20/20 [00:21<00:00,  1.07s/it]
100%|██████████████████████████████████████████████████████████████████████████████████████████████| 20/20 [00:21<00:00,  1.09s/it]
Total progress: 100%|██████████████████████████████████████████████████████████████████████████████| 20/20 [00:19<00:00,  1.03it/s]
100%|██████████████████████████████████████████████████████████████████████████████████████████████| 20/20 [00:20<00:00,  1.01s/it]
Total progress: 100%|██████████████████████████████████████████████████████████████████████████████| 20/20 [00:19<00:00,  1.03it/s]
100%|██████████████████████████████████████████████████████████████████████████████████████████████| 20/20 [00:20<00:00,  1.01s/it]
Total progress: 100%|██████████████████████████████████████████████████████████████████████████████| 20/20 [00:19<00:00,  1.02it/s]
100%|██████████████████████████████████████████████████████████████████████████████████████████████| 20/20 [00:22<00:00,  1.15s/it]
Total progress: 100%|██████████████████████████████████████████████████████████████████████████████| 20/20 [00:21<00:00,  1.07s/it]
100%|██████████████████████████████████████████████████████████████████████████████████████████████| 20/20 [00:21<00:00,  1.06s/it]
Total progress: 100%|██████████████████████████████████████████████████████████████████████████████| 20/20 [00:20<00:00,  1.00s/it]
- 1
- 2
- 3
- 4
- 5
- 6
- 7
- 8
- 9
- 10
- 11
- 12
- 13
- 14
- 15
- 16
- 17
- 18
- 19
- 20
- 21
片刻之间,挥毫落纸如云烟。
遗憾的是,引导词不支持中文,但可以配置权重,数值从0.1~100,默认状态是1,低于1就是减弱,大于1就是加强:
(Tall buildings:1.1), people bustling(1.61),(heavy traffic:0.3),(staggered light and shadow:1.3)
- 1
- 2
- 3
- 4
- 5
Stable-Diffusion-Webui也支持Negative prompt(反向引导词)。
就是用文字描述你不想在图像中出现的东西:
对图片进行去噪处理,使其看起来更像你的提示词;同样使其看起来更像你的反向提示词。
同时观察正方向两者之间的差异,并利用它来产生一组对噪声图片的改变,将最终结果移向前者而远离后者。
默认通用反向引导词:
lowres,bad anatomy,bad hands,text,error,missing fingers,
extra digit,fewer digits,cropped,worst quality,
low quality,normal quality,jpeg artifacts,signature,
watermark,username,blurry,missing arms,long neck,
Humpbacked,missing limb,too many fingers,
mutated,poorly drawn,out of frame,bad hands,
owres,unclear eyes,poorly drawn,cloned face,bad face
- 1
- 2
- 3
- 4
- 5
- 6
- 7
除了引导词,还可以调整采样迭代步数 (Sampling Steps)。
系统先随机生成一个基础的图片,然后一步步的调整图片,向引导词 Prompt 靠拢
Sampling Steps参数就是告诉人工智能,这样的步骤应该进行多少次。
次数越多,每一步训练也就越小越精确。当然了,成本也会越高,同时每一次训练的时间也会成同比增长。
除了迭代步数,也可以自由地选择采样方法(Sampling method)
也就是让Stable-Diffusion-Webui具体使用用什么算法来训练图片模型。
默认算法是Euler a :富有创造力,不同步数可以生产出不同的图片。 但是超过30步左右基本就没有实质化的增益效果。
Euler算法:最简单的算法,训练速度也是最快的。
LMS算法:Euler的延伸算法,相对更稳定一点,30步就比较稳定了
PLMS:优化过的LMS算法
其他的一些参数:
生成批次Batch count/n_iter:同样的配置,循环跑几次
每批数量 Batch size:同时生成多少个图像,增加这个值可以并行运行,但也需要更多的显卡显存。
提示词相关性 CFG Scale:图像与引导词匹配程度。增加这个值将导致图像更接近引导词,但过高会让图像色彩过于饱和。一般在5~15之间为好,7,9,12是3个常见的设置值。
宽度 X 高度 Width X Height:单位是像素,适当增加尺寸,后台会试图填充更多的细节进来。
Stable-Diffusion-Webui定制化模型
Stable-Diffusion-Webui默认下载的基础模型在项目目录的models/Stable-diffusion文件夹中:
/stable-diffusion-webui/models/Stable-diffusion
- 1
模型名称是v1-5-pruned-emaonly.safetensors,体积是4.27GB。
如果需要一些比较有个性定制化模型,可以在civitai.com平台进行挑选和下载,需要注意的是,该平台上的模型鱼龙混杂,良莠不齐,不能说是蔚为大观,但多多少少有点泥沙俱下的意思,所以最好不要在比较正式的公共(工作)环境打开该平台,否则结果可能会令人非常尴尬。
这里我们选择相对比较潮流的赛博朋克风格模型:synthwavepunk
将下载的模型放入models/Stable-diffusion目录。
随后重启Stable-Diffusion-Webui服务:
python3 launch.py --skip-torch-cuda-test --upcast-sampling --use-cpu interrogate
- 1
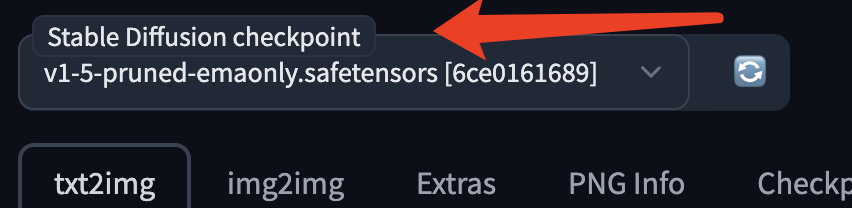
在页面表单中的Stable Diffusion checkpoint选项里选择对应的模型:
引导词:
concept art, 4k, intricate, pinup, a woman, beautiful face, embroidery, lace, hyper-realistic, highly detailed, octane render, concept art, smooth, 8k, dancing princess, snthwve style, nvinkpunk, by jeremy mann, by sandra chevrier, by dave mckean and richard avedon and maciej kuciara
- 1
训练结果:

好了,现在,你已经知晓那些网络上的漂亮小姐姐是怎么生成的了。
结语
也许我们只是偶尔被网络上那些酷炫而猎奇的AI生成图所吸引,但如果你真的动手去搭建、调试、甚至开始训练属于自己的绘画模型,相信我,你马上就会深陷其中,不能自拔,AI仿若可以满足你所有的幻想,欲望满溢,又欲言又止,分寸把握之精确,妙入毫颠。什么?你还在玩那些无聊的电子游戏?相信我,Stable-Diffusion-Webui才是最高级的精神享受,没有之一,也不可替代。


