
- 1我就不信这些 npm 指令你全知道_npm 如何kill
- 2Spring Boot笔记-拦截器相关(用户权限方面)_interceptor拦截器初步赋子不同类型用户权限
- 3ONLYOFFICE:兼顾协作与安全的开源办公套件
- 41.2 金融数据处理_qstock get_data
- 5【qstock量化】动态交互数据可视化_qstock.data.trade
- 6Spring Boot Thymeleaf 中文乱码_spring boot thymleaf 中文 显示 \u
- 7convertToWorldSpace convertToNodeSpace_converttoworldspace converttonodespace
- 8日志处理--Logo4Net与文件的并发处理_log4net 多线程
- 9mysqldump介绍及使用_mysqldump 表
- 10DoTween全解析(入门篇)
使用STM32 再实现循迹/跟随/摇头避障小车_stm32小车不能走直线
赞
踩
循迹小车
硬件介绍和接线
TCRT5000
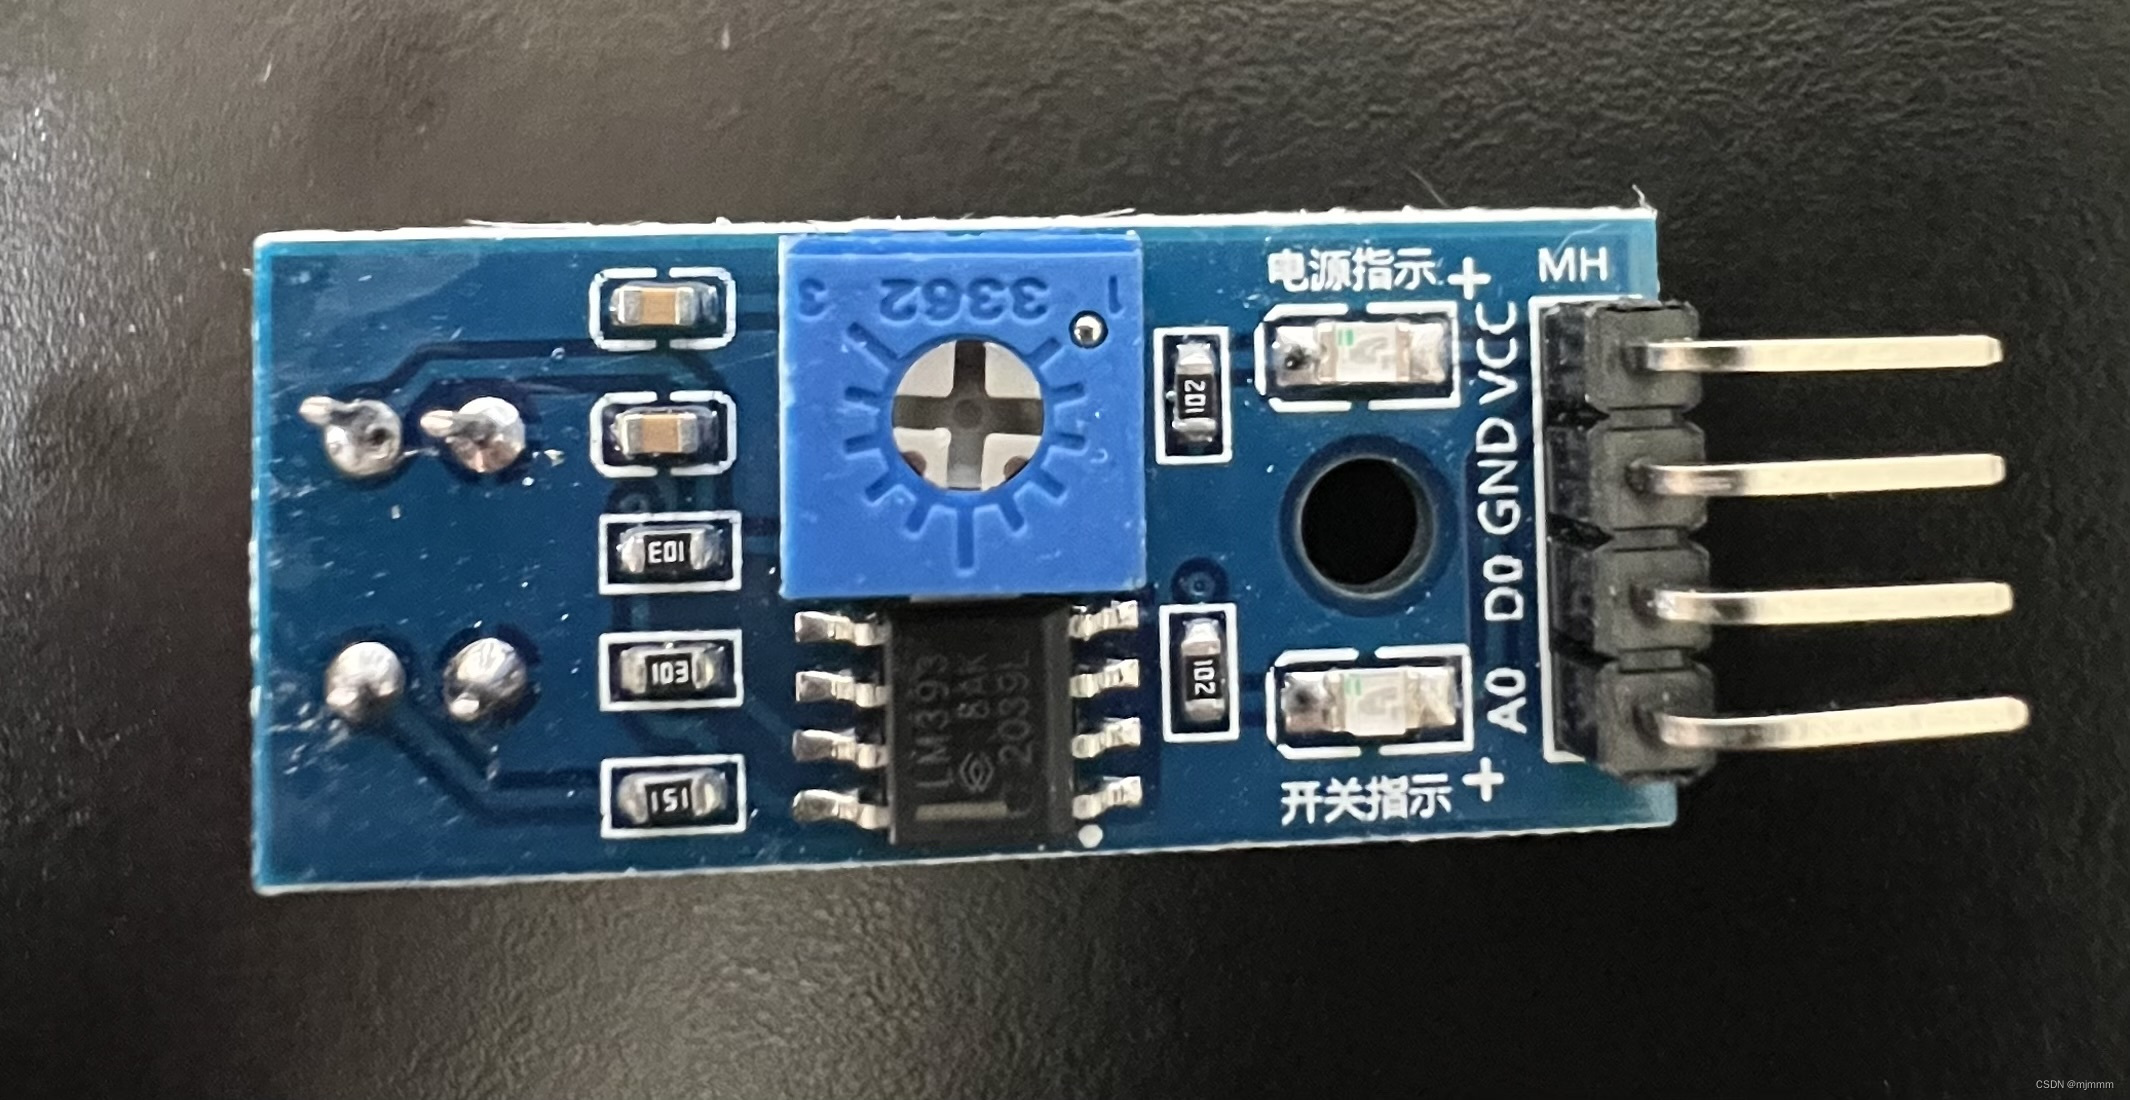
使用方法和原理见89C52时期的介绍。
循迹小车需要使用两个TCRT5000,左侧的DO接到PB3;右侧的DO接到PB4
CubeMX
1. 在上节的基础上进行修改 + 配置两个传感器的GPIO
![]()
2. 惯例配置更新代码
Keil
注意,如果要使用PWM调速就必须全部是PWM调速,因为一旦使用PWM调速之后又使用其他motor.c中的前后左右,就会重置PB1和PB10的值,而如果要使用调速,PB1和PB10就必须一直为HIGH,使用PWM调速的优点是转弯平滑,缺点是电机很容易因为PWM波的有效电平持续时间过低而转不动。
如果不想用PWM调速,不仅不能调用PWM调速的函数,在main中也记得将PWM使能关闭,在Cube中要把PA1和PA2改回GPIO,不使用PWM调速的优点是电机动力充足,缺点是转弯不太平滑。
按照代码封装的方法,封装route_sensor.c和route_sensor.h:
route_sensor.c:
- #include "route_sensor.h"
- #include "motor.h"
- #include "gpio.h"
-
-
-
- void route_sensor_mode()
- {
- if((HAL_GPIO_ReadPin(GPIOB, GPIO_PIN_3) == GPIO_PIN_RESET) && (HAL_GPIO_ReadPin(GPIOB, GPIO_PIN_4) == GPIO_PIN_RESET)){ //此时左右都没有检测到黑线,说明在轨迹上,直走, 两个灯都亮
- move_forward();
- //speed_left(180); //speed就是CCRx的值,理论在0到199之间,实际最好大于130
- //speed_right(180);
- }
- if((HAL_GPIO_ReadPin(GPIOB, GPIO_PIN_3) == GPIO_PIN_SET) && (HAL_GPIO_ReadPin(GPIOB, GPIO_PIN_4) == GPIO_PIN_RESET)){ //此时左模块检测到黑线,说明车身偏右即将离开轨道,此时需要左转修正,只有右灯亮
- move_leftturn();
- //speed_left(160); //speed就是CCRx的值,理论在0到199之间,实际最好大于130
- //speed_right(199);
- }
- if((HAL_GPIO_ReadPin(GPIOB, GPIO_PIN_3) == GPIO_PIN_RESET) && (HAL_GPIO_ReadPin(GPIOB, GPIO_PIN_4) == GPIO_PIN_SET)){ //此时右模块检测到黑线,说明车身偏左即将离开轨道,此时需要右转修正,只有左灯亮
- move_rightturn();
- //speed_left(199); //speed就是CCRx的值,理论在0到199之间,实际最好大于130
- //speed_right(160);
- }
- if((HAL_GPIO_ReadPin(GPIOB, GPIO_PIN_3) == GPIO_PIN_SET) && (HAL_GPIO_ReadPin(GPIOB, GPIO_PIN_4) == GPIO_PIN_SET)){ //此时左右都检测到黑线,说明不在轨迹上了,停止,两个灯都灭
- move_stop();
- //speed_left(0); //speed就是CCRx的值,理论在0到199之间,实际最好大于130
- //speed_right(0);
- }
-
- }
-

route_sensor.h:
- #ifndef __route_sensor_H__ // "XXXX"就是h文件的名字
- #define __route_sensor_H__
-
- void route_sensor_mode(void);
-
- #endif
main.c:
- #include "motor.h"
- #include "route_sensor.h"
-
- int main(void)
- {
- //HAL_TIM_PWM_Start(&htim2, TIM_CHANNEL_1); //打开Timer2的1号Channel, 1号通道对应 左轮
- //HAL_TIM_PWM_Start(&htim2, TIM_CHANNEL_2); //打开Timer2的2号Channel, 2号通道对应 右轮
-
- while (1)
- {
- route_sensor_mode();
- }
- }
实现效果
实现效果和89C52时一样,所以不重复展示了。
循迹小车
硬件介绍和接线
红外避障模块

使用方法和原理见89C52时期的介绍。
跟随小车需要使用两个红外避障模块,左侧的DO接到PB5;右侧的DO接到PB6
CubeMX
1. 在上节的基础上进行修改 + 配置两个传感器的GPIO
![]()
2. 惯例配置更新代码
Keil
按照代码封装的方法,封装route_follow.c和route_follow.h:
route_follow.c:
- #include "route_follow.h"
- #include "motor.h"
- #include "gpio.h"
-
- void route_follow_mode()
- {
- if((HAL_GPIO_ReadPin(GPIOB, GPIO_PIN_5) == GPIO_PIN_RESET) && (HAL_GPIO_ReadPin(GPIOB, GPIO_PIN_6) == GPIO_PIN_RESET)){ //此时左右都没有检测到黑线,说明在轨迹上,直走, 两个灯都亮
- move_forward();
- }
- if((HAL_GPIO_ReadPin(GPIOB, GPIO_PIN_5) == GPIO_PIN_SET) && (HAL_GPIO_ReadPin(GPIOB, GPIO_PIN_6) == GPIO_PIN_RESET)){ //此时左模块检测到黑线,说明车身偏右即将离开轨道,此时需要左转修正,只有右灯亮
- move_rightturn();
- }
- if((HAL_GPIO_ReadPin(GPIOB, GPIO_PIN_5) == GPIO_PIN_RESET) && (HAL_GPIO_ReadPin(GPIOB, GPIO_PIN_6) == GPIO_PIN_SET)){ //此时右模块检测到黑线,说明车身偏左即将离开轨道,此时需要右转修正,只有左灯亮
- move_leftturn();
- }
- if((HAL_GPIO_ReadPin(GPIOB, GPIO_PIN_5) == GPIO_PIN_SET) && (HAL_GPIO_ReadPin(GPIOB, GPIO_PIN_6) == GPIO_PIN_SET)){ //此时左右都检测到黑线,说明不在轨迹上了,停止,两个灯都灭
- move_stop();
- }
-
- }
-
route_follow.h:
- #ifndef __route_follow_H__ // "XXXX"就是h文件的名字
- #define __route_follow_H__
-
- void route_follow_mode(void);
-
- #endif
main.c:
- #include "motor.h"
- #include "route_follow.h"
-
- int main(void)
- {
- //HAL_TIM_PWM_Start(&htim2, TIM_CHANNEL_1); //打开Timer2的1号Channel, 1号通道对应 左轮
- //HAL_TIM_PWM_Start(&htim2, TIM_CHANNEL_2); //打开Timer2的2号Channel, 2号通道对应 右轮
-
- while (1)
- {
- route_follow_mode();
- }
- }
实现效果
实现效果和89C52时一样,所以不重复展示了。
摇头避障小车
硬件介绍和接线
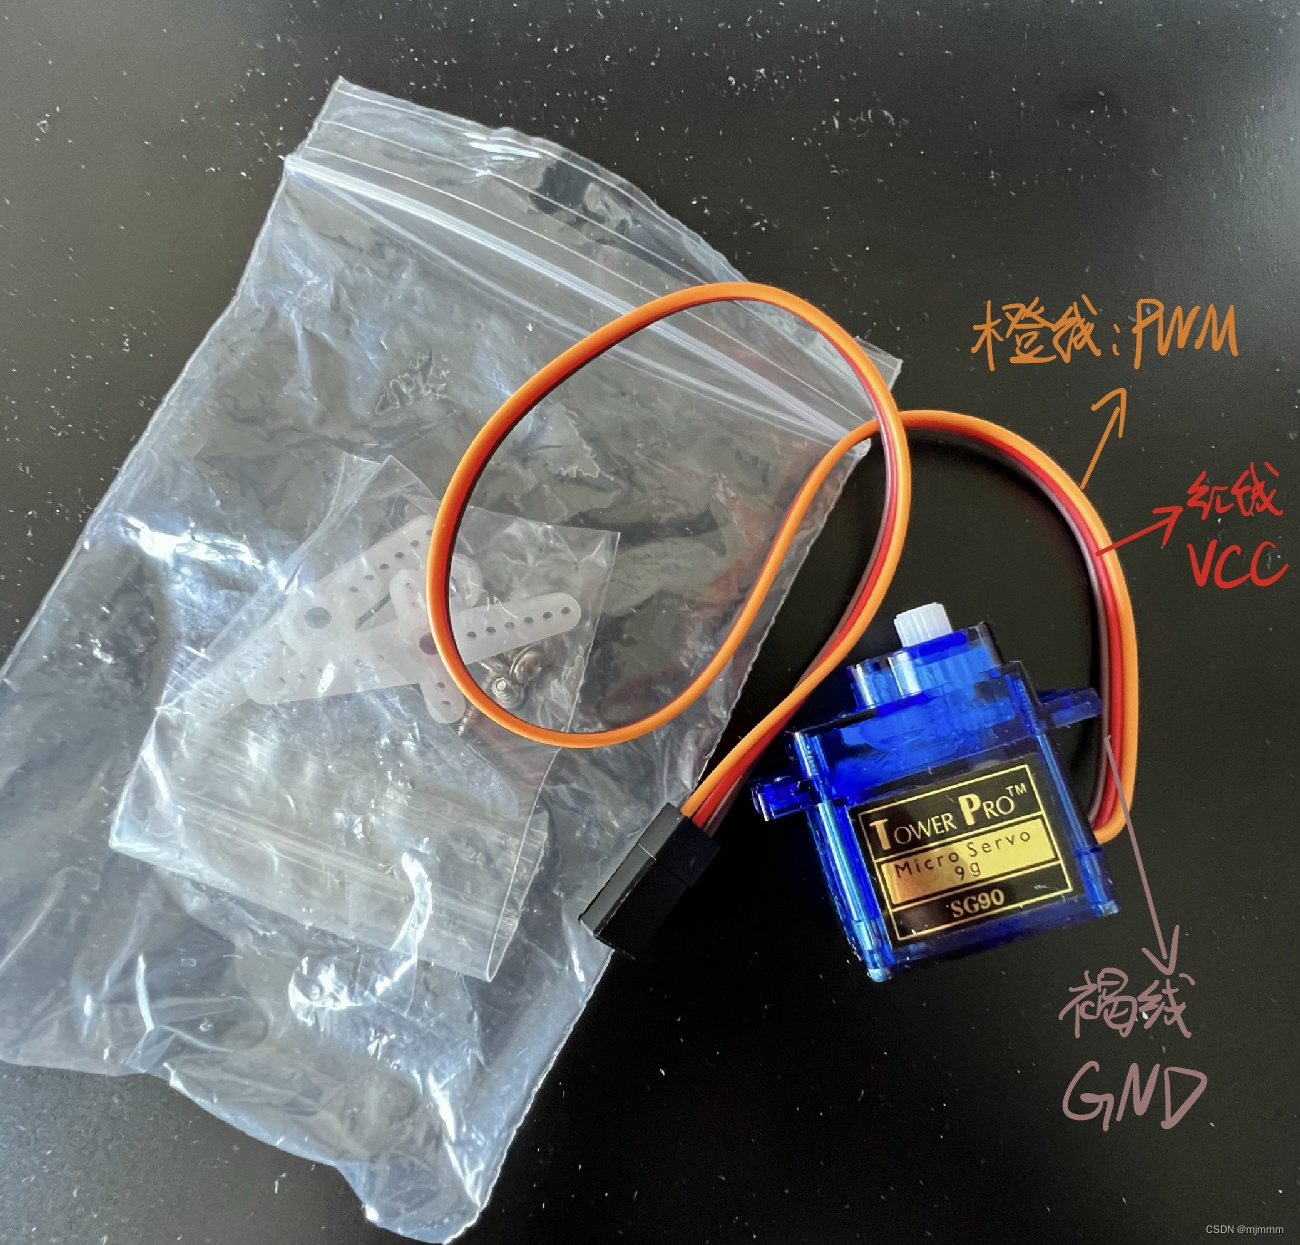
SG90舵机(实现摇头)
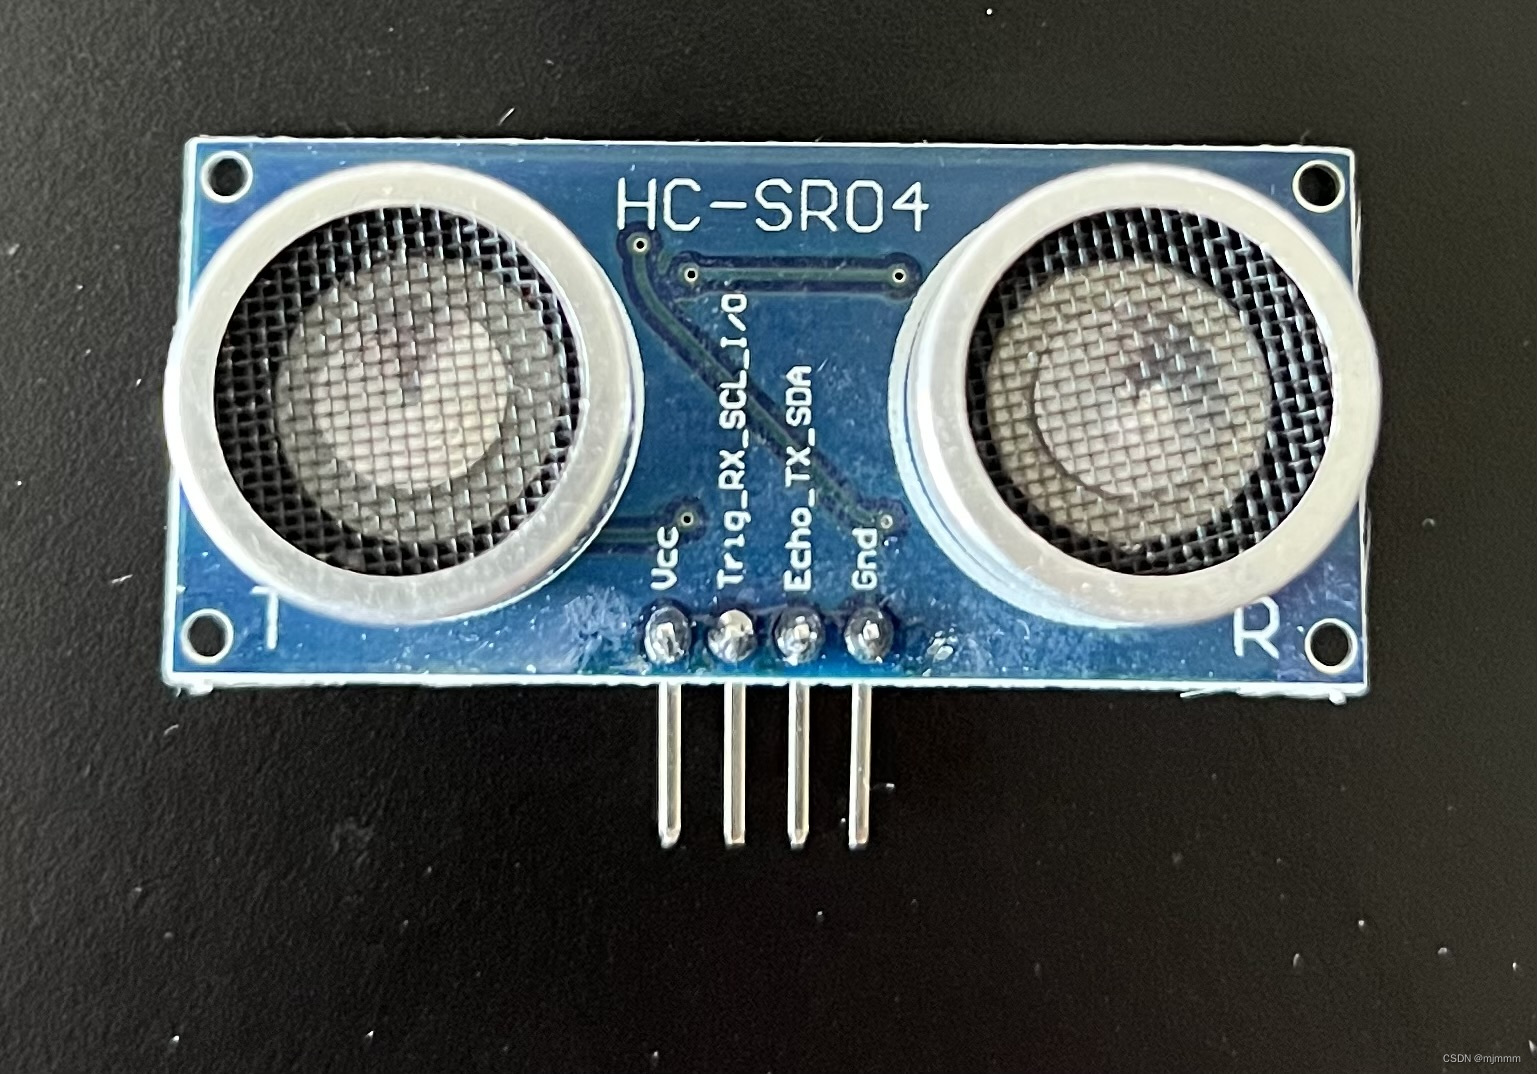
HC-SR04超声波测距模块(实现避障)
由于驱动舵机使用的PWM也是周期为20ms的,所以可以直接用TIM1的CH3,对应PA2
HC-SR04的Trig接PA5;Echo接PA4
CubeMX
1. 在上节的基础上进行修改 + 配置Trig和Echo的GPIO:
![]()
2. 打开TIM2的CH3的PWM,由于PSC和ARR已经设置过了所以不用设置,有效电平为HIGH也不用设置:
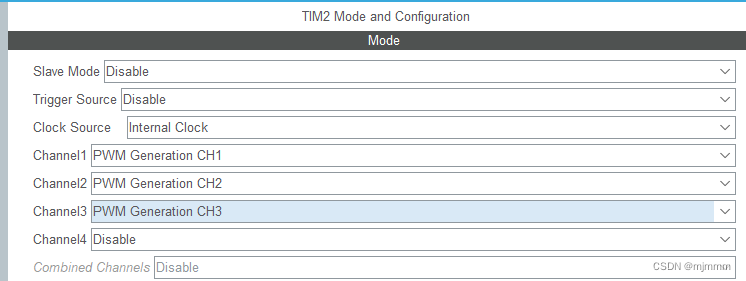
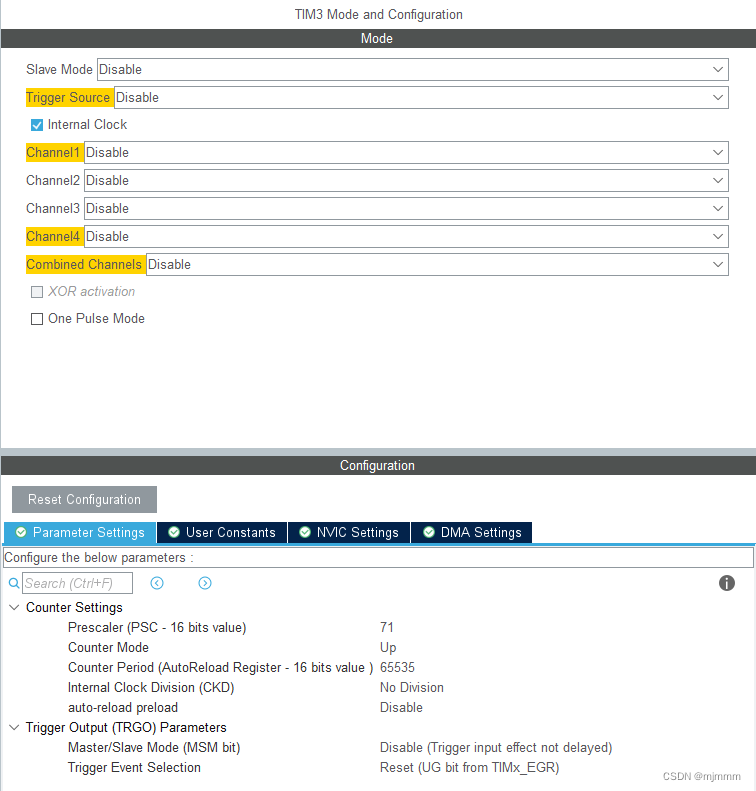
3. 打开TIM3,用作HC-SR04的计时器,并且只用来作为计数功能,并软件控制何时停止计数,因此只需要设置TIM2的PSC而不需要设置ARR。
神奇的事情又发生了...在前几个项目里,同样是HC-SR04的初始化,使用的是微秒级的延时,但是在这个项目里,又变回了毫秒级的延时???唯一的区别是,上个项目使用的是TIM2,此处是TIM3...
4. 惯例配置更新代码
Keil
按照代码封装的方法,封装SG90.c, SG90.h, HC_SR04.c, HC_SR04.h:
SG90.c:
- #include "SG90.h"
- #include "tim.h"
-
- int angle;
-
- void head_right()
- {
- angle = 0;
- __HAL_TIM_SetCompare(&htim2, TIM_CHANNEL_3, 5); //0度
- }
-
- void head_middle()
- {
- angle = 1;
- __HAL_TIM_SetCompare(&htim2, TIM_CHANNEL_3, 15); //90度
- }
-
- void head_left()
- {
- angle = 2;
- __HAL_TIM_SetCompare(&htim2, TIM_CHANNEL_3, 25); //180度
- }
SG90.h:
- #ifndef __SG90_H__ // "XXXX"就是h文件的名字
- #define __SG90_H__
-
- void head_right(void);
- void head_middle(void);
- void head_left(void);
-
-
- #endif
HC_SR04.c:
- #include "HC_SR04.h"
- #include "SG90.h"
- #include "gpio.h"
- #include "tim.h"
- #include "motor.h"
-
-
- double dist_middle;
- double dist_left;
- double dist_right;
-
-
-
- void StartHC()
- {
- HAL_GPIO_WritePin(GPIOA, GPIO_PIN_5, GPIO_PIN_RESET); //Trig写0
- HAL_GPIO_WritePin(GPIOA, GPIO_PIN_5, GPIO_PIN_SET); //Trig写1
- HAL_Delay(10);
- HAL_GPIO_WritePin(GPIOA, GPIO_PIN_5, GPIO_PIN_RESET); //Trig写0
-
- }
-
- double get_dist()
- {
- int cnt;
- double dist;
-
- StartHC();
-
- while((HAL_GPIO_ReadPin(GPIOA, GPIO_PIN_4)) == GPIO_PIN_RESET); //等待Echo变高的一瞬间
- HAL_TIM_Base_Start(&htim3); //TIM3开始计时
- __HAL_TIM_SetCounter(&htim3,0); //将TIM3的计数器置0
-
- while((HAL_GPIO_ReadPin(GPIOA, GPIO_PIN_4)) == GPIO_PIN_SET); //等待Echo变低的一瞬间
- HAL_TIM_Base_Stop(&htim3); //TIM3停止计时
-
- cnt = __HAL_TIM_GetCounter(&htim3);//求出计了多少次,由于计数一次经过的时间是1us
- dist = cnt*340/2*0.000001*100; //求出距离
-
- return dist;
- }
-
- void deal_dist()
- {
- dist_middle = get_dist();
- if(dist_middle > 35){ //如果距离大于35cm就可以前进
- move_forward();//前进
- }else if((dist_middle > 10) && (dist_middle < 35)){ //距离小于35cm但大于10cm时
- move_stop();//先停下
- head_left();//将测距传感器通过SG90转到左边
- dist_left = get_dist();
- HAL_Delay(300);//根据实际情况
-
- head_right();//将测距传感器通过SG90转到右边
- dist_right = get_dist();
- HAL_Delay(300);//根据实际情况
-
- if(dist_right > dist_left){ //哪边距离大往哪边转
- move_rightturn();
- HAL_Delay(300);//根据实际情况
- move_stop();
- }else{
- move_leftturn();
- HAL_Delay(300);//根据实际情况
- move_stop();
- }
- }else{ //当距离已经小于10cm时
- move_backward();//此时距离已经危险了,需要后退一下
- HAL_Delay(300);//根据实际情况
- move_stop();
- }
- }
-
HC_SR04.h:
- #ifndef __HC_SR04_H__ // "XXXX"就是h文件的名字
- #define __HC_SR04_H__
-
- void deal_dist(void);
-
- #endif
main.c:
- #include "SG90.h"
- #include "HC_SR04.h"
-
- extern int angle;
-
- int main(void)
- {
- //HAL_TIM_PWM_Start(&htim2, TIM_CHANNEL_1); //打开Timer2的1号Channel, 1号通道对应 左轮
- //HAL_TIM_PWM_Start(&htim2, TIM_CHANNEL_2); //打开Timer2的2号Channel, 2号通道对应 右轮
- HAL_TIM_PWM_Start(&htim2, TIM_CHANNEL_3); //打开Timer2的3号Channel, 控制SG90
- head_middle();
-
- while (1)
- {
- if(angle != 1){ //如果不在中间的话,回到中间
- head_middle();
- HAL_Delay(300);
- }
-
- deal_dist();
- HAL_Delay(50); //重要
-
- }
- }
实现效果
实现效果和89C52时一样,所以不重复展示了。


