
热门标签
热门文章
- 1开源C语言库Melon:数据恢复算法
- 2Unity3D之发布到IOS,Android的各种坑_unity admob销毁了但是没关掉
- 32024-01-18(SpringCloud)
- 4《Django开发从入门到实践》学习笔记
- 5外星人入侵游戏-(创新版)
- 6【无人机组装与调试】第四章 F450四轴装机实例-选择机型、需要的器材工具材料_f450组装与调试实训报告
- 7【AI绘画--七夕篇】使用Stable Diffusion的艺术二维码完全生成攻略
- 8【Python】安装包的时候提示缺少Microsoft Visual C++ 14.0的解决方案
- 9decapoda-research/llama-7b-hf 的踩坑记录_decapoda-research/llama-7b-hf is not a local folde
- 10C++---练习_void showshape
当前位置: article > 正文
spring boot2.x版本学习笔记之使用mybatis的xml配置方式配合DruidDataSource数据源访问MySQL数据库_druiddatasource 和 mybatis xml如何对应
作者:代码秘术家 | 2024-01-30 12:27:41
赞
踩
druiddatasource 和 mybatis xml如何对应
- 首先创建一个用于测试的数据库,创建一张user表,建表语句如下:
CREATE TABLE `user`  (
  `id` bigint(20) NOT NULL,
  `name` varchar(50) CHARACTER SET utf8mb4 COLLATE utf8mb4_0900_ai_ci NULL DEFAULT NULL,
  `age` int(11) NULL DEFAULT NULL,
  PRIMARY KEY (`id`) USING BTREE
) ENGINE = InnoDB CHARACTER SET = utf8mb4 COLLATE = utf8mb4_0900_ai_ci ROW_FORMAT = Dynamic;
- 1
- 2
- 3
- 4
- 5
- 6
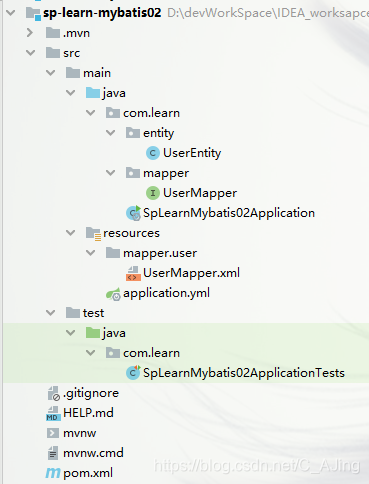
- 创建一个spring boot项目,项目结构如下:
- 导入相关的maven依赖:
		<dependency>
            <groupId>com.alibaba</groupId>
            <artifactId>druid-spring-boot-starter</artifactId>
            <version>1.1.23</version>
        </dependency>

        <dependency>
            <groupId>org.mybatis.spring.boot</groupId>
            <artifactId>mybatis-spring-boot-starter</artifactId>
            <version>2.1.3</version>
        </dependency>

        <dependency>
            <groupId>mysql</groupId>
            <artifactId>mysql-connector-java</artifactId>
            <scope>runtime</scope>
        </dependency>

        <dependency>
            <groupId>org.projectlombok</groupId>
            <artifactId>lombok</artifactId>
            <optional>true</optional>
        </dependency>

- 1
- 2
- 3
- 4
- 5
- 6
- 7
- 8
- 9
- 10
- 11
- 12
- 13
- 14
- 15
- 16
- 17
- 18
- 19
- 20
- 21
- 22
- 23
- 编写数据源配置文件,这里使用的是DruidDataSource数据源:
spring:
  datasource:
    druid:
      url: jdbc:mysql://localhost:3306/bg-learnsp?serverTimezone=Asia/Shanghai&useUnicode=true&characterEncoding=UTF-8&useSSL=false # 连接数据库的url
      username: root # 连接数据库的用户名
      password: root # 连接数据库的密码。
      driver-class-name: com.mysql.cj.jdbc.Driver # 这一项可配可不配,如果不配置druid会根据url自动识别dbType,然后选择相应的driverClassName
      initial-size: 5 # 初始化时建立物理连接的个数。初始化发生在显示调用init方法,或者第一次getConnection时
      max-active: 10 # 最大连接池数量
      max-wait: 60000 # 获取连接时最大等待时间,单位毫秒。配置了maxWait之后,缺省启用公平锁,并发效率会有所下降,如果需要可以通过配置useUnfairLock属性为true使用非公平锁。
      min-idle: 1 # 最小连接池数量
      time-between-eviction-runs-millis: 60000 # 有两个含义: 1) Destroy线程会检测连接的间隔时间,如果连接空闲时间大于等于minEvictableIdleTimeMillis则关闭物理连接。 2) testWhileIdle的判断依据
      test-while-idle: true # 建议配置为true,不影响性能,并且保证安全性。申请连接的时候检测,如果空闲时间大于timeBetweenEvictionRunsMillis,执行validationQuery检测连接是否有效。
      min-evictable-idle-time-millis: 30000 # 连接保持空闲而不被驱逐的最小时间
      test-on-borrow: true # 申请连接时执行validationQuery检测连接是否有效,做了这个配置会降低性能
      test-on-return: false # 归还连接时执行validationQuery检测连接是否有效,做了这个配置会降低性能
      pool-prepared-statements: true # 是否缓存preparedStatement,也就是PSCache。PSCache对支持游标的数据库性能提升巨大,比如说oracle。在mysql下建议关闭。
      max-open-prepared-statements: 10
      validation-query: select 1 # 用来检测连接是否有效的sql,要求是一个查询语句,常用select ‘x’。如果validationQuery为null,testOnBorrow、testOnReturn、testWhileIdle都不会起作用
      validation-query-timeout: 50 # 单位:秒,检测连接是否有效的超时时间。底层调用jdbc Statement对象的void setQueryTimeout(int seconds)方法
      filter: start # 属性类型是字符串,通过别名的方式配置扩展插件,常用的插件有:
                      #   监控统计用的filter:stat
                      #  日志用的filter:log4j
                     #   防御sql注入的filter:wall
# 增加日志记录
logging:
  level:
    root: info
    com.learn.mapper: debug

mybatis:
  mapper-locations: classpath:mapper/**/*.xml # 指定mapper文件的位置
- 1
- 2
- 3
- 4
- 5
- 6
- 7
- 8
- 9
- 10
- 11
- 12
- 13
- 14
- 15
- 16
- 17
- 18
- 19
- 20
- 21
- 22
- 23
- 24
- 25
- 26
- 27
- 28
- 29
- 30
- 31
- 32
Druid连接池是阿里巴巴开源的数据库连接池项目。Druid连接池为监控而生,内置强大的监控功能,监控特性不影响性能。功能强大,能防SQL注入,内置Loging能诊断Hack应用行为。上面常用的参数已经详细介绍了含义,如果想要了解更多配置可以访问DruidDataSource配置属性列表,想要了解DruidDataSource更多信息可以访问DruidDataSource官网。
- 编写User实体类对象:
@Data
public class UserEntity {

    private Long id;

    private String name;

    private Integer age;
}
- 1
- 2
- 3
- 4
- 5
- 6
- 7
- 8
- 9
- 创建UserMapper接口:
public interface UserMapper {

    /**
     * 通过id查询用户信息
     *
     * @param id
     * @return
     */
    UserEntity findUserById(Long id);

    /**
     * 插入用户信息
     *
     * @param user
     * @return
     */
    int insert(UserEntity user);
}
- 1
- 2
- 3
- 4
- 5
- 6
- 7
- 8
- 9
- 10
- 11
- 12
- 13
- 14
- 15
- 16
- 17
- 18
- 在启动类上使用@MapperScan注解,增加对mapper包的扫描:
@SpringBootApplication
@MapperScan("com.learn.mapper")
public class SpLearnMybatis02Application {

    public static void main(String[] args) {
        SpringApplication.run(SpLearnMybatis02Application.class, args);
    }

}
- 1
- 2
- 3
- 4
- 5
- 6
- 7
- 8
- 9
- 创建UserMapper.xml文件:
<?xml version="1.0" encoding="UTF-8"?>
<!DOCTYPE mapper
        PUBLIC "-//mybatis.org//DTD Mapper 3.0//EN"
        "http://mybatis.org/dtd/mybatis-3-mapper.dtd">

<mapper namespace="com.learn.mapper.UserMapper">
    <select id="findUserById" parameterType="long" resultType="com.learn.entity.UserEntity">
        SELECT * FROM USER WHERE ID = #{ID}
    </select>

    <insert id="insert">
        INSERT INTO USER(ID,NAME, AGE) VALUES(#{id},#{name}, #{age})
    </insert>
</mapper>
- 1
- 2
- 3
- 4
- 5
- 6
- 7
- 8
- 9
- 10
- 11
- 12
- 13
- 14
- 在application.yml配置文件中,指定xml文件位置:
mybatis:
  mapper-locations: classpath:mapper/**/*.xml # 指定mapper文件的位置
- 1
- 2
10.编写测试用例:
@SpringBootTest
class SpLearnMybatis02ApplicationTests {

    @Autowired
    private UserMapper userMapper;

    @Test
    void testUserMapper() {
        UserEntity userEntity = new UserEntity();
        userEntity.setId(9999L);
        userEntity.setName("阿里巴巴");
        userEntity.setAge(85);
        //保存用户
        userMapper.insert(userEntity);
        //查询用户
        UserEntity user = userMapper.findUserById(9999L);
        System.out.println(user);
    }

}
- 1
- 2
- 3
- 4
- 5
- 6
- 7
- 8
- 9
- 10
- 11
- 12
- 13
- 14
- 15
- 16
- 17
- 18
- 19
- 20
测试结果:
UserEntity(id=9999, name=阿里巴巴, age=85)
- 1
到这里,使用spring boot整合mybatis使用xml文件的方式,配合使用DruidDataSource数据源访问MySQL数据库的小案例就搭建好了。
本文内容由网友自发贡献,转载请注明出处:https://www.wpsshop.cn/article/detail/46442
推荐阅读

相关标签

