
- 1One Piece1-541(ed2k)_one piece hentai
- 2【错误文档】This与Here的区别、主系表结构、如何合并两个句子、祈使句结构
- 3机器学习笔记(7)——决策树&随机森林代码_随机森林模型代码
- 4stm32 PWM驱动呼吸灯_stm32呼吸灯pwm
- 5【链表*】交换结点_链表交换节点
- 6【CSS】transform 属性详解_css transform 属性的定义
- 7vscode调试pytorch分布式代码
- 8去除XML标注文件中的多余标签类别_python去除文本中的xml标签
- 9前端之vue 根据菜单自动生成路由(动态配置前端路由)_vue从后端读取的菜单如何转换成路由
- 105年python程序员,目前月薪30K,分享点实实在在的(踩坑)学习经验!_python程序员工资
[STM32F103C8T6]基于stm32的循迹,跟随,避障智能小车_基于stm32c8t6的电磁循迹小车
赞
踩
目录
2.我们可以加入串口控制电机驱动(重写串口接收回调函数,和重定向printf)
为什么使用的是HAL_Delay()要设置滴答定时器的中断优先级呢?
1.小车驱动主要是通过L9110S模块来驱动电机
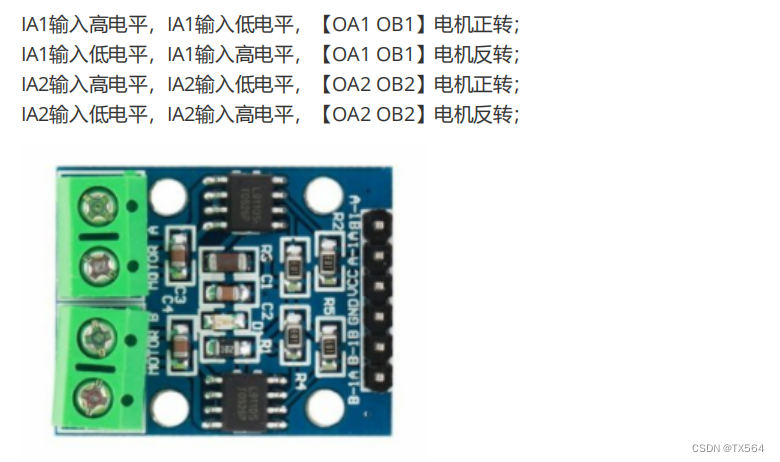
本次STM32与L9110s的接线是:
B-1A -- PB0B-1B -- PB1A-1A -- PB2A-1B -- PB10
通过对GPIO口的配置,可以写出电机的驱动程序(全速模式)

motor.c
- #include "motor.h"
- #include "gpio.h"
-
- void GoForward(void)
- {
- //右轮
- HAL_GPIO_WritePin(GPIOB,GPIO_PIN_0,GPIO_PIN_SET);
- HAL_GPIO_WritePin(GPIOB,GPIO_PIN_1,GPIO_PIN_RESET);
- //左轮
- HAL_GPIO_WritePin(GPIOB,GPIO_PIN_2,GPIO_PIN_SET);
- HAL_GPIO_WritePin(GPIOB,GPIO_PIN_10,GPIO_PIN_RESET);
- }
-
- void GoBack(void)
- {
- //右轮
- HAL_GPIO_WritePin(GPIOB,GPIO_PIN_0,GPIO_PIN_RESET);
- HAL_GPIO_WritePin(GPIOB,GPIO_PIN_1,GPIO_PIN_SET);
- //左轮
- HAL_GPIO_WritePin(GPIOB,GPIO_PIN_2,GPIO_PIN_RESET);
- HAL_GPIO_WritePin(GPIOB,GPIO_PIN_10,GPIO_PIN_SET);
- }
-
- void GoLeft(void)
- {
- //右轮
- HAL_GPIO_WritePin(GPIOB,GPIO_PIN_0,GPIO_PIN_SET);
- HAL_GPIO_WritePin(GPIOB,GPIO_PIN_1,GPIO_PIN_RESET);
- //左轮
- HAL_GPIO_WritePin(GPIOB,GPIO_PIN_2,GPIO_PIN_RESET);
- HAL_GPIO_WritePin(GPIOB,GPIO_PIN_10,GPIO_PIN_RESET);
- }
-
- void GoRight(void)
- {
- //右轮
- HAL_GPIO_WritePin(GPIOB,GPIO_PIN_0,GPIO_PIN_RESET);
- HAL_GPIO_WritePin(GPIOB,GPIO_PIN_1,GPIO_PIN_RESET);
- //左轮
- HAL_GPIO_WritePin(GPIOB,GPIO_PIN_2,GPIO_PIN_SET);
- HAL_GPIO_WritePin(GPIOB,GPIO_PIN_10,GPIO_PIN_RESET);
- }
-
- void Stop(void)
- {
- //右轮
- HAL_GPIO_WritePin(GPIOB,GPIO_PIN_0,GPIO_PIN_RESET);
- HAL_GPIO_WritePin(GPIOB,GPIO_PIN_1,GPIO_PIN_RESET);
- //左轮
- HAL_GPIO_WritePin(GPIOB,GPIO_PIN_2,GPIO_PIN_RESET);
- HAL_GPIO_WritePin(GPIOB,GPIO_PIN_10,GPIO_PIN_RESET);
- }

2.我们可以加入串口控制电机驱动(重写串口接收回调函数,和重定向printf)
加入串口控制,我们需要在cubeMX中开启串口中断用于接收串口发来的数据


Uart.c
- void HAL_UART_MspDeInit(UART_HandleTypeDef* uartHandle)
- {
-
- if(uartHandle->Instance==USART1)
- {
- /* USER CODE BEGIN USART1_MspDeInit 0 */
-
- /* USER CODE END USART1_MspDeInit 0 */
- /* Peripheral clock disable */
- __HAL_RCC_USART1_CLK_DISABLE();
-
- /**USART1 GPIO Configuration
- PA9 ------> USART1_TX
- PA10 ------> USART1_RX
- */
- HAL_GPIO_DeInit(GPIOA, GPIO_PIN_9|GPIO_PIN_10);
-
- /* USART1 interrupt Deinit */
- HAL_NVIC_DisableIRQ(USART1_IRQn);
- /* USER CODE BEGIN USART1_MspDeInit 1 */
-
- /* USER CODE END USART1_MspDeInit 1 */
- }
- }
-
- /* USER CODE BEGIN 1 */
- //串口接收缓存(1字节)
- uint8_t buf=0;
- //定义最大接收字节数 200,可根据需求调整
- #define UART1_REC_LEN 200
- #define SIZE 12
- // 接收缓冲, 串口接收到的数据放在这个数组里,最大UART1_REC_LEN个字节
- uint8_t UART1_RX_Buffer[UART1_REC_LEN];
- // 接收状态
- // bit15, 接收完成标志
- // bit14, 接收到0x0d
- // bit13~0, 接收到的有效字节数目
- uint16_t UART1_RX_STA=0;
-
- char buffer[SIZE];
- // 接收完成回调函数,收到一个数据后,在这里处理
- void HAL_UART_RxCpltCallback(UART_HandleTypeDef *huart)
- {
- // 判断中断是由哪个串口触发的
- if(huart->Instance == USART1)
- {
- // 判断接收是否完成(UART1_RX_STA bit15 位是否为1)
- if((UART1_RX_STA & 0x8000) == 0)
- {
- // 如果已经收到了 0x0d (回车),
- if(UART1_RX_STA & 0x4000)
- {
- // 则接着判断是否收到 0x0a (换行)
- if(buf == 0x0a)
- {
- // 如果 0x0a 和 0x0d 都收到,则将 bit15 位置为1
- UART1_RX_STA |= 0x8000;
- // printf("1");
-
- // 车控指令
- if(!strcmp((const char*)UART1_RX_Buffer, "M1"))
- {
- printf("Forwad......");
- GoForward();
- }
- else if(!strcmp((const char*)UART1_RX_Buffer, "M2"))
- {
- printf("Back......");
- GoBack();
- }
- else if(!strcmp((const char*)UART1_RX_Buffer, "M3"))
- {
- printf("Left......");
- GoLeft();
- }
- else if(!strcmp((const char*)UART1_RX_Buffer, "M4"))
- {
- printf("Right......");
- GoRight();
- }
- else if(!strcmp((const char*)UART1_RX_Buffer, "Stop"))
- {
- printf("Stop......");
- Stop();
- }
- memset(UART1_RX_Buffer, 0, UART1_REC_LEN);
- UART1_RX_STA = 0;
- }
- else
- // 否则认为接收错误,重新开始
- UART1_RX_STA = 0;
- }
- else // 如果没有收到了 0x0d (回车)
- {
- //则先判断收到的这个字符是否是 0x0d (回车)
- if(buf == 0x0d)
- {
- // 是的话则将 bit14 位置为1
- UART1_RX_STA |= 0x4000;
- }
- else
- {
- // 否则将接收到的数据保存在缓存数组里
- UART1_RX_Buffer[UART1_RX_STA & 0X3FFF] = buf;
- UART1_RX_STA++;
- // 如果接收数据大于UART1_REC_LEN(200字节),则重新开始接收
- if(UART1_RX_STA > UART1_REC_LEN - 1)
- UART1_RX_STA = 0;
- }
- }
- }
- // 重新开启中断
- HAL_UART_Receive_IT(&huart1, &buf, 1);
- }
- }
-
- int fputc(int ch, FILE *f)
- {
- unsigned char temp[1]={ch};
- HAL_UART_Transmit(&huart1,temp,1,0xffff);
- return ch;
- }
main.c
- extern uint8_t buf;
-
- int main(void)
- {
- /* USER CODE BEGIN 1 */
-
- /* USER CODE END 1 */
-
- /* MCU Configuration--------------------------------------------------------*/
-
- /* Reset of all peripherals, Initializes the Flash interface and the Systick. */
- HAL_Init();
-
- /* USER CODE BEGIN Init */
-
- /* USER CODE END Init */
-
- /* Configure the system clock */
- SystemClock_Config();
-
- /* USER CODE BEGIN SysInit */
-
- /* USER CODE END SysInit */
-
- /* Initialize all configured peripherals */
- MX_GPIO_Init();
- MX_USART1_UART_Init();
- /* USER CODE BEGIN 2 */
- HAL_UART_Receive_IT(&huart1, &buf, 1);//开启串口接收
- /* USER CODE END 2 */
-
- /* Infinite loop */
- /* USER CODE BEGIN WHILE */
- while (1)
- {
- /* USER CODE END WHILE */
-
- /* USER CODE BEGIN 3 */
- }
- /* USER CODE END 3 */
- }
切记主函数内需要调用开启串口接收函数!!!!!!
将HC08模块接入STM32,连接蓝牙就可以通过蓝牙APP控制
3.点动功能
如果用蓝牙app实现遥控车模式,我们会发现,点了前进按钮,小车会一直前进,按下左转会一直左转,而遥控车应该是点动功能,按一下向前就向前走一下,一直按一直走
我的思路是,主程序一直跑Stop(); 接收到来自蓝牙(串口)的数据后执行动作(几毫秒),从而实现点动
uart.c
- void HAL_UART_MspDeInit(UART_HandleTypeDef* uartHandle)
- {
-
- if(uartHandle->Instance==USART1)
- {
- /* USER CODE BEGIN USART1_MspDeInit 0 */
-
- /* USER CODE END USART1_MspDeInit 0 */
- /* Peripheral clock disable */
- __HAL_RCC_USART1_CLK_DISABLE();
-
- /**USART1 GPIO Configuration
- PA9 ------> USART1_TX
- PA10 ------> USART1_RX
- */
- HAL_GPIO_DeInit(GPIOA, GPIO_PIN_9|GPIO_PIN_10);
-
- /* USART1 interrupt Deinit */
- HAL_NVIC_DisableIRQ(USART1_IRQn);
- /* USER CODE BEGIN USART1_MspDeInit 1 */
-
- /* USER CODE END USART1_MspDeInit 1 */
- }
- }
-
- /* USER CODE BEGIN 1 */
- //串口接收缓存(1字节)
- uint8_t buf=0;
- //定义最大接收字节数 200,可根据需求调整
- #define UART1_REC_LEN 200
- #define SIZE 12
- // 接收缓冲, 串口接收到的数据放在这个数组里,最大UART1_REC_LEN个字节
- uint8_t UART1_RX_Buffer[UART1_REC_LEN];
- // 接收状态
- // bit15, 接收完成标志
- // bit14, 接收到0x0d
- // bit13~0, 接收到的有效字节数目
- uint16_t UART1_RX_STA=0;
-
- char buffer[SIZE];
- // 接收完成回调函数,收到一个数据后,在这里处理
- void HAL_UART_RxCpltCallback(UART_HandleTypeDef *huart)
- {
- // 判断中断是由哪个串口触发的
- if(huart->Instance == USART1)
- {
- // 判断接收是否完成(UART1_RX_STA bit15 位是否为1)
- if((UART1_RX_STA & 0x8000) == 0)
- {
- // 如果已经收到了 0x0d (回车),
- if(UART1_RX_STA & 0x4000)
- {
- // 则接着判断是否收到 0x0a (换行)
- if(buf == 0x0a)
- {
- // 如果 0x0a 和 0x0d 都收到,则将 bit15 位置为1
- UART1_RX_STA |= 0x8000;
- // printf("1");
-
- // 车控指令
- if(!strcmp((const char*)UART1_RX_Buffer, "M1"))
- {
- printf("Forwad......");
- GoForward();
- HAL_Delay(10);
- }
- else if(!strcmp((const char*)UART1_RX_Buffer, "M2"))
- {
- printf("Back......");
- GoBack();
- HAL_Delay(10);
- }
- else if(!strcmp((const char*)UART1_RX_Buffer, "M3"))
- {
- printf("Left......");
- GoLeft();
- HAL_Delay(10);
- }
- else if(!strcmp((const char*)UART1_RX_Buffer, "M4"))
- {
- printf("Right......");
- GoRight();
- HAL_Delay(10);
- }
- else if(!strcmp((const char*)UART1_RX_Buffer, "Stop"))
- {
- printf("Stop......");
- Stop();
- HAL_Delay(10);
- }
- memset(UART1_RX_Buffer, 0, UART1_REC_LEN);
- UART1_RX_STA = 0;
- }
- else
- // 否则认为接收错误,重新开始
- UART1_RX_STA = 0;
- }
- else // 如果没有收到了 0x0d (回车)
- {
- //则先判断收到的这个字符是否是 0x0d (回车)
- if(buf == 0x0d)
- {
- // 是的话则将 bit14 位置为1
- UART1_RX_STA |= 0x4000;
- }
- else
- {
- // 否则将接收到的数据保存在缓存数组里
- UART1_RX_Buffer[UART1_RX_STA & 0X3FFF] = buf;
- UART1_RX_STA++;
- // 如果接收数据大于UART1_REC_LEN(200字节),则重新开始接收
- if(UART1_RX_STA > UART1_REC_LEN - 1)
- UART1_RX_STA = 0;
- }
- }
- }
- // 重新开启中断
- HAL_UART_Receive_IT(&huart1, &buf, 1);
- }
- }
-
- int fputc(int ch, FILE *f)
- {
- unsigned char temp[1]={ch};
- HAL_UART_Transmit(&huart1,temp,1,0xffff);
- return ch;
- }
main.c
- extern uint8_t buf;
-
- int main(void)
- {
- /* USER CODE BEGIN 1 */
-
- /* USER CODE END 1 */
-
- /* MCU Configuration--------------------------------------------------------*/
-
- /* Reset of all peripherals, Initializes the Flash interface and the Systick. */
- HAL_Init();
-
- /* USER CODE BEGIN Init */
-
- /* USER CODE END Init */
-
- /* Configure the system clock */
- SystemClock_Config();
-
- /* USER CODE BEGIN SysInit */
-
- /* USER CODE END SysInit */
-
- /* Initialize all configured peripherals */
- MX_GPIO_Init();
- MX_USART1_UART_Init();
- /* USER CODE BEGIN 2 */
- HAL_UART_Receive_IT(&huart1, &buf, 1);//开启串口接收
- HAL_NVIC_SetPriority(SysTick_IRQn,0,0);//提高滴答定时器优先级
- /* USER CODE END 2 */
-
- /* Infinite loop */
- /* USER CODE BEGIN WHILE */
- while (1)
- {
- /* USER CODE END WHILE */
- Stop();
- /* USER CODE BEGIN 3 */
- }
- /* USER CODE END 3 */
- }
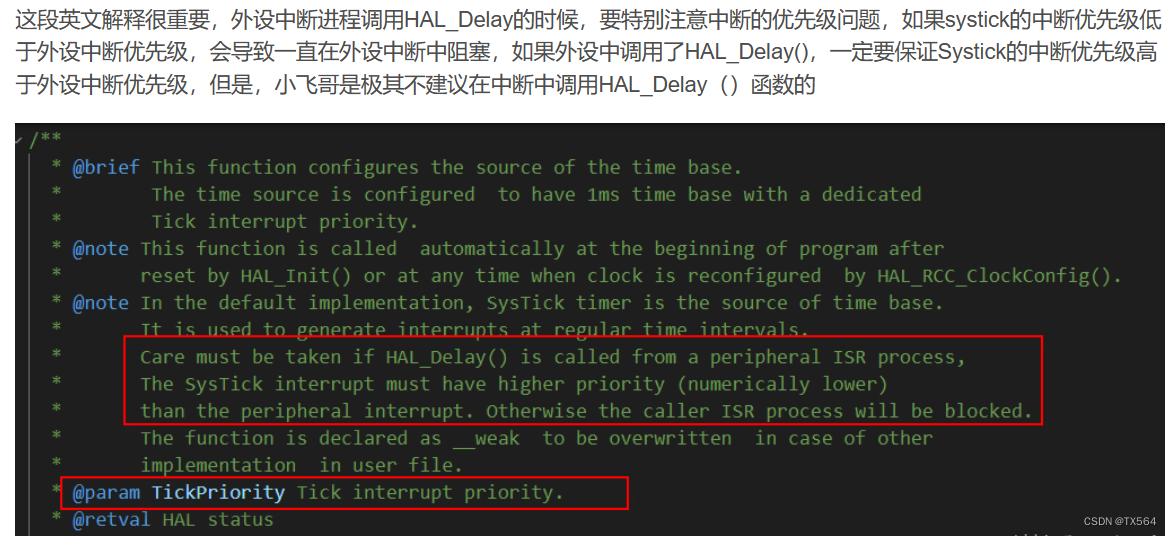
提高滴答定时器优先级,这样的话在串口中断中使用HAL_Delay()不会出现卡死的bug
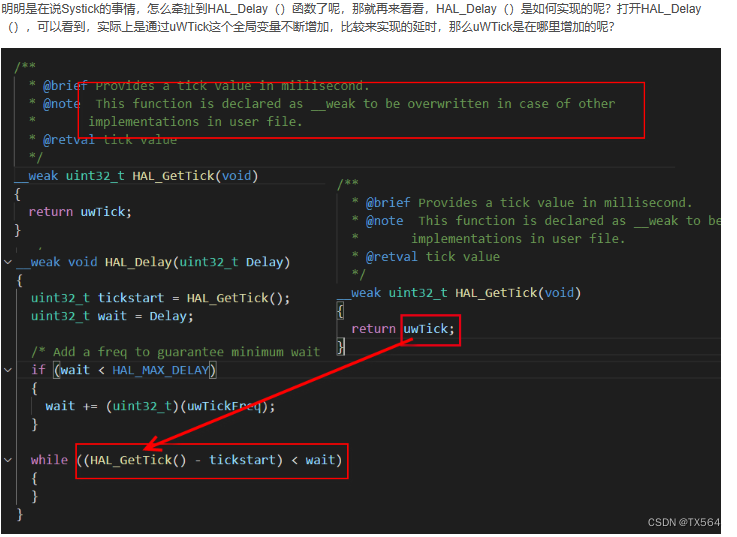
为什么使用的是HAL_Delay()要设置滴答定时器的中断优先级呢?
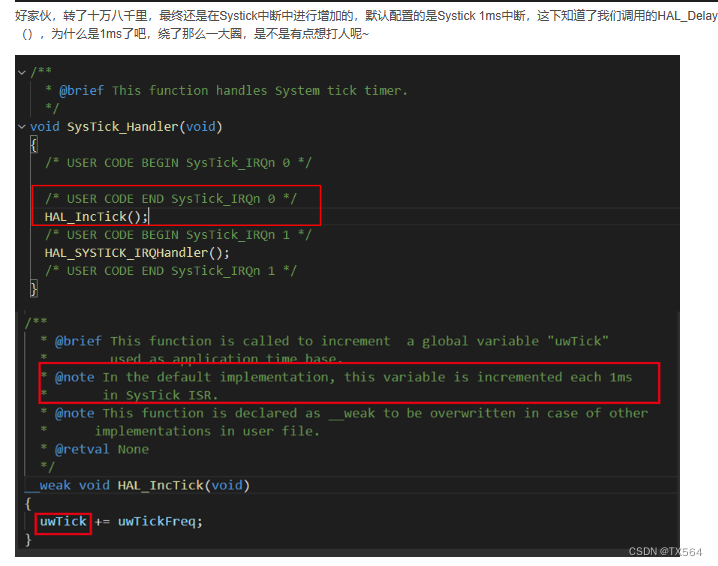
从英文解释中(别说看不懂哈),Systick被配置为系统时基,并且被配置为了1ms,做技术,要有刨根问底的精神,奥利给,继续跟进去看看
关于滴答定时器可以看这篇文章,us级延时怎么实现

- //使用TIM2来做us级延时函数
- void TIM2_Delay_us(uint16_t n_us)
- {
- /* 使能定时器2计数 */
- __HAL_TIM_ENABLE(&htim2);
- __HAL_TIM_SetCounter(&htim2, 0);
- while(__HAL_TIM_GetCounter(&htim2) < ((1 * n_us)-1) );
- /* 关闭定时器2计数 */
- __HAL_TIM_DISABLE(&htim2);
- }
4.小车PWM调速,
通过实验我们又发现了bug,如果是全速驱动的话,小车转弯,比如左转就会左边轮子不动右边动,理论上是这样的,但是实际上会出现小车转弯一卡一卡的bug,于是我想到了用PWM调速,转弯的时候左右轮分开调速,左转就左轮速度低于右轮,右转就右轮速度低于左轮
STM32与51单片机不同,STM32具有硬件PWM调速
根据查数据手册可知,我使用的是TIM2的CH1和CH2,CH1,CH2分别对应左右轮
更改后连线为
B-1A -- PA0B-1B -- PB1A-1A -- PA1A-1B -- PB10
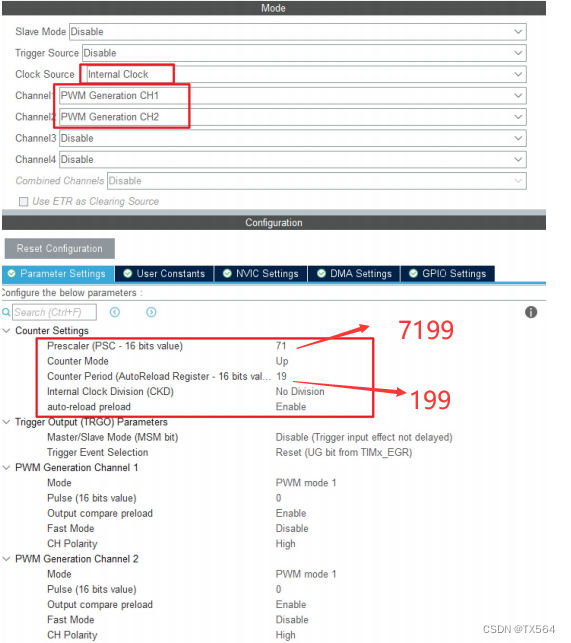
具体PWM可以参考之前写的PWM实现呼吸灯文章
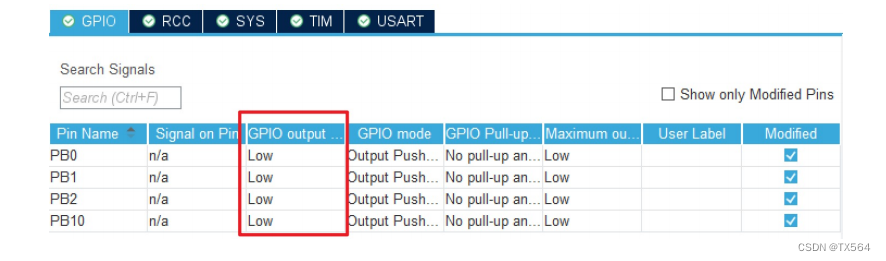
根据前面L9110s模块的运用可知,A-1A,A-1B,B-1A,B-2B是分别为一高一低电平才能驱动
当PWM调速时,PWM使用的TIM2对应端口PA0,PA1会出现占空比,占空比内为高电平,那么其他两个IO口就必须为低电平,才能驱动L9110s,所以PWM调速,必须将对应电机驱动的所有的IO口都拉低
PWM主要用的两个函数 一个是PWM启动函数,一个是PWM比较函数
HAL_TIM_PWM_Start ( & htim2 , TIM_CHANNEL_1 );HAL_TIM_PWM_Start ( & htim2 , TIM_CHANNEL_2 );__HAL_TIM_SetCompare ( & htim2 , TIM_CHANNEL_1 , 8 );//8是PWM_Val的值,小于8都是高电平,大于8是低电平,这个数的值要小于设定的 CCRx
- void main()
- {
- HAL_TIM_PWM_Start(&htim2,TIM_CHANNEL_1);
- HAL_TIM_PWM_Start(&htim2,TIM_CHANNEL_2);
- while(1)
- {
- __HAL_TIM_SetCompare(&htim2, TIM_CHANNEL_1,8);
- __HAL_TIM_SetCompare(&htim2, TIM_CHANNEL_2,15);
- HAL_Delay(1000);
- __HAL_TIM_SetCompare(&htim2, TIM_CHANNEL_1,15);
- __HAL_TIM_SetCompare(&htim2, TIM_CHANNEL_2,8);
- HAL_Delay(1000);
- }
- }
解决过弯一卡一卡的bug就可以将
__HAL_TIM_SetCompare(&htim2, TIM_CHANNEL_1,8);
__HAL_TIM_SetCompare(&htim2, TIM_CHANNEL_2,15);替换motor.c中的GPIO_PIN_WritePin函数
5.小车循迹功能
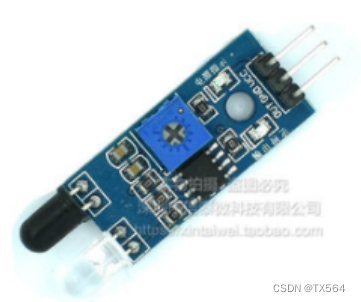
小车循迹主要用到的模块是循迹模块

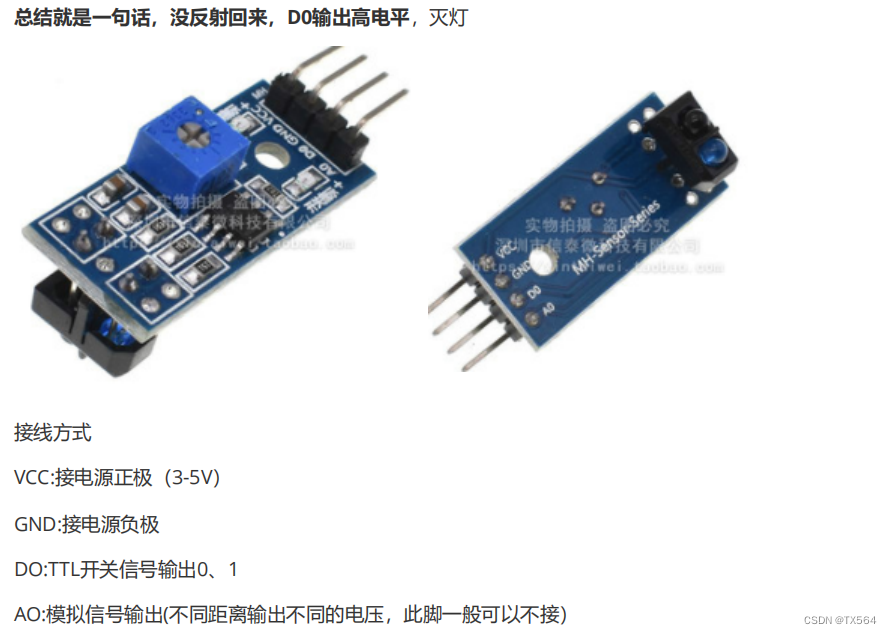
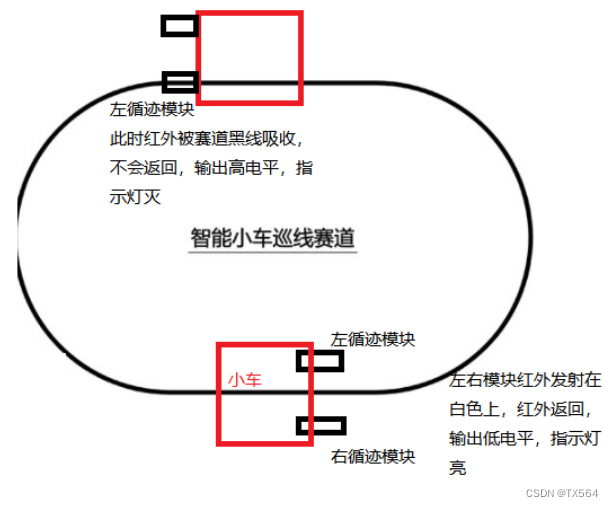
小车循迹主要是通过循迹模块,黑色会续收红外线,当红外线被吸收,就没法返回,于是模块输出高电平,灯灭,如果是白色区域,红外线会返回,灯亮,输出低电平
本次接线是将两个循迹模块的DO接入PB5,PB6
于是循迹的逻辑就是,左右两边各安一个循迹模块,当两个模块都返回红外线输出低电平灯亮的时候,小车向前进,如果左边模块没有返回红外线高电平灯灭,右边模块返回红外线低电平灯亮,那么就说明遇到左转弯道,左转,相反就右转----->哪边高电平往哪边转
- #define LeftWheel_Value HAL_GPIO_ReadPin(GPIOB, GPIO_PIN_3)
- #define RightWheel_Value HAL_GPIO_ReadPin(GPIOB, GPIO_PIN_4)
-
- void xunji(void)
- {
- if(LeftWheel_Value == GPIO_PIN_RESET && RightWheel_Value == GPIO_PIN_RESET)
- {
- __HAL_TIM_SetCompare(&htim2, TIM_CHANNEL_1,19);
- __HAL_TIM_SetCompare(&htim2, TIM_CHANNEL_2,19);
- }
- if(LeftWheel_Value == GPIO_PIN_SET && RightWheel_Value == GPIO_PIN_RESET)
- {
- __HAL_TIM_SetCompare(&htim2, TIM_CHANNEL_1,15);
- __HAL_TIM_SetCompare(&htim2, TIM_CHANNEL_2,8);
- }
- if(LeftWheel_Value == GPIO_PIN_RESET && RightWheel_Value == GPIO_PIN_SET)
- {
- __HAL_TIM_SetCompare(&htim2, TIM_CHANNEL_1,8);
- __HAL_TIM_SetCompare(&htim2, TIM_CHANNEL_2,15);
- }
- if(LeftWheel_Value == GPIO_PIN_SET && RightWheel_Value == GPIO_PIN_SET)
- {
- __HAL_TIM_SetCompare(&htim2, TIM_CHANNEL_1,0);
- __HAL_TIM_SetCompare(&htim2, TIM_CHANNEL_2,0);
- }
- }
-
- // main函数里
- while (1)
- {
- xunji();
- }
6.跟随功能
跟随功能的实现主要是跟随模块
哪边低电平,往哪边转(因为跟随模块是有物体挡着才会返回红外线,返回为低电平)
- #define LeftWheel_Value HAL_GPIO_ReadPin(GPIOB, GPIO_PIN_5)
- #define RightWheel_Value HAL_GPIO_ReadPin(GPIOB, GPIO_PIN_6)
-
- void gensui(void)
- {
- if(LeftWheel_Value == GPIO_PIN_RESET && RightWheel_Value == GPIO_PIN_RESET)
- goForward();
- if(LeftWheel_Value == GPIO_PIN_SET && RightWheel_Value == GPIO_PIN_RESET)
- goRight();
- if(LeftWheel_Value == GPIO_PIN_RESET && RightWheel_Value == GPIO_PIN_SET)
- goLeft();
- if(LeftWheel_Value == GPIO_PIN_SET && RightWheel_Value == GPIO_PIN_SET)
- stop();
-
- }
-
-
- // main函数里
- while (1)
- {
- gensui();
- }
7.避障功能
避障功能主要是依靠SG90舵机和超声波实现的,当超声波测距小于一个值,比如35cm,SG90舵机开始转动角度,实现超声波摇头,摇头:显示中间位,然后左转,然后右转
超声波测距流程
1.Trig至少10us的高电平
2.发送波,定时器启动,开始计时
启动定时器的函数:HAL_TIM_Base_Start(&htim2);//启动定时器2
开始计算时间函数:__HAL_TIM_SetCounter(&htim2,0);//计算时间
2.1怎么判断是否发送波了呢?:当波发送出去echo会由低电平变为高电平 while(HAL_GPIO_ReadPin(GPIOB,GPIO_PIN_7) == GPIO_PIN_RESET);//卡低电平
3.接收到波,定时器关闭停止计时
停止定时器的函数:HAL_TIM_Base_Stop(&htim2);//停止定时器
3.1怎么判断接收到波了呢?:当接收到波echo会由高电平变为低电平
while(HAL_GPIO_ReadPin(GPIOB,GPIO_PIN_7) == GPIO_PIN_SET);//卡高电平
4.读取定时器计时时间
获取时间的函数:cnt = __HAL_TIM_GetCounter(&htim2);
5.distance = (340m/s * 时间)/2(注意换算单位 100cm/1000000us)
CSB.c
-
- //使用TIM2来做us级延时函数
- void TIM2_Delay_us(uint16_t n_us)
- {
- /* 使能定时器2计数 */
- __HAL_TIM_ENABLE(&htim2);
- __HAL_TIM_SetCounter(&htim2, 0);
- while(__HAL_TIM_GetCounter(&htim2) < ((1 * n_us)-1) );
- /* 关闭定时器2计数 */
- __HAL_TIM_DISABLE(&htim2);
- }
- double get_distance(void)
- {
- int cnt=0;
- //1. Trig ,给Trig端口至少10us的高电平
- HAL_GPIO_WritePin(GPIOB, GPIO_PIN_7, GPIO_PIN_SET);//拉高
- TIM2_Delay_us(20);
- HAL_GPIO_WritePin(GPIOB, GPIO_PIN_7, GPIO_PIN_RESET);//拉低
- //2. echo由低电平跳转到高电平,表示开始发送波
- //波发出去的那一下,开始启动定时器
- while(HAL_GPIO_ReadPin(GPIOB, GPIO_PIN_8) == GPIO_PIN_RESET);//等待输入电平拉高
- HAL_TIM_Base_Start(&htim2);//启动定时器2
- __HAL_TIM_SetCounter(&htim2,0);//计算时间
- //3. 由高电平跳转回低电平,表示波回来了
- while(HAL_GPIO_ReadPin(GPIOB, GPIO_PIN_8) == GPIO_PIN_SET);//等待输入电平变低
- //波回来的那一下,我们开始停止定时器
- HAL_TIM_Base_Stop(&htim2);//停止定时器
- //4. 计算出中间经过多少时间
- cnt = __HAL_TIM_GetCounter(&htim2);//获取时间
- //5. 距离 = 速度 (340m/s)* 时间/2(计数1次表示1us)
- return (cnt*340/2*0.000001*100); //单位:cm
- }
SG90.c
- void initSG90(void)
- {
- HAL_TIM_PWM_Start(&htim4,TIM_CHANNEL_4); //启动定时器4,启动PWM
- __HAL_TIM_SetCompare(&htim4, TIM_CHANNEL_4, 9); //将舵机置为90度
- }
- void sgMiddle(void)
- {
- __HAL_TIM_SetCompare(&htim4, TIM_CHANNEL_4, 9); //将舵机置为75度
- }
- void sgRight(void)
- {
- __HAL_TIM_SetCompare(&htim4, TIM_CHANNEL_4, 5); //将舵机置为0度
- }
- void sgLeft(void)
- {
- __HAL_TIM_SetCompare(&htim4, TIM_CHANNEL_4, 14); //将舵机置为135度
- }
main.c
- #define MIDDLE 0
- #define RIGHT 2
- #define LEFT 1
-
- int main(void)
- {
- /* USER CODE BEGIN 1 */
- char dir;
- double disMiddle;
- double disLeft;
- double disRight;
- /* USER CODE END 1 */
-
- /* MCU Configuration--------------------------------------------------------*/
-
- /* Reset of all peripherals, Initializes the Flash interface and the Systick. */
- HAL_Init();
-
- /* USER CODE BEGIN Init */
-
- /* USER CODE END Init */
-
- /* Configure the system clock */
- SystemClock_Config();
-
- /* USER CODE BEGIN SysInit */
-
- /* USER CODE END SysInit */
-
- /* Initialize all configured peripherals */
- MX_GPIO_Init();
- MX_TIM4_Init();
- MX_TIM2_Init();
- /* USER CODE BEGIN 2 */
- initSG90();//一开始先让超声波在中间位
- HAL_Delay(1000);
- /* USER CODE END 2 */
- void csb(void)
- {
- /*为了不歪头卡死,每次必须测完回到中间位*/
- if(dir != MIDDLE){
- sgMiddle();
- dir = MIDDLE;
- HAL_Delay(300);
- }
- /*为了不歪头卡死,每次必须测完回到中间位*/
- disMiddle = get_distance();
- if(disMiddle > 35){
- //前进
- GoForward();
- }else if(disMiddle < 10){
- GoBack();
- }else
- {
- //停止
- Stop();
- //测左边距离
- sgLeft();
- HAL_Delay(300);
-
- disLeft = get_distance();
- sgMiddle();
- HAL_Delay(300);
-
- sgRight();
- dir = RIGHT;
- HAL_Delay(300);
- disRight = get_distance();
- if(disLeft < disRight){
- GoRight();
- HAL_Delay(150);
- Stop();
- }
- if(disRight < disLeft){
- GoLeft();
- HAL_Delay(150);
- Stop();
- }
- }
- }
- /* Infinite loop */
- /* USER CODE BEGIN WHILE */
- while (1)
- {
- /* USER CODE END WHILE */
- csb();
- HAL_Delay(50);//必须要延时,不然执行代码速度太快就会一直前进或者后退,不会摇头
- /* USER CODE BEGIN 3 */
- }
- /* USER CODE END 3 */
- }
将所有模块的函数封装好后,可以通过按键或者其他方式切换循迹,跟随,避障模式
- #define Key_On 0
- #define Key_Off 1
-
- unsigned char Scanf_Key(GPIO_TypeDef *GPIOx, uint16_t GPIO_Pin)
- {
- unsigned int status;
- status = HAL_GPIO_ReadPin(GPIO_TypeDef *GPIOx, uint16_t GPIO_Pin);
- if(status == GPIO_PIN_RESET)
- return 0;
- else if(status == GPIO_PIN_SET)
- return 1;
- }
-
- void main()
- {
- while(1)
- {
- if(Scanf_Key(GPIOA,GPIO_PIN_0) == Key_On)
- {
- csb();
- }
-
- if(Scanf_Key(GPIOA,GPIO_PIN_1) == Key_On)
- {
- gensui();
- }
-
- if(Scanf_Key(GPIOA,GPIO_PIN_3) == Key_On)
- {
- xunji();
- }
- }
- }
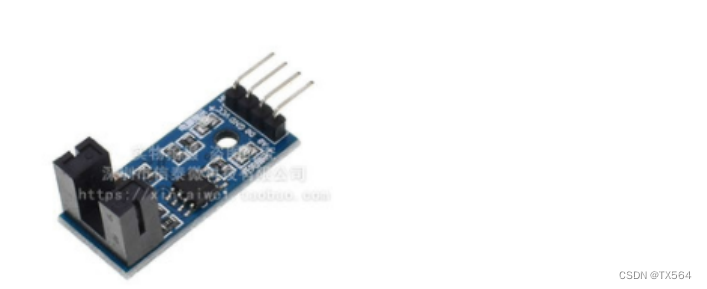
测速功能
测速功能主要是用测速模块配合码盘实现
配置cubeMX
使用定时器计时1s,获取码盘每1s转了多少圈,通过计算可获得速度
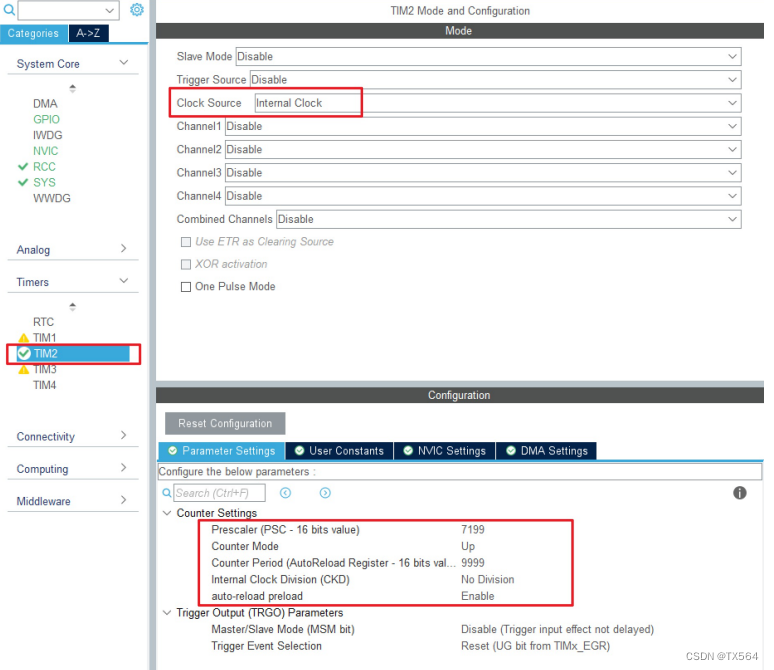 定时器公式:
T = {(PSC+1)*(Counter Period + 1)}/72000000HZ
轮子走一圈,经过一个周长, C = 2x3.14x 半径 = 3.14 x 直径( 6.5cm )对应的码盘也转了一圈,码盘有 20 个格子,每经过一个格子,会遮挡(高电平)和不遮挡(低电平),那么一个脉冲就是走了 3.14 * 6.5 cm /20 = 1.0205CM定时器可以设计成一秒,统计脉冲数,一个脉冲就是 1cm假设一秒有 80 脉冲,那么就是 80cm/s
开启定时器中断和外部中断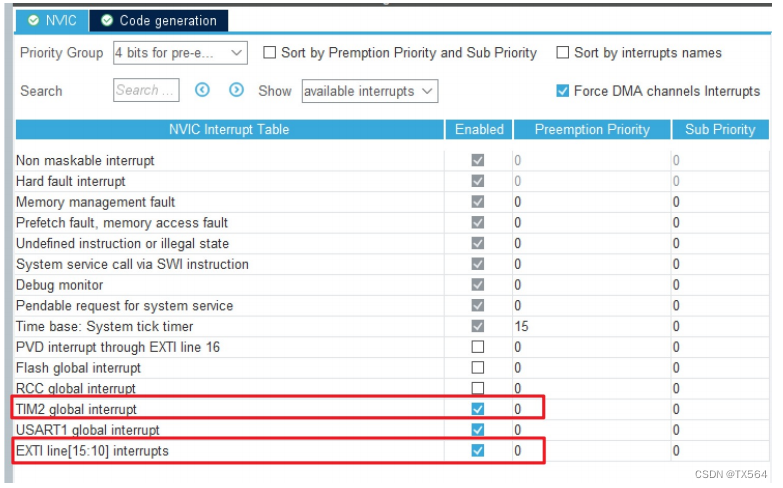
代码实现
先找到定时器中断服务函数,外部中断服务函数,再重写回调函数
-
- void HAL_GPIO_EXIT_Callback(uint_t GPIO_pin)
- {
- if(GPIO_pin == GPIO_PIN_14)//判断是不是PB14产生的中断
- if(HAL_GPIO_ReadPin(GPIOB,GPIO_PIN_14) == GPIO_PIN_RESET)//判断PB14是否为低电平,从而判断是否产生下降沿
- SpeedCnt++;// dis = SpeedCnt * time 定时器1s产生中断所以dis = SpeedCnt
- }
-
- void HAL_TIM_PeriodElapsedCallback(TIM_HandleTypeDef *htim)
- {
- printf("speed:%d\r\n",SpeedCnt);//重定向printf,打印到串口
- SpeedCnt = 0;
- }
-
-
-
-
-
-
- int main(void)
- {
-
- HAL_Init();
-
-
- HAL_SYSTICK_Config(HAL_RCC_GetHCLKFreq() / 1000); //1ms
-
-
- SystemClock_Config();
-
-
- MX_GPIO_Init();
- MX_USART1_UART_Init();
- MX_TIM2_Init();
-
- HAL_UART_Receive_IT(&huart1, &buf, 1);//开启串口接收中断
- HAL_TIM_Base_Start_IT(&htim2);//开启定时器中断
-
- while (1)
- {
- }
- }
通过oled显示实时的车速
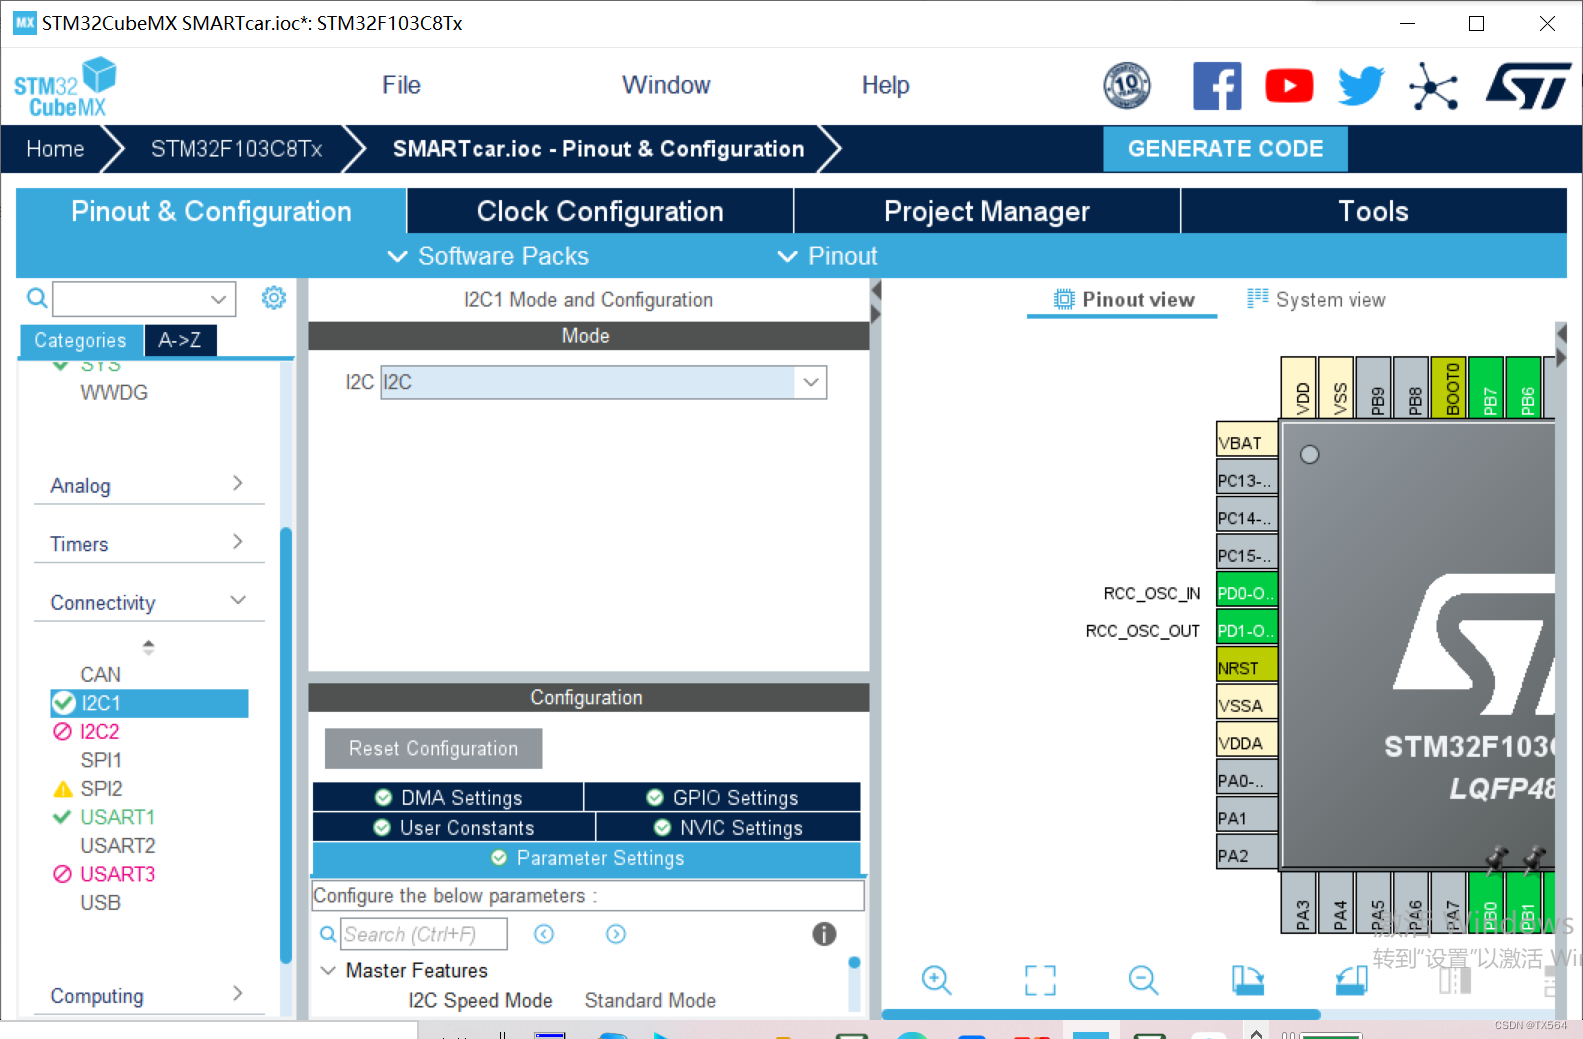
oled.c
- #include "oled.h"
- #include "i2c.h"
- #include "oledfont.h"
-
- void Oled_Write_Cmd(uint8_t dataCmd)
- {
- HAL_I2C_Mem_Write(&hi2c1, 0x78, 0x00, I2C_MEMADD_SIZE_8BIT,
- &dataCmd, 1, 0xff);
- }
- void Oled_Write_Data(uint8_t dataData)
- {
- HAL_I2C_Mem_Write(&hi2c1, 0x78, 0x40, I2C_MEMADD_SIZE_8BIT,
- &dataData, 1, 0xff);
- }
- void Oled_Init(void)
- {
- Oled_Write_Cmd(0xAE);//--display off
- Oled_Write_Cmd(0x00);//---set low column address
- Oled_Write_Cmd(0x10);//---set high column address
- Oled_Write_Cmd(0x40);//--set start line address
- Oled_Write_Cmd(0xB0);//--set page address
- Oled_Write_Cmd(0x81); // contract control
- Oled_Write_Cmd(0xFF);//--128
- Oled_Write_Cmd(0xA1);//set segment remap
- Oled_Write_Cmd(0xA6);//--normal / reverse
- Oled_Write_Cmd(0xA8);//--set multiplex ratio(1 to 64)
- Oled_Write_Cmd(0x3F);//--1/32 duty
- Oled_Write_Cmd(0xC8);//Com scan direction
- Oled_Write_Cmd(0xD3);//-set display offset
- Oled_Write_Cmd(0x00);//
- Oled_Write_Cmd(0xD5);//set osc division
- Oled_Write_Cmd(0x80);//
- Oled_Write_Cmd(0xD8);//set area color mode off
- Oled_Write_Cmd(0x05);//
- Oled_Write_Cmd(0xD9);//Set Pre-Charge Period
- Oled_Write_Cmd(0xF1);//
- Oled_Write_Cmd(0xDA);//set com pin configuartion
- Oled_Write_Cmd(0x12);//
- Oled_Write_Cmd(0xDB);//set Vcomh
- Oled_Write_Cmd(0x30);//
- Oled_Write_Cmd(0x8D);//set charge pump enable
- Oled_Write_Cmd(0x14);//
- Oled_Write_Cmd(0xAF);//--turn on oled panel
- }
- void Oled_Screen_Clear(void)
- {
- int i,n;
- Oled_Write_Cmd (0x20); //set memory addressing mode
- Oled_Write_Cmd (0x02); //page addressing mode
- for(i=0;i<8;i++){
- Oled_Write_Cmd(0xb0+i); //PAGE0 - PAGE7
- Oled_Write_Cmd(0x00); //每个page从第0列开始
- Oled_Write_Cmd(0x10); //每个page从第0列开始
- for(n=0;n<128;n++)Oled_Write_Data(0x00);//每个page的127列全写0
- }
- }
-
- /*移植源代码*/
-
- /显示单个字符/
- void Oled_Show_Char(char row,char col,char oledChar){ //row*2-2
- unsigned int i;
- Oled_Write_Cmd(0xb0+(row*2-2)); //page 0
- Oled_Write_Cmd(0x00+(col&0x0f)); //low
- Oled_Write_Cmd(0x10+(col>>4)); //high
- for(i=((oledChar-32)*16);i<((oledChar-32)*16+8);i++){
- Oled_Write_Data(F8X16[i]); //写数据oledTable1
- }
-
- Oled_Write_Cmd(0xb0+(row*2-1)); //page 1
- Oled_Write_Cmd(0x00+(col&0x0f)); //low
- Oled_Write_Cmd(0x10+(col>>4)); //high
- for(i=((oledChar-32)*16+8);i<((oledChar-32)*16+8+8);i++){
- Oled_Write_Data(F8X16[i]); //写数据oledTable1
- }
- }
-
- /显示字符串/
- void Oled_Show_Str(char row,char col,char *str){
- while(*str!=0){
- Oled_Show_Char(row,col,*str);
- str++;
- col += 8;
- }
- }
oledfont.h
- const unsigned char F8X16[]=
- {
- 0x00,0x00,0x00,0x00,0x00,0x00,0x00,0x00,0x00,0x00,0x00,0x00,0x00,0x00,0x00,0x00,// 0
- 0x00,0x00,0x00,0xF8,0x00,0x00,0x00,0x00,0x00,0x00,0x00,0x33,0x30,0x00,0x00,0x00,//! 1
- 0x00,0x10,0x0C,0x06,0x10,0x0C,0x06,0x00,0x00,0x00,0x00,0x00,0x00,0x00,0x00,0x00,//" 2
- 0x40,0xC0,0x78,0x40,0xC0,0x78,0x40,0x00,0x04,0x3F,0x04,0x04,0x3F,0x04,0x04,0x00,//# 3
- 0x00,0x70,0x88,0xFC,0x08,0x30,0x00,0x00,0x00,0x18,0x20,0xFF,0x21,0x1E,0x00,0x00,//$ 4
- 0xF0,0x08,0xF0,0x00,0xE0,0x18,0x00,0x00,0x00,0x21,0x1C,0x03,0x1E,0x21,0x1E,0x00,//% 5
- 0x00,0xF0,0x08,0x88,0x70,0x00,0x00,0x00,0x1E,0x21,0x23,0x24,0x19,0x27,0x21,0x10,//& 6
- 0x10,0x16,0x0E,0x00,0x00,0x00,0x00,0x00,0x00,0x00,0x00,0x00,0x00,0x00,0x00,0x00,//' 7
- 0x00,0x00,0x00,0xE0,0x18,0x04,0x02,0x00,0x00,0x00,0x00,0x07,0x18,0x20,0x40,0x00,//( 8
- 0x00,0x02,0x04,0x18,0xE0,0x00,0x00,0x00,0x00,0x40,0x20,0x18,0x07,0x00,0x00,0x00,//) 9
- 0x40,0x40,0x80,0xF0,0x80,0x40,0x40,0x00,0x02,0x02,0x01,0x0F,0x01,0x02,0x02,0x00,//* 10
- 0x00,0x00,0x00,0xF0,0x00,0x00,0x00,0x00,0x01,0x01,0x01,0x1F,0x01,0x01,0x01,0x00,//+ 11
- 0x00,0x00,0x00,0x00,0x00,0x00,0x00,0x00,0x80,0xB0,0x70,0x00,0x00,0x00,0x00,0x00,//, 12
- 0x00,0x00,0x00,0x00,0x00,0x00,0x00,0x00,0x00,0x01,0x01,0x01,0x01,0x01,0x01,0x01,//- 13
- 0x00,0x00,0x00,0x00,0x00,0x00,0x00,0x00,0x00,0x30,0x30,0x00,0x00,0x00,0x00,0x00,//. 14
- 0x00,0x00,0x00,0x00,0x80,0x60,0x18,0x04,0x00,0x60,0x18,0x06,0x01,0x00,0x00,0x00,/// 15
- 0x00,0xE0,0x10,0x08,0x08,0x10,0xE0,0x00,0x00,0x0F,0x10,0x20,0x20,0x10,0x0F,0x00,//0 16
- 0x00,0x10,0x10,0xF8,0x00,0x00,0x00,0x00,0x00,0x20,0x20,0x3F,0x20,0x20,0x00,0x00,//1 17
- 0x00,0x70,0x08,0x08,0x08,0x88,0x70,0x00,0x00,0x30,0x28,0x24,0x22,0x21,0x30,0x00,//2 18
- 0x00,0x30,0x08,0x88,0x88,0x48,0x30,0x00,0x00,0x18,0x20,0x20,0x20,0x11,0x0E,0x00,//3 19
- 0x00,0x00,0xC0,0x20,0x10,0xF8,0x00,0x00,0x00,0x07,0x04,0x24,0x24,0x3F,0x24,0x00,//4 20
- 0x00,0xF8,0x08,0x88,0x88,0x08,0x08,0x00,0x00,0x19,0x21,0x20,0x20,0x11,0x0E,0x00,//5 21
- 0x00,0xE0,0x10,0x88,0x88,0x18,0x00,0x00,0x00,0x0F,0x11,0x20,0x20,0x11,0x0E,0x00,//6 22
- 0x00,0x38,0x08,0x08,0xC8,0x38,0x08,0x00,0x00,0x00,0x00,0x3F,0x00,0x00,0x00,0x00,//7 23
- 0x00,0x70,0x88,0x08,0x08,0x88,0x70,0x00,0x00,0x1C,0x22,0x21,0x21,0x22,0x1C,0x00,//8 24
- 0x00,0xE0,0x10,0x08,0x08,0x10,0xE0,0x00,0x00,0x00,0x31,0x22,0x22,0x11,0x0F,0x00,//9 25
- 0x00,0x00,0x00,0xC0,0xC0,0x00,0x00,0x00,0x00,0x00,0x00,0x30,0x30,0x00,0x00,0x00,//: 26
- 0x00,0x00,0x00,0x80,0x00,0x00,0x00,0x00,0x00,0x00,0x80,0x60,0x00,0x00,0x00,0x00,//; 27
- 0x00,0x00,0x80,0x40,0x20,0x10,0x08,0x00,0x00,0x01,0x02,0x04,0x08,0x10,0x20,0x00,//< 28
- 0x40,0x40,0x40,0x40,0x40,0x40,0x40,0x00,0x04,0x04,0x04,0x04,0x04,0x04,0x04,0x00,//= 29
- 0x00,0x08,0x10,0x20,0x40,0x80,0x00,0x00,0x00,0x20,0x10,0x08,0x04,0x02,0x01,0x00,//> 30
- 0x00,0x70,0x48,0x08,0x08,0x08,0xF0,0x00,0x00,0x00,0x00,0x30,0x36,0x01,0x00,0x00,//? 31
- 0xC0,0x30,0xC8,0x28,0xE8,0x10,0xE0,0x00,0x07,0x18,0x27,0x24,0x23,0x14,0x0B,0x00,//@ 32
- 0x00,0x00,0xC0,0x38,0xE0,0x00,0x00,0x00,0x20,0x3C,0x23,0x02,0x02,0x27,0x38,0x20,//A 33
- 0x08,0xF8,0x88,0x88,0x88,0x70,0x00,0x00,0x20,0x3F,0x20,0x20,0x20,0x11,0x0E,0x00,//B 34
- 0xC0,0x30,0x08,0x08,0x08,0x08,0x38,0x00,0x07,0x18,0x20,0x20,0x20,0x10,0x08,0x00,//C 35
- 0x08,0xF8,0x08,0x08,0x08,0x10,0xE0,0x00,0x20,0x3F,0x20,0x20,0x20,0x10,0x0F,0x00,//D 36
- 0x08,0xF8,0x88,0x88,0xE8,0x08,0x10,0x00,0x20,0x3F,0x20,0x20,0x23,0x20,0x18,0x00,//E 37
- 0x08,0xF8,0x88,0x88,0xE8,0x08,0x10,0x00,0x20,0x3F,0x20,0x00,0x03,0x00,0x00,0x00,//F 38
- 0xC0,0x30,0x08,0x08,0x08,0x38,0x00,0x00,0x07,0x18,0x20,0x20,0x22,0x1E,0x02,0x00,//G 39
- 0x08,0xF8,0x08,0x00,0x00,0x08,0xF8,0x08,0x20,0x3F,0x21,0x01,0x01,0x21,0x3F,0x20,//H 40
- 0x00,0x08,0x08,0xF8,0x08,0x08,0x00,0x00,0x00,0x20,0x20,0x3F,0x20,0x20,0x00,0x00,//I 41
- 0x00,0x00,0x08,0x08,0xF8,0x08,0x08,0x00,0xC0,0x80,0x80,0x80,0x7F,0x00,0x00,0x00,//J 42
- 0x08,0xF8,0x88,0xC0,0x28,0x18,0x08,0x00,0x20,0x3F,0x20,0x01,0x26,0x38,0x20,0x00,//K 43
- 0x08,0xF8,0x08,0x00,0x00,0x00,0x00,0x00,0x20,0x3F,0x20,0x20,0x20,0x20,0x30,0x00,//L 44
- 0x08,0xF8,0xF8,0x00,0xF8,0xF8,0x08,0x00,0x20,0x3F,0x00,0x3F,0x00,0x3F,0x20,0x00,//M 45
- 0x08,0xF8,0x30,0xC0,0x00,0x08,0xF8,0x08,0x20,0x3F,0x20,0x00,0x07,0x18,0x3F,0x00,//N 46
- 0xE0,0x10,0x08,0x08,0x08,0x10,0xE0,0x00,0x0F,0x10,0x20,0x20,0x20,0x10,0x0F,0x00,//O 47
- 0x08,0xF8,0x08,0x08,0x08,0x08,0xF0,0x00,0x20,0x3F,0x21,0x01,0x01,0x01,0x00,0x00,//P 48
- 0xE0,0x10,0x08,0x08,0x08,0x10,0xE0,0x00,0x0F,0x18,0x24,0x24,0x38,0x50,0x4F,0x00,//Q 49
- 0x08,0xF8,0x88,0x88,0x88,0x88,0x70,0x00,0x20,0x3F,0x20,0x00,0x03,0x0C,0x30,0x20,//R 50
- 0x00,0x70,0x88,0x08,0x08,0x08,0x38,0x00,0x00,0x38,0x20,0x21,0x21,0x22,0x1C,0x00,//S 51
- 0x18,0x08,0x08,0xF8,0x08,0x08,0x18,0x00,0x00,0x00,0x20,0x3F,0x20,0x00,0x00,0x00,//T 52
- 0x08,0xF8,0x08,0x00,0x00,0x08,0xF8,0x08,0x00,0x1F,0x20,0x20,0x20,0x20,0x1F,0x00,//U 53
- 0x08,0x78,0x88,0x00,0x00,0xC8,0x38,0x08,0x00,0x00,0x07,0x38,0x0E,0x01,0x00,0x00,//V 54
- 0xF8,0x08,0x00,0xF8,0x00,0x08,0xF8,0x00,0x03,0x3C,0x07,0x00,0x07,0x3C,0x03,0x00,//W 55
- 0x08,0x18,0x68,0x80,0x80,0x68,0x18,0x08,0x20,0x30,0x2C,0x03,0x03,0x2C,0x30,0x20,//X 56
- 0x08,0x38,0xC8,0x00,0xC8,0x38,0x08,0x00,0x00,0x00,0x20,0x3F,0x20,0x00,0x00,0x00,//Y 57
- 0x10,0x08,0x08,0x08,0xC8,0x38,0x08,0x00,0x20,0x38,0x26,0x21,0x20,0x20,0x18,0x00,//Z 58
- 0x00,0x00,0x00,0xFE,0x02,0x02,0x02,0x00,0x00,0x00,0x00,0x7F,0x40,0x40,0x40,0x00,//[ 59
- 0x00,0x0C,0x30,0xC0,0x00,0x00,0x00,0x00,0x00,0x00,0x00,0x01,0x06,0x38,0xC0,0x00,//\ 60
- 0x00,0x02,0x02,0x02,0xFE,0x00,0x00,0x00,0x00,0x40,0x40,0x40,0x7F,0x00,0x00,0x00,//] 61
- 0x00,0x00,0x04,0x02,0x02,0x02,0x04,0x00,0x00,0x00,0x00,0x00,0x00,0x00,0x00,0x00,//^ 62
- 0x00,0x00,0x00,0x00,0x00,0x00,0x00,0x00,0x80,0x80,0x80,0x80,0x80,0x80,0x80,0x80,//_ 63
- 0x00,0x02,0x02,0x04,0x00,0x00,0x00,0x00,0x00,0x00,0x00,0x00,0x00,0x00,0x00,0x00,//` 64
- 0x00,0x00,0x80,0x80,0x80,0x80,0x00,0x00,0x00,0x19,0x24,0x22,0x22,0x22,0x3F,0x20,//a 65
- 0x08,0xF8,0x00,0x80,0x80,0x00,0x00,0x00,0x00,0x3F,0x11,0x20,0x20,0x11,0x0E,0x00,//b 66
- 0x00,0x00,0x00,0x80,0x80,0x80,0x00,0x00,0x00,0x0E,0x11,0x20,0x20,0x20,0x11,0x00,//c 67
- 0x00,0x00,0x00,0x80,0x80,0x88,0xF8,0x00,0x00,0x0E,0x11,0x20,0x20,0x10,0x3F,0x20,//d 68
- 0x00,0x00,0x80,0x80,0x80,0x80,0x00,0x00,0x00,0x1F,0x22,0x22,0x22,0x22,0x13,0x00,//e 69
- 0x00,0x80,0x80,0xF0,0x88,0x88,0x88,0x18,0x00,0x20,0x20,0x3F,0x20,0x20,0x00,0x00,//f 70
- 0x00,0x00,0x80,0x80,0x80,0x80,0x80,0x00,0x00,0x6B,0x94,0x94,0x94,0x93,0x60,0x00,//g 71
- 0x08,0xF8,0x00,0x80,0x80,0x80,0x00,0x00,0x20,0x3F,0x21,0x00,0x00,0x20,0x3F,0x20,//h 72
- 0x00,0x80,0x98,0x98,0x00,0x00,0x00,0x00,0x00,0x20,0x20,0x3F,0x20,0x20,0x00,0x00,//i 73
- 0x00,0x00,0x00,0x80,0x98,0x98,0x00,0x00,0x00,0xC0,0x80,0x80,0x80,0x7F,0x00,0x00,//j 74
- 0x08,0xF8,0x00,0x00,0x80,0x80,0x80,0x00,0x20,0x3F,0x24,0x02,0x2D,0x30,0x20,0x00,//k 75
- 0x00,0x08,0x08,0xF8,0x00,0x00,0x00,0x00,0x00,0x20,0x20,0x3F,0x20,0x20,0x00,0x00,//l 76
- 0x80,0x80,0x80,0x80,0x80,0x80,0x80,0x00,0x20,0x3F,0x20,0x00,0x3F,0x20,0x00,0x3F,//m 77
- 0x80,0x80,0x00,0x80,0x80,0x80,0x00,0x00,0x20,0x3F,0x21,0x00,0x00,0x20,0x3F,0x20,//n 78
- 0x00,0x00,0x80,0x80,0x80,0x80,0x00,0x00,0x00,0x1F,0x20,0x20,0x20,0x20,0x1F,0x00,//o 79
- 0x80,0x80,0x00,0x80,0x80,0x00,0x00,0x00,0x80,0xFF,0xA1,0x20,0x20,0x11,0x0E,0x00,//p 80
- 0x00,0x00,0x00,0x80,0x80,0x80,0x80,0x00,0x00,0x0E,0x11,0x20,0x20,0xA0,0xFF,0x80,//q 81
- 0x80,0x80,0x80,0x00,0x80,0x80,0x80,0x00,0x20,0x20,0x3F,0x21,0x20,0x00,0x01,0x00,//r 82
- 0x00,0x00,0x80,0x80,0x80,0x80,0x80,0x00,0x00,0x33,0x24,0x24,0x24,0x24,0x19,0x00,//s 83
- 0x00,0x80,0x80,0xE0,0x80,0x80,0x00,0x00,0x00,0x00,0x00,0x1F,0x20,0x20,0x00,0x00,//t 84
- 0x80,0x80,0x00,0x00,0x00,0x80,0x80,0x00,0x00,0x1F,0x20,0x20,0x20,0x10,0x3F,0x20,//u 85
- 0x80,0x80,0x80,0x00,0x00,0x80,0x80,0x80,0x00,0x01,0x0E,0x30,0x08,0x06,0x01,0x00,//v 86
- 0x80,0x80,0x00,0x80,0x00,0x80,0x80,0x80,0x0F,0x30,0x0C,0x03,0x0C,0x30,0x0F,0x00,//w 87
- 0x00,0x80,0x80,0x00,0x80,0x80,0x80,0x00,0x00,0x20,0x31,0x2E,0x0E,0x31,0x20,0x00,//x 88
- 0x80,0x80,0x80,0x00,0x00,0x80,0x80,0x80,0x80,0x81,0x8E,0x70,0x18,0x06,0x01,0x00,//y 89
- 0x00,0x80,0x80,0x80,0x80,0x80,0x80,0x00,0x00,0x21,0x30,0x2C,0x22,0x21,0x30,0x00,//z 90
- 0x00,0x00,0x00,0x00,0x80,0x7C,0x02,0x02,0x00,0x00,0x00,0x00,0x00,0x3F,0x40,0x40,//{ 91
- 0x00,0x00,0x00,0x00,0xFF,0x00,0x00,0x00,0x00,0x00,0x00,0x00,0xFF,0x00,0x00,0x00,//| 92
- 0x00,0x02,0x02,0x7C,0x80,0x00,0x00,0x00,0x00,0x40,0x40,0x3F,0x00,0x00,0x00,0x00,//} 93
- 0x00,0x06,0x01,0x01,0x02,0x02,0x04,0x04,0x00,0x00,0x00,0x00,0x00,0x00,0x00,0x00,//~ 94
- };
- #include "oled.h"
- #include "main.h"
- #include "i2c.h"
- #include "tim.h"
- #include "gpio.h"
-
-
- char speedMES[24];
-
- void HAL_GPIO_EXIT_Callback(uint_t GPIO_pin)
- {
- if(GPIO_pin == GPIO_PIN_14)//判断是不是PB14产生的中断
- if(HAL_GPIO_ReadPin(GPIOB,GPIO_PIN_14) == GPIO_PIN_RESET)//判断PB14是否为低电平,从而判断是否产生下降沿
- SpeedCnt++;// dis = SpeedCnt * time 定时器1s产生中断所以dis = SpeedCnt
- }
-
- void HAL_TIM_PeriodElapsedCallback(TIM_HandleTypeDef *htim)
- {
- sprintf(speedMES,"speed:%dcm/s",SpeedCnt);//将数据以speed:xx的形式传给speedMES数组
- Oled_Show_Str(2,2,speedMES);
- printf("speed:%d\r\n",SpeedCnt);//重定向printf,打印到串口
- SpeedCnt = 0;
- }
-
-
-
-
-
-
- int main(void)
- {
-
- HAL_Init();
-
-
- HAL_SYSTICK_Config(HAL_RCC_GetHCLKFreq() / 1000); //1ms
-
-
- SystemClock_Config();
-
-
- MX_GPIO_Init();
- MX_USART1_UART_Init();
- MX_TIM2_Init();
-
- HAL_UART_Receive_IT(&huart1, &buf, 1);//开启串口接收中断
- HAL_TIM_Base_Start_IT(&htim2);//开启定时器中断
- Oled_Init();
- Oled_Screen_Clear();//实时显示其实就是不断刷屏显示新的数据
-
- while (1)
- {
- }
- }


