
热门标签
热门文章
- 1SpringBoot【运维实用篇】---- 配置高级_配置项compatibility.override main response version: t
- 2数据结构.栈
- 3在eclipse中报找不到或加载到某类的错误解决办法_eclipse错误: 在模块 wekstest 中找不到或无法加载主类 weka.classifie
- 4纯净安装 Windows 11 官方原版系统的方法图解(适用强迫症患者)_winntsetup4.2 win11
- 5Unity引擎的打包Player Settings设置介绍_unity palyer 设置install location
- 6PDF与Base64的相互转换以及操作_pdf转base64
- 7【Python 第2篇】如何用Python设计简单的“猜数字”小游戏_用python输入数字,猜测输的对不对
- 8【Java进阶】Java线程池ThreadPoolExecutor的使用详解以及SpringBoot下如何使用线程池_threadpoolexecutor 实现类注册进bean
- 9stm32 hal库 RCC初始化函数SystemClock_Config()梳理分析、初步细致学习(一)
- 10ubuntu 12.04 使用纪要 -- 持续更新
当前位置: article > 正文
C++ 类(class)的具体实现_c++ class .h
作者:思考机器3 | 2024-01-29 17:26:53
赞
踩
c++ class .h
类在.h和.cpp文件中的具体实现
前言
实际的应用中,我们经常使用多个自建头文件和cpp来组成整个项目,而类的封装作用能够使整个项目更加严密逻辑,一般把class以及它的变量、成员函数、引用等在头文件中声明,具体实现写在cpp文件中,格式如【基本结构】所示,当同一目录的任一文件引用了该头文件,则class中的所有组成部分都直接调用,例如:
我在test.h中声明了一个叫test的类,public里面有一个int类型的test1,和一个int类型的函数test2(test3);则在test.cpp中#include"test.h"后可以使用int test::test2(test3){ return test1+test3;}在任一写有#include"test.h"的文件中就可以建对象和调用了test test4; test4.test2(a);
//"test.h"文件
class test{
public:
	int test1=1;
	int test2(int test3);
private:
};

//"test.cpp"文件
 #include"test.h"
 int test::test2(int test3){
 	return test1+test3;	//test1作为test类中的一员,不用放进参数列表中
};

//其他文件
#include"test.h"
test a;//创建了test的对象a,任何类都需要对象才能进行调用
int i=1;
int k=a.test2(i);//k=1+1=2

- 1
- 2
- 3
- 4
- 5
- 6
- 7
- 8
- 9
- 10
- 11
- 12
- 13
- 14
- 15
- 16
- 17
- 18
- 19
【基本结构】
//头文件"test.h"
class 类名{
public:
	变量类型 变量名;
	函数类型 函数名(参数);
private:
};

//cpp文件"test.cpp"
#include"test.h"
函数类型 类名::函数名(参数){
	函数体;
}

//其他cpp文件
#include"test.h
类名 对象名;
对象.函数名(参数列表);
- 1
- 2
- 3
- 4
- 5
- 6
- 7
- 8
- 9
- 10
- 11
- 12
- 13
- 14
- 15
- 16
- 17
- 18
【问题描述】
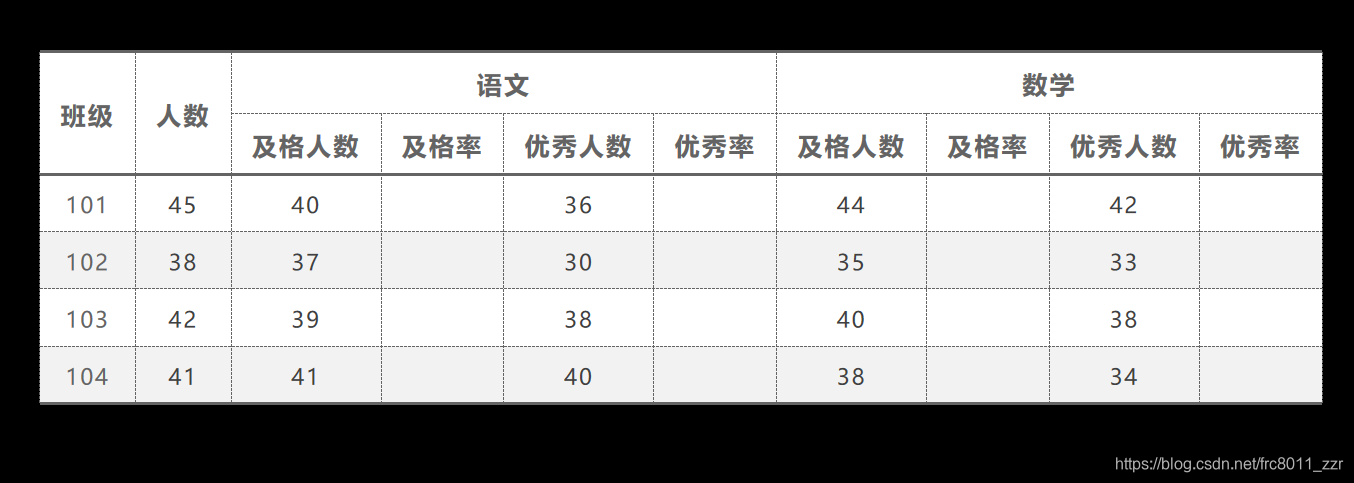
如图有n个班级,每个班级有m名学生,现要求使用类来对他们的语文、数学成绩进行统计
【输入格式】
第一行一个整数n,表示接下来有n行;
接下来的n行,每行6个整数,分别是班级的序号,学生总数,语文及格人数,语文优秀人数,数学及格人数,数学优秀人数
【输出格式】
一共n行,每行按照表格的顺序,把八个数顺次输出
【示例代码】
//班级考试系统.cpp
#include<iostream>
#include"class.h"
using namespace std;
int main() {
	int i;
	cin >> i;
	Class* a;
	a = new Class [i+1];
	for(int j=1;j<=i;j++)
	a[j].input();
	for (int k = 1;k <= i ;k++)
	a[k].print();
}


//class.h
#pragma once
#include"subject.h"
class Class {
public:
	int num;
	int popu;
	subject Maths;
	subject Chinese;
	void print();
	void input();
};


//class.cpp
#include"class.h"
#include<iostream>
using namespace std;
void Class::print() {
		cout << num << " ";
		cout << popu << " ";
		Chinese.output();
		Maths.output();
		cout << endl;
}
void Class::input() {
	cin >> num >> popu;
	Chinese.input();
	Maths.input();
}


//subject.h
#pragma once
#include<iostream>

using namespace std;
class subject {
public:
	int pass;
	double pRate=0.0;
	void rateP(int& popu);
	int exce;
	double eRate=0.0;
	void rateE(int& popu);
	void output();
	void input();
};


//subject.cpp
#include<iostream>
#include"subject.h"
void subject::rateP(int &popu) {
	pRate =100*double (pass) /double( popu);
}
void subject::rateE(int &popu) {
	eRate= 100*double(exce) /double( popu);
}
void subject::input() {
	cin >> pass >> exce;
}
void subject::output() {
	cout << pass << " " <<pRate<< "& " << exce << " " << eRate << "& " << endl;
}
- 1
- 2
- 3
- 4
- 5
- 6
- 7
- 8
- 9
- 10
- 11
- 12
- 13
- 14
- 15
- 16
- 17
- 18
- 19
- 20
- 21
- 22
- 23
- 24
- 25
- 26
- 27
- 28
- 29
- 30
- 31
- 32
- 33
- 34
- 35
- 36
- 37
- 38
- 39
- 40
- 41
- 42
- 43
- 44
- 45
- 46
- 47
- 48
- 49
- 50
- 51
- 52
- 53
- 54
- 55
- 56
- 57
- 58
- 59
- 60
- 61
- 62
- 63
- 64
- 65
- 66
- 67
- 68
- 69
- 70
- 71
- 72
- 73
- 74
- 75
- 76
- 77
- 78
- 79
- 80
- 81
- 82
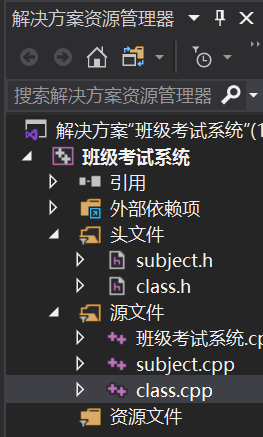
在Visual Studio中我们通过Ctrl+Alt+L的快捷方式打开解决方案资源管理器,在这里新建.h和.cpp文件,并对他们进行管理

限笔者水平有限,文章有不妥处,敬请斧正
声明:本文内容由网友自发贡献,转载请注明出处:【wpsshop博客】
推荐阅读
相关标签

