
读猿码系列——5.解析Golang常用定时任务库gron和cron_@daily cron golang
赞
踩
在实际开发环境中,我们经常会接触到定时任务的概念,比如每6个月清理一次历史日志,每天0点推送卡片消息或者每天凌晨2点重启服务等多种场景。在Linux系统中用crontab就可以搞定,你只需要简单的语法控制就能实现定时的语义,具体用法可以参考下在线工具:https://crontab.guru/。
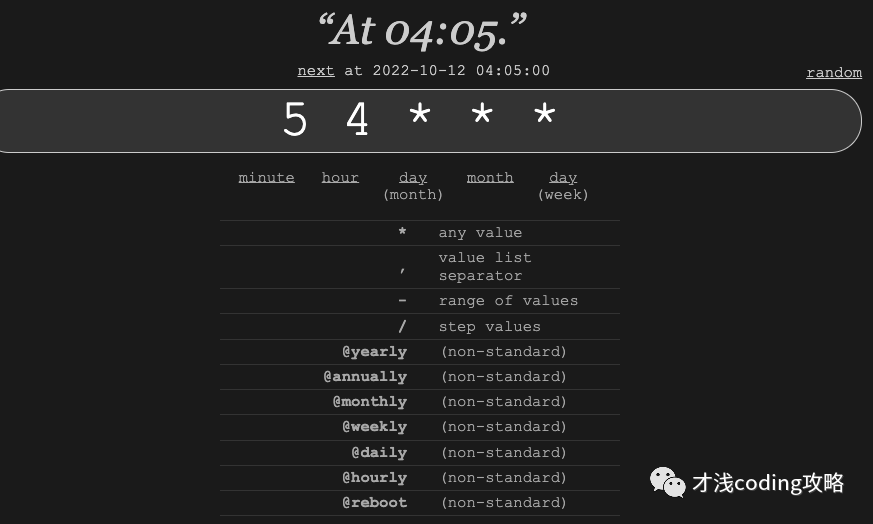
更形象一点表示就是:
- ┌───────────── minute (0 - 59)
- │ ┌───────────── hour (0 - 23)
- │ │ ┌───────────── day of the month (1 - 31)
- │ │ │ ┌───────────── month (1 - 12 or JAN-DEC)
- │ │ │ │ ┌───────────── day of the week (0 - 6 or SUN-SAT, Sunday=0 or 7)
- │ │ │ │ │
- │ │ │ │ │
- │ │ │ │ │
- * * * * *
其中(*)表示所有字段的可能值;(,)表示指定值列表;(-)表示指定值范围;(/)表示指定步长值。
crontab是Linux操作系统级别工具,如果定时任务失败或者压根没有启动,crontab是没办法通知提醒开发者的。在golang开源库中有两个比较常用且方便上手的库,就是今天要和大家介绍的gron和cron。
gron
开源地址:
https://github.com/roylee0704/gron
首先使用go get安装依赖:
$ go get github.com/roylee0704/gron
我们先来通过官方给出的quick start简单体验下使用方法:
- package main
-
- import (
- "fmt"
- "time"
- "github.com/roylee0704/gron"
- )
-
- func main() {
- c := gron.New()
- c.AddFunc(gron.Every(1*time.Hour), func() {
- fmt.Println("runs every hour.")
- })
- c.Start()
- }
实现的效果是每小时在终端上打印出runs every hour.
我们跟到New()方法中看下它的源码实现如下,可以看到在New()方法之后返回的是一个指向Cron对象的指针,其中为stop和add这两个channel做了初始化。
- type Cron struct {
- entries []*Entry // 记录一组定时任务
- running bool // 标识这个cron是否已经启动
- add chan *Entry //是一个channel,用于在Cron启动后新增定时任务
- stop chan struct{} // 是一个channel,是个空结构体,用来控制Cron停止
- }
-
- // New instantiates new Cron instant c.
- func New() *Cron {
- return &Cron{
- stop: make(chan struct{}),
- add: make(chan *Entry),
- }
- }
再跟到Entry中,我们看到一句:Entry consists of a schedule and the job to be executed on that schedule.
- type Entry struct {
- Schedule Schedule
- Job Job
-
- // the next time the job will run. This is zero time if Cron has not been
- // started or invalid schedule.
- Next time.Time
-
- // the last time the job was run. This is zero time if the job has not been
- // run.
- Prev time.Time
- }
对应的两个接口类型Schedule和Job:
- type Schedule interface {
- Next(t time.Time) time.Time
- }
- type Job interface {
- Run()
- }
Schedule代表具体的定时策略,它包含一个Next()方法,接受一个时间点,业务要返回下一次触发调度的时间点。
Job是对定时任务的抽象,只需要实现Run()方法即可。
接着看回我们的quick start,之后出现的是AddFunc()方法,其中加入gron.Every(2 * time.Second)一个简单的定时任务。我们跟到AddFunc()方法看下:
- type JobFunc func()
-
- // Run calls j()
- func (j JobFunc) Run() {
- j()
- }
- // AddFunc registers the Job function for the given Schedule.
- func (c *Cron) AddFunc(s Schedule, j func()) {
- c.Add(s, JobFunc(j))
- }
我们发现它的核心方法是Add,至此整个流程是用户传入一个func(),它在内部会被转化为JobFunc,即实现了刚刚提到的Job接口。如果Cron示例未启动,就加入到entries定时任务列表中,在启动后被处理;否则放到add这个channel中,进行额外新增的调度流程。
- func (c *Cron) Add(s Schedule, j Job) {
-
- entry := &Entry{
- Schedule: s,
- Job: j,
- }
-
- if !c.running {
- c.entries = append(c.entries, entry)
- return
- }
- c.add <- entry
- }
最后是去启动Cron,即c.Start()我们也跟到源码中看看:
- // Start signals cron instant c to get up and running.
- func (c *Cron) Start() {
- c.running = true
- go c.run()
- }
Start()方法执行时先将running置为true,用来标识实例已启动,然后启动一个goroutine来实际跑启动的逻辑。
另外在Stop()方法中将running置为false,标识实例停止,然后向stop这个channel中放入一个空结构体。
- // Stop halts cron instant c from running.
- func (c *Cron) Stop() {
-
- if !c.running {
- return
- }
- c.running = false
- c.stop <- struct{}{}
- }
再来看看c.run()中发生了什么:
- func (c *Cron) run() {
-
- var effective time.Time
- now := time.Now().Local()
-
- // to figure next trig time for entries, referenced from now
- for _, e := range c.entries {
- e.Next = e.Schedule.Next(now)
- }
-
- for {
- sort.Sort(byTime(c.entries))
- if len(c.entries) > 0 {
- effective = c.entries[0].Next
- } else {
- effective = now.AddDate(15, 0, 0) // to prevent phantom jobs.
- }
-
- select {
- case now = <-after(effective.Sub(now)):
- // entries with same time gets run.
- for _, entry := range c.entries {
- if entry.Next != effective {
- break
- }
- entry.Prev = now
- entry.Next = entry.Schedule.Next(now)
- go entry.Job.Run()
- }
- case e := <-c.add:
- e.Next = e.Schedule.Next(time.Now())
- c.entries = append(c.entries, e)
- case <-c.stop:
- return // terminate go-routine.
- }
- }

-
首先拿到当前时区时间now;
-
循环entries定时任务列表,根据now计算出下一次定时任务触发时间;
-
将任务列表根据时间sort排序;
-
拿到最近要到期的时间点,在select中通过time.After监听;到点了就新启动一个goroutine跑对应entry中的Job,并回到for循环,继续重新根据时间排序,再走同样的流程;
-
如果add channel中有新的Entry被加进来,就放到entries定时任务列表中,触发新的sort;
-
如果stop channel中收到信号,直接返回,结束执行。
整个流程还是比较简单的,值得我们学习的是Cron中控制退出的写法。因为停止只需要一个信号,核心逻辑使用for+select格式,并向stop channel中传入空结构体,还能大大节省内存。核心代码如下:
- type Cron struct {
- stop chan struct{}
- }
-
- func (c *Cron) Stop() {
- c.stop <- struct{}{}
- }
-
- func (c *Cron) run() {
-
- for {
- select {
- case <-c.stop:
- return // terminate go-routine.
- }
- }
- }
好的,到此我们通过官方quick start的示例深入源码了解了gron库的执行流程,还有一些时间格式及自定义定时任务的使用方法我放到了gitlab上,这里就不再赘述了。
https://gitlab.com/893376179/daily-golang-package/-/tree/main/crontab
下面来重点看下cron,由于gron代码很简洁,功能也相对简单,适合用来学习,但作者在6年前已经停止维护,两者也是大同小异。如果有定时任务需求,还是建议使用cron。
robfig/cron
开源地址:
https://github.com/robfig/cron
首先使用go get安装依赖:
$ go get -u github.com/robfig/cron/v3
我们还是先通过官方给出的quick start简单体验下使用方法:
- package main
-
- import (
- "fmt"
- "time"
-
- "github.com/robfig/cron/v3"
- )
-
- func main() {
- c := cron.New()
- c.AddFunc("@every 1s", func() {
- fmt.Println("tick every 1 second")
- })
- c.Start()
- time.Sleep(5 * time.Second)
- }
-
- // tick every 1 second
- // tick every 1 second
- // tick every 1 second
- // tick every 1 second
- // tick every 1 second
实现的效果就是每秒打印一次 tick every 1 second
cron支持固定时间间隔,像是示例中的@every 1s,意为每隔固定时间触发一次,例如2h30m30s。还支持以下几种时间格式:
- package main
-
- import (
- "fmt"
- "time"
-
- "github.com/robfig/cron/v3"
- )
-
- func main() {
- c := cron.New()
- c.AddFunc("30 * * * *", func() {
- fmt.Println("Every hour on the half hour")
- })
- c.AddFunc("30 3-6,20-23 * * *", func() {
- fmt.Println("On the half hour of 3-6am, 8-11pm")
- })
- c.AddFunc("0 0 1 1 *", func() {
- fmt.Println("Jan 1 every year")
- })
-
- c.AddFunc("@hourly", func() {
- fmt.Println("Every hour")
- })
- c.AddFunc("@daily", func() {
- fmt.Println("Every day")
- })
- c.AddFunc("@weekly", func() {
- fmt.Println("Every week")
- })
-
- c.Start()
-
- for {
- time.Sleep(time.Second)
- }
- }
可以看到它和Linux中的crontab命令语法相似,用5个空格分割的域来表示时间,其中分别表示Minutes、Hours、Day of month、Month、Day of week。另外还可以预定义时间规则,比如@yearly表示每年第一天的 0 点;@monthly表示每月第一天的 0 点;@hourly表示每小时的开始。
我们也可以指定时区,根据不同时区设置不同定时任务:
- package main
-
- import (
- "fmt"
- "time"
-
- "github.com/robfig/cron/v3"
- )
-
- func main() {
- nyc, _ := time.LoadLocation("America/New_York")
- c := cron.New(cron.WithLocation(nyc))
- c.AddFunc("0 6 * * ?", func() {
- fmt.Println("Every 6 o'clock at New York")
- })
- c.AddFunc("CRON_TZ=Asia/Tokyo 0 6 * * ?", func() {
- fmt.Println("Every 6 o'clock at Tokyo")
- })
- c.Start()
- for {
- time.Sleep(time.Second)
- }
-
- }
cron同gron一样,它也支持Job接口:
- // cron.go
- type Job interface {
- Run()
- }
我们需要自定义实现接口Job的结构体,完成它的Run()方法即可:
- package main
-
- import (
- "fmt"
- "time"
-
- "github.com/robfig/cron/v3"
- )
-
- type GreetingJob struct {
- Msg string
- }
-
- func (g GreetingJob) Run() {
- fmt.Println("Hello " + g.Msg)
- }
-
- func main() {
- c := cron.New()
- c.AddJob("@every 1s", GreetingJob{"wolrd"})
- c.Start()
- time.Sleep(3 * time.Second)
- }
-
- // Hello world
- // Hello world
- // Hello world
cron对象的AddJob()方法将GreetingJob对象添加到定时管理器中。在AddFunc()方法中,将传入的回调转为FuncJob类型,然后调用AddJob()方法:
- func (c *Cron) AddFunc(spec string, cmd func()) (EntryID, error) {
- return c.AddJob(spec, FuncJob(cmd))
- }
cron对象创建不仅有上述提到的指定时区,还可以使用自定义解析器,对这部分感兴趣可以到官方库使用文档中看看。除此之外cron还提供了WithLogger和WithChain两种选项。
WithLogger可以设置cron内部使用我们自定义的Logger:
- package main
-
- import (
- "fmt"
- "log"
- "os"
- "time"
-
- "github.com/robfig/cron/v3"
- )
-
- func main() {
- c := cron.New(
- cron.WithLogger(
- cron.VerbosePrintfLogger(log.New(os.Stdout, "cron: ", log.LstdFlags))))
- c.AddFunc("@every 2s", func() {
- fmt.Println("hello world")
- })
- c.Start()
-
- time.Sleep(5 * time.Second)
- }
-
- // cron: 2022/10/11 19:13:05 start
- // cron: 2022/10/11 19:13:05 schedule, now=2022-10-11T19:13:05+08:00, entry=1, next=2022-10-11T19:13:07+08:00
- // cron: 2022/10/11 19:13:07 wake, now=2022-10-11T19:13:07+08:00
- // cron: 2022/10/11 19:13:07 run, now=2022-10-11T19:13:07+08:00, entry=1, next=2022-10-11T19:13:09+08:00
- // hello world
- // cron: 2022/10/11 19:13:09 wake, now=2022-10-11T19:13:09+08:00
- // hello world
- // cron: 2022/10/11 19:13:09 run, now=2022-10-11T19:13:09+08:00, entry=1, next=2022-10-11T19:13:11+08:00
WithChain可以在执行实际的Job前后添加一些逻辑:比如捕获panic、如果上次运行还未结束,推迟/跳过本次执行、记录每个Job执行情况。实际上就是在Job的执行逻辑外在封装一层逻辑得到JobWrapper。
- // chain.go
- type JobWrapper func(Job) Job
然后使用一个Chain对象将这些JobWrapper组合到一起,调用Chain对象的Then(job)方法应用这些JobWrapper,返回最终的Job。
- type Chain struct {
- wrappers []JobWrapper
- }
-
- func NewChain(c ...JobWrapper) Chain {
- return Chain{c}
- }
-
- func (c Chain) Then(j Job) Job {
- for i := range c.wrappers {
- j = c.wrappers[len(c.wrappers)-i-1](j)
- }
- return j
- }
继续来看刚刚提到的那三种JobWrapper的方法:
Recover:捕获内部Job产生的 panic
- package main
-
- import (
- "fmt"
- "time"
-
- "github.com/robfig/cron/v3"
- )
-
- type panicJob struct {
- count int
- }
-
- func (job *panicJob) Run() {
- job.count++
- if job.count == 1 {
- panic("oooooooooops!")
- }
- fmt.Println("hello world")
- }
-
- func main() {
- c := cron.New()
- c.AddJob("@every 1s", cron.NewChain(cron.Recover(cron.DefaultLogger)).Then(&panicJob{}))
- c.Start()
-
- time.Sleep(5 * time.Second)
- }
-
- // cron: 2022/10/11 21:08:21 panic, error=oooooooooops!, stack=...
- // goroutine 7 [running]:
- // github.com/robfig/cron/v3.Recover.func1.1.1()
- // /Users/apple/go/pkg/mod/github.com/robfig/cron/v3@v3.0.1/chain.go:45 +0x85
- // panic({0x10a69a0, 0x10d8a80})
- // /usr/local/Cellar/go/1.17.5/libexec/src/runtime/panic.go:1038 +0x215
- // main.(*panicJob).Run(0xedad761c4)
- // /Users/apple/Desktop/daily-golang-package/crontab/cron/jobWrapper/recover/recover.go:17 +0x85
- // github.com/robfig/cron/v3.Recover.func1.1()
- // /Users/apple/go/pkg/mod/github.com/robfig/cron/v3@v3.0.1/chain.go:53 +0x73
- // github.com/robfig/cron/v3.FuncJob.Run(0x0)
- // /Users/apple/go/pkg/mod/github.com/robfig/cron/v3@v3.0.1/cron.go:136 +0x1a
- // github.com/robfig/cron/v3.(*Cron).startJob.func1()
- // /Users/apple/go/pkg/mod/github.com/robfig/cron/v3@v3.0.1/cron.go:312 +0x6a
- // created by github.com/robfig/cron/v3.(*Cron).startJob
- // /Users/apple/go/pkg/mod/github.com/robfig/cron/v3@v3.0.1/cron.go:310 +0xb2
- // hello world
- // hello world
- // hello world
- // hello world
DelayIfStillRunning:触发时,如果上一次任务还未执行完成(耗时太长),则等待上一次任务完成之后再执行
- package main
-
- import (
- "log"
- "time"
-
- "github.com/robfig/cron/v3"
- )
-
- type delayJob struct {
- count int
- }
-
- func (job *delayJob) Run() {
- time.Sleep(2 * time.Second)
- job.count++
- log.Printf("%d: hello world\n", job.count)
- }
-
- func main() {
- c := cron.New()
- c.AddJob("@every 1s", cron.NewChain(cron.DelayIfStillRunning(cron.DefaultLogger)).Then(&delayJob{}))
- c.Start()
- time.Sleep(10 * time.Second)
- }
-
- // 2022/10/11 21:22:18 1: hello world
- // 2022/10/11 21:22:20 2: hello world
- // 2022/10/11 21:22:22 3: hello world
- // 2022/10/11 21:22:24 4: hello world
- func DelayIfStillRunning(logger Logger) JobWrapper {
- return func(j Job) Job {
- var mu sync.Mutex
- return FuncJob(func() {
- start := time.Now()
- mu.Lock()
- defer mu.Unlock()
- if dur := time.Since(start); dur > time.Minute {
- logger.Info("delay", "duration", dur)
- }
- j.Run()
- })
- }
- }
首先定义一个互斥锁sync.Mutex,记录当前时间并获取锁,如果上一个任务还未结束就一直持有锁,直到上一个执行结束,锁才会被释放,保证了任务被串行执行。
SkipIfStillRunning:触发时,如果上一次任务还未完成,则跳过此次执行
- package main
-
- import (
- "log"
- "sync/atomic"
- "time"
-
- "github.com/robfig/cron/v3"
- )
-
- type skipJob struct {
- count int32
- }
-
- func (job *skipJob) Run() {
- atomic.AddInt32(&job.count, 1)
- log.Printf("%d: hello world\n", job.count)
- if atomic.LoadInt32(&job.count) == 1 {
- time.Sleep(2 * time.Second)
- }
- }
-
- func main() {
- c := cron.New()
- c.AddJob("@every 1s", cron.NewChain(cron.SkipIfStillRunning(cron.DefaultLogger)).Then(&skipJob{}))
- c.Start()
-
- time.Sleep(10 * time.Second)
- }
-
- // 2022/10/11 21:29:41 1: hello world
- // 2022/10/11 21:29:44 2: hello world
- // 2022/10/11 21:29:45 3: hello world
- // 2022/10/11 21:29:46 4: hello world
- // 2022/10/11 21:29:47 5: hello world
- // 2022/10/11 21:29:48 6: hello world
- // 2022/10/11 21:29:49 7: hello world
- // 2022/10/11 21:29:50 8: hello world
我们跟到源码里看下这个方法是如何实现的:
- func SkipIfStillRunning(logger Logger) JobWrapper {
- return func(j Job) Job {
- var ch = make(chan struct{}, 1)
- ch <- struct{}{}
- return FuncJob(func() {
- select {
- case v := <-ch:
- j.Run()
- ch <- v
- default:
- logger.Info("skip")
- }
- })
- }
- }
定义一个缓存大小为1的channel,初始发送空结构体保证第一个任务正常执行。在执行任务时从channel中取值,如果成功,执行任务并向chennel中发送下一个值,否则跳过。
对于gron和cron这两个定时任务相关的常用库,其实现相对简单且优雅,有兴趣的朋友可以去学习下!本文涉及的全部代码我放到了git上。之后再看到有意思的常用库也会放到对应目录下。日拱一卒,感谢你的阅读!
https://gitlab.com/893376179/daily-golang-package/-/tree/main/
参考
https://zhuanlan.zhihu.com/p/343895819
https://juejin.cn/post/7132715360293716004
https://darjun.github.io/2020/06/25/godailylib/cron
我的个人公众号,“才浅coding攻略”,这里可以第一时间收到推送,期待你的关注和催更!


