
- 1【网络奇幻之旅】那年我与区块链技术的邂逅
- 2是面试官放水,还是公司实在是太缺人?这都没挂,华为原来这么容易进..._华为内推容易进吗
- 3【FAQ】HarmonyOS JavaUI中使用terminate()后重新打开AbilitySlice页面存在缓存_harmony terminate
- 4【Linux下基本指令 —— 2】
- 5鸿蒙开发入门 | 开发第一个鸿蒙应用+页面跳转
- 6Python项目打包, docker build构建docker镜像, Docker Compose (Docker编配)_docker打包python项目
- 7网络通信之旅:揭秘交换机、路由器与网关的神奇世界!_网关和交换机
- 8如何检查Python中OpenCV的版本_如何查看opencv版本
- 9通过内网穿透本地MariaDB数据库,实现在公网环境下使用navicat图形化工具
- 10Windows Server 2016 安装步骤_server2016安装教程
第十八届全国大学生智能车室外组5g开源(小白小白小白队)
赞
踩
第一次参加智能车室外赛,我和队友都是小白,所以队名叫小白小白小白(重复字语音识别准确率高哈哈),虽然经历很多坎坷,但是也学到很多东西。代码本身没有多少东西,都是最基本的图像处理,方案开源旨在互相学习,下面简述方案,仅供学习参考。
1.基本循迹
室外环境复杂多变,得到一个稳定的图像尤为重要,其中方案的鲁棒性是首要,同时要便于调试。秉承大道至简的原则,使用双边滤波弱化图像赛道纹理,高斯模糊去除图像绝大多数的高频信号,保留图像低频信号,最后使用canny边缘检测获得清晰的赛道边界。


在得到理想的边缘检测图像后可以发现,图像中仍会因为各种原因对循迹造成影响,使用霍夫线变换提取指定角度线条即可达到较为理想的图像。
- 代码仅供参考
-
- std::vector<cv::Vec4i> lines;
- cv::HoughLinesP(dilated_ca, lines, 1, CV_PI / 180, 70, 25, 5);
-
- cv::Mat line_image = cv::Mat::zeros(dilated_ca.size(), CV_8UC1);
- // 过滤指定范围外的角度=============《《《开始》》》
- std::vector<cv::Vec4i> filtered_lines;
- //先画左线
- double min_angle = -90; // 最小角度(以度为单位)
- double max_angle = -18; // 最大角度(以度为单位)
-
- for (size_t i = 0; i < lines.size(); i++)
- {
- cv::Vec4i line = lines[i];
- double angle_rad = atan2(line[3] - line[1], line[2] - line[0]); // 计算角度(弧度)
- double angle_deg = angle_rad * 180 / CV_PI; // 将角度从弧度转换为度
-
- if (angle_deg >= min_angle && angle_deg <= max_angle) {
- filtered_lines.push_back(line);
- }
- }
- // 在图像上绘制筛选后的线条
- for (size_t i = 0; i < filtered_lines.size(); i++)
- {
- const cv::Vec4i& line = filtered_lines[i];
- const cv::Point pt1(line[0], line[1]);
- const cv::Point pt2(line[2], line[3]);
- cv::line(line_image, pt1, pt2, cv::Scalar(255), 2, cv::LINE_AA);
- }
- //再画右线
- min_angle = 18; // 最小角度(以度为单位)
- max_angle = 90; // 最大角度(以度为单位)
- for (size_t i = 0; i < lines.size(); i++)
- {
- cv::Vec4i line = lines[i];
- double angle_rad = atan2(line[3] - line[1], line[2] - line[0]); // 计算角度(弧度)
- double angle_deg = angle_rad * 180 / CV_PI; // 将角度从弧度转换为度
-
- if (angle_deg >= min_angle && angle_deg <= max_angle)
- {
- filtered_lines.push_back(line);
- }
- }
- // 在图像上绘制筛选后的线条
- for (size_t i = 0; i < filtered_lines.size(); i++)
- {
- const cv::Vec4i& line = filtered_lines[i];
- const cv::Point pt1(line[0], line[1]);
- const cv::Point pt2(line[2], line[3]);
- cv::line(line_image, pt1, pt2, cv::Scalar(255), 2, cv::LINE_AA);
- }
- // 最后对图像进行膨胀处理
- // 膨胀核
- cv::Mat kernel2 = cv::getStructuringElement(cv::MORPH_RECT, cv::Size(2, 2));
- // 对边缘检测后的图像进行膨胀处理
- cv::Mat dilated_ca2;
- cv::dilate(line_image, dilated_ca2, kernel2, cv::Point(-1, -1), 1);
- // 过滤指定范围外的角度=============《《《结束》》》》

Video_1697621771909
最后扫线方案多样,参考室内智能车,这里不多赘述。
由于操场赛道弯道相当平缓,所以PID算法使用最简单的位置式即可,在图像处理稳定,帧率跑满时,参数基本上瞎给都能达到极高的循迹速度。引入该车自带组合导航模块获取偏航角角速度适当消抖便可进一步提升速度(参考逐飞)。
2.元素识别
2.1.斑马线识别。
依旧秉承大道至简的原则,利用循迹时获得的边缘检测图像,检测其闭合轮廓即可,适当限制条件便可准确识别到斑马线。
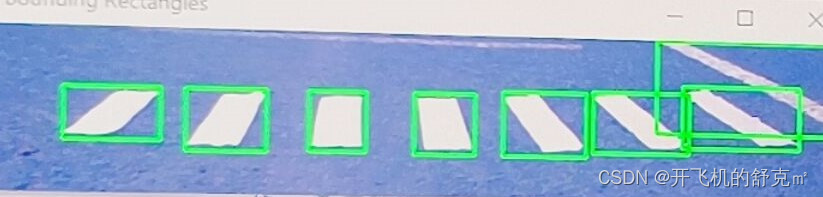
当然由于规则上说明要停止到30cm内,仅仅看到斑马线直接刹车是不够的,实时获取斑马线位置提前减速,检测斑马线与小车距离,以此达到精准识别和精准停车。
- 代码仅供参考
-
- int BanMa_Find(cv::Mat BanMa_Find_data)
- {
- // 查找图像中的轮廓
- std::vector<std::vector<cv::Point>> contours;
- cv::findContours(BanMa_Find_data, contours, cv::RETR_EXTERNAL, cv::CHAIN_APPROX_SIMPLE);
- // 创建一个副本以便绘制轮廓
- cv::Mat contour_img = BanMa_Find_data.clone();
- static int count_BMXduilie[8];
- int Y_point[20];//避障坐标值
- int count_BMX = 0;//斑马线标志
- // 定义矩形的大小宽度阈值(根据实际需要调整)
- int min_wh = 5; // 最小宽度
- int max_wh = 55; // 最大宽度
- // 遍历每个找到的轮廓
- for (const auto& contour : contours)
- {
- cv::Rect rect = cv::boundingRect(contour);
- if (min_wh <= rect.height && rect.height < max_wh && min_wh <= rect.width && rect.width < max_wh)
- {
- //过滤赛道外的轮廓
- if (rect.y >= 10 && rect.y <= 85)
- {
- if (rect.y % 2 == 0) rect.y = rect.y - 1;
- if (rect.y >= 85)
- {
- if(rect.x >= (20) && rect.x <= (300))
- {
- cv::rectangle(contour_img, rect, cv::Scalar(255), 2);
- // 打印轮廓坐标信息
- // std::cout << "轮廓坐标X = " << rect.x << " 轮廓坐标Y = " << rect.y << std::endl;
- count_BMX++;
- Y_point[count_BMX] = rect.y;
- }
- }
- else
- {
- if (rect.x >= (Left_Add_Line[rect.y] - 20) && rect.x <= (Right_Add_Line[rect.y] + 20))
- {
- cv::rectangle(contour_img, rect, cv::Scalar(255), 2);
- // 打印轮廓坐标信息
- // std::cout << "轮廓坐标X = " << rect.x << " 轮廓坐标Y = " << rect.y << std::endl;
- count_BMX++;
- Y_point[count_BMX] = rect.y;
- }
- }
- }
- if(count_BMX >= 6) count_BMX = 6;
- }
- }
- int pingJun = (Y_point[1] + Y_point[2] + Y_point[3]+ Y_point[4])/4;
- pingJun = (Q_jdz(pingJun - Y_point[1]) + Q_jdz(pingJun - Y_point[2]) + Q_jdz(pingJun - Y_point[3])+ Q_jdz(pingJun - Y_point[4]))/4;
- //printQ("pingJun",pingJun);
- if (count_BMX >= 4)
- {
- banmaxian_Y = (Y_point[1] + Y_point[2] +Y_point[3] +Y_point[4])/4;
- // std::cout << "斑马线坐标 = " << banmaxian_Y << std::endl; //
- count_BMX = 0;
- count_BMXduilie[7] = 1;
- if(pingJun >= 5)//看他们横坐标的平均值
- {
- return 0;
- }
- }
- else
- {
- count_BMX = 0;
- count_BMXduilie[7] = 0;
- }
-
- count_BMXduilie[0] = count_BMXduilie[1];
- count_BMXduilie[1] = count_BMXduilie[2];
- count_BMXduilie[2] = count_BMXduilie[3];
- count_BMXduilie[3] = count_BMXduilie[4];
- count_BMXduilie[4] = count_BMXduilie[5];
- count_BMXduilie[5] = count_BMXduilie[6];
- count_BMXduilie[6] = count_BMXduilie[7];
- for (int num = 0; num <= 7; num++)
- {
- if (count_BMXduilie[num] == 1)
- {
- count_BMX++;
- }
- }
- // 显示带有轮廓外接矩形的图像
- // cv::imshow("contour_img", contour_img);
- //最终返回值
- if (count_BMX >= 3) //4个就停车
- {
- return 1;
- }
- else return 0;
- }
2.2.避障
使用hsv颜色阈值二值化图像,判断其蓝色色块是否在小车所处的赛道内,过滤赛道外干扰色块,返回赛道内障碍物坐标映射在循迹图像中,根据色块坐标适当规划循迹路径即可完成避障。
- 代码仅供参考
-
- int find_XYdata[3];//障碍物坐标
- int find_XYdata_second[3];//障碍物坐标
- int BZ_chuli(cv::Mat BZdata)//传入原图
- {
- cv::Mat hsvvvv;
- cv::cvtColor(cropped_imageddddd, hsvvvv, cv::COLOR_BGR2HSV);
- // cv::imshow("yuantu2", BZdata);
- // cv::imshow("yuantu", cropped_imageddddd);
- // 定义红色和蓝色范围
- //红色阈值
- cv::Scalar red_lower1(150 ,0,0);
- cv::Scalar red_upper1(180, 255, 255);
- // cv::Scalar red_lower1(Hmin ,Smin, Vmin);
- //cv::Scalar red_upper1(Hmax, Smax, Vmax);
- cv::Scalar red_lower2(0, 140, 150);
- cv::Scalar red_upper2(10, 255, 250);
- //蓝色阈值
-
- //cv::Scalar blue_lower(Hmin ,Smin, Vmin);
- // cv::Scalar blue_upper(Hmax, Smax, Vmax);
- cv::Scalar blue_lower(80,85, 107);
- cv::Scalar blue_upper(115, 255, 255);
- //黄色阈值
- // cv::Scalar yellow_lower(Hmin ,Smin, Vmin);
- //cv::Scalar yellow_upper(Hmax, Smax, Vmax);
- cv::Scalar yellow_lower(0, 19, 71);
- cv::Scalar yellow_upper(54, 255, 255);
- // std::cout << "BZdata图像尺寸: " << BZdata.size() << std::endl;
- // 高斯模糊
- //cv::imshow("yuantu1", BZdata);
- // cv::GaussianBlur(BZdata, BZdata, cv::Size(5, 5), 2);
- //cv::imshow("yuantu2", BZdata);
-
- // 颜色提取(红色和蓝色)
- cv::Mat red_mask, blue_mask,red_mask2;
- //黄色图像
- cv::Mat yellow_mask;
- cv::inRange(BZdata, yellow_lower, yellow_upper, yellow_mask);
- cv::inRange(hsvvvv, blue_lower, blue_upper, blue_mask);
- cv::inRange(BZdata, red_lower1, red_upper1, red_mask);
- //cv::inRange(BZdata, red_lower2, red_upper2, red_mask2);
-
-
-
- //腐蚀黄色图像------------------------------
- cv::Mat kerneyellow = cv::getStructuringElement(cv::MORPH_RECT, cv::Size(1, 1)); // 可以调整核的大小
- cv::erode(yellow_mask, yellow_mask, kerneyellow, cv::Point(-1, -1), 1);
- // //膨胀黄色图像
- cv::Mat kerneyellow22 = cv::getStructuringElement(cv::MORPH_RECT, cv::Size(1, 1)); // 可以调整核的大小
- cv::dilate(yellow_mask, yellow_mask, kerneyellow22, cv::Point(-1, -1), 1);
- CAR_STOP_FLAG = CAR_STOP(yellow_mask);//看到黄色后停车 要改一下找点的范围,不然会越界---------------------------------------------------------
-
- // //腐蚀蓝色和红色
- cv::Mat kernel3 = cv::getStructuringElement(cv::MORPH_RECT, cv::Size(2, 2)); // 可以调整核的大小
- cv::erode(blue_mask, blue_mask, kernel3, cv::Point(-1, -1), 1);
- cv::erode(blue_mask, blue_mask, kernel3, cv::Point(-1, -1), 1);
- // // 膨胀蓝色和红色
- cv::Mat kernel2 = cv::getStructuringElement(cv::MORPH_RECT, cv::Size(1,1));
- cv::dilate(blue_mask, blue_mask, kernel2, cv::Point(-1, -1), 1);
- cv::dilate(blue_mask, blue_mask, kernel2, cv::Point(-1, -1), 1);
-
- //发车识别
- UI_music = CAR_FaChe(red_mask);
-
- //
- if(BZ_Imageflag == 1) cv::imshow("red_mask", red_mask);
- if(yellow_Imageflag == 1) cv::imshow("yellow_mask", yellow_mask);
- if(blue_Imageflag == 1) cv::imshow("blue_mask", blue_mask);
- if(TIME_BIZHANG == 0) return 0;//跳过避障
- // 寻找蓝色色块的轮廓
- std::vector<std::vector<cv::Point>> red_contours;
- cv::findContours(blue_mask, red_contours, cv::RETR_EXTERNAL, cv::CHAIN_APPROX_SIMPLE);
- // 找到最大的红色色块
- double max_area = 0;
- int max_area_index = -1;
- double second_max_area = 0;
- int second_max_area_index = -1;
- for (int i = 0; i < red_contours.size(); i++)
- {
- double area = cv::contourArea(red_contours[i]);
- //
- if (area > max_area)
- {
- second_max_area = max_area;
- second_max_area_index = max_area_index;
- max_area = area;
- max_area_index = i;
- }
- else if(area > second_max_area)
- {
- second_max_area_index = i;
- second_max_area = area;//如果当前区域小于最大区域但是大于第二大区域
- }
- }
- if(BZ_Imageflag == 2) cv::imshow("标记红色色块", BZdata);
- // 标记最大的红色色块并打印中心点坐标
- if (max_area_index >= 0)
- {
- // cv::drawContours(BZdata, red_contours, max_area_index, cv::Scalar(0, 0, 255), 2);
- // 获取最大红色色块的边界框
- cv::Rect bounding_rect = cv::boundingRect(red_contours[max_area_index]);//最大
- // 计算最大红色色块的中心点坐标
- int center_x = (bounding_rect.x + bounding_rect.width / 2)/2;
- int center_y = (bounding_rect.y + bounding_rect.height / 2)/2;
- // 打印中心点坐标
- //std::cout << "最大红色色块的中心点坐标: (" << center_x << ", " << center_y << ")" <<"像素点数目"<<max_area<< std::endl;//
- if(max_area <= 2) return 0;//障碍物大小
- find_XYdata[0] = center_x;
- find_XYdata[1] = center_y;
- // cv::imshow("标记红色色块", BZdata);
- if(second_max_area_index >= 0)//第二个
- {
- cv::Rect bounding_rect = cv::boundingRect(red_contours[second_max_area_index]);//第二大
- // 计算最大红色色块的中心点坐标
- int center_x = (bounding_rect.x + bounding_rect.width / 2)/2;
- int center_y = (bounding_rect.y + bounding_rect.height / 2)/2;
- // 打印中心点坐标
- // std::cout << "第二大红色色块的中心点坐标: (" << center_x << ", " << center_y << ")" <<"像素点数目"<<max_area<< std::endl;
- if(second_max_area <= 2) return 0;//障碍物大小
- find_XYdata_second[0] = center_x;
- find_XYdata_second[1] = center_y;
- }
- return 1;
- }
-
- // 展示标记后的图像
-
- return 0;
- }
- void bizhangBuxian(int data_X, int data_Y, int bizhang_fangxiang)//0 向左避障 1向右避障
- {
- if (bizhang_fangxiang == 0)//左避障
- {
- for (int i = ROW-1; i >= 9; i -= 2)
- {
- Right_Add_Line[i] = data_X - Bizhang_line_move;
- }
-
- }
- else if (bizhang_fangxiang == 1)//右避障
- {
- for (int i = ROW-1; i >= 9; i -= 2)
- {
- Left_Add_Line[i] = data_X + Bizhang_line_move + 10;
- }
- }
- }
- int BZ_PANDUAN_2(void)//判断障碍物是否在赛道内
- {
- int flagd = 0;
- int Y = 0;
- if(find_XYdata[1] <=10 && find_XYdata_second[1] <=10) return 0;
- for (int i = ROW-1; i >= 9; i -= 2)
- {
- if (find_XYdata[1] >= i)//找到障碍点所在行
- {
- Y = i;
- break;
- }
- if (i <= 11) {flagd = 1;}//不认为在.试试2号大
- }
- if(flagd == 1)
- {
- for (int i = ROW-1; i >= 9; i -= 2)
- {
- if (find_XYdata_second[1] >= i)//找到障碍点所在行
- {
- Y = i;
- flagd = 2;
- break;
- }
- if (i <= 11) {return 0;}//不认为在
- }
- }
- if(flagd == 0)
- {
- if (find_XYdata[0] <= Left_Add_Line[Y] -25 || find_XYdata[0] >= Right_Add_Line[Y] + 25 )//判断是否在赛道内
- {
- flagd = 2;
- }
- else return 1;
- }
- if(flagd == 2)
- {
- for (int i = ROW-1; i >= 9; i -= 2)
- {
- if (find_XYdata_second[1] >= i)//找到障碍点所在行
- {
- Y = i;
- break;
- }
- if (i <= 11) {return 0;}//不认为在
-
- }
- }
- if(flagd == 2) //2号大
- {
- if (find_XYdata_second[0] <= find_XYdata_second[Y] -25 || find_XYdata_second[0] >= find_XYdata_second[Y] + 25 )//判断是否在赛道内
- {
- return 0;
- }
- else
- {
- find_XYdata[0] = find_XYdata_second[0];
- return 1;
- }
- }
- return 0;
-
- }
- void BZ_LuoJISET(void)//避障逻辑
- {
- static int zhangai_flag1 = 0;
- static int zhangai_flag22 = 1;
- static int zhangai_Left_or_Right = 0;
- static int nums = 0;
- if (find_XYdata[1] > 85 && zhangai_flag1 == 0)//在图像下方出现
- {
- nums++;
- if(nums >= 1)//1帧
- {
- nums = 0;
- zhangai_flag1 = 1;
- }
- printQ("下方下方下方下方下方下方下方下方", 1);
- }
- if (zhangai_flag1 == 1)//又出现在上方
- {
- if (find_XYdata[1] <= 75)
- {
- printQ("上方上方上方上方上方", 1);
- nums++;
- if (nums >= 1)//3帧
- {
- nums = 0;
- zhangai_flag1 = 2;
- }
- }
- }
- if (zhangai_flag1 == 2)//切换
- {
- zhangai_flag22++;
- if (zhangai_flag22 >= 2) zhangai_flag22 = 0;
- zhangai_flag1 = 0;
- }
- if (zhangai_flag22 == 0) { printQ("左避障", 0); zhangai_Left_or_Right = 0; }
- if (zhangai_flag22 == 1) { printQ("右避障", 1); zhangai_Left_or_Right = 1; }
- //--------------
- bizhangBuxian(find_XYdata[0], find_XYdata[1], zhangai_Left_or_Right);//避障改线
- Mid_Line_Repair();
- }
video_20231210_201610_edit
2.3.其他
发车识别赛道颜色,停车识别黄线,没啥说的,两个一毛一样。
- int CAR_STOP(cv::Mat yellow_Find_data) //320 * 96
- {
- //std::cout << "yellow_Find_data: " << yellow_Find_data.size() << std::endl;
- int yellowPoint_num = 0;
- for(int i = 95;i>= 95-70;i-=1)
- {
- for(int j = 319-30;j>=30;j-=2)
- {
- if(yellow_Find_data.at<uchar>(i, j) > 100)
- {
- yellowPoint_num++;
- }
- }
-
- }
- if(0)
- {
- printQ("黄点数目",yellowPoint_num);
- cv::Point pA(10, 169);//记录点
- cv::Point pB(10, 100);//记录点
- //描点画线
- cv::circle(yellow_Find_data, pA, 8, 255);
- cv::circle(yellow_Find_data, pB, 8, 255);
- cv::imshow("contour_img", yellow_Find_data);//障碍物
- }
- //printQ("黄色数目",yellowPoint_num);
- if(yellowPoint_num >= 200)
- {
- return 1;
- }
-
- return 0;
- }
-
- int CAR_FaChe(cv::Mat FaChe_data)//发车
- {
- static int flag_1 = 0;
- static int numstc = 0;
- int Red_Point_num = 0;
- if(flag_1 == 1) return 0;
- for(int i = 95;i>= 95-70;i-=2)
- {
- for(int j = 319-30;j>=30;j-=2)
- {
- if(FaChe_data.at<uchar>(i, j) > 100)
- {
- Red_Point_num++;
- }
- }
-
- }
-
- printQ("红点数目",Red_Point_num);
- if(Red_Point_num >= 200) numstc++;
- else numstc = 0;
- if(numstc >= 20){ flag_1 = 1;return 0;}
- else return 1;
-
- }
-
尾言
大道至简,代码和我有一个能跑就行

最后感谢安徽工程大学电子科技协会,感谢每一位指导老师。

