
- 12024美国大学生数学建模竞赛A-F题思路助攻汇总_24美赛
- 2linux进程监控提醒,linux进程监控,monitor脚本
- 3[数据挖掘、数据分析] clickhouse在go语言里的实践_go语言做大数据
- 4Maven配置远程仓库-详细操作_maven-source-plugin 部署 远程仓库
- 5英语不好可以学mysql吗_请你不要坚持自学一直很烂的英语了,好吗?
- 6python asyncio socket
- 7java jar 启动脚本_java启动脚本
- 8three.js通过自定义后期处理实现智慧城市扫光效果
- 9蓝桥杯试题 算法训练 拿金币(C语言)_有一个n x n的方格,每一个格子都有一些金币,只要站在格子里就能拿到里面的金币。你站在最左上角的格
- 10STM32的三种Boot模式_stm32boot启动项
【基于Mediapipe与Unity的人体姿态捕捉系统】_unity mediapipe
赞
踩
基于Mediapipe与Unity的人体姿态捕捉系统
1. 工程整体介绍
整个工程主要分成三部分:1.基于Mediapipe的人体姿态估计;2.基于Unity的人体姿态展示;3.从Mediapipe到Unity的通讯,即Mediapipe估计的姿态如何实时传递给Unity。
2. 基于Mediapipe的人体姿态估计
姿态估计部分,使用opencv进行人体采集,然后调用Mediapipe对读取的每一帧图像进行姿态估计。
2.1 环境搭建
版本要求:python >= 3.7
 pip install mediapipe
 pip install opencv-python
 pip install opencv-contrib-python
- 1
- 2
- 3
参考官方文档:
链接: https://google.github.io/mediapipe/solutions/pose.
2.2 代码片段
博主假设你已经掌握了最基础的python语法
import cv2
import mediapipe as mp
import numpy as np

def Pose_Images():
    #使用算法包进行姿态估计时设置的参数
    mp_pose = mp.solutions.pose
    with mp_pose.Pose(
        min_detection_confidence=0.5,
        min_tracking_confidence=0.8) as pose:
      #打开摄像头
      cap = cv2.VideoCapture(0)
      while(True):
        #读取摄像头图像
        hx, image = cap.read()
        if hx is False:
            print('read video error')
            exit(0)
        image.flags.writeable = False
        # Convert the BGR image to RGB before processing.
        # 姿态估计
        results = pose.process(cv2.cvtColor(image, cv2.COLOR_BGR2RGB))
        print(results.pose_landmarks)
        cv2.imshow('image', image)

        if cv2.waitKey(10) & 0xFF == ord('q'):       # 按q退出
          break
      cap.release()


if __name__ == '__main__':
    Pose_Images()

- 1
- 2
- 3
- 4
- 5
- 6
- 7
- 8
- 9
- 10
- 11
- 12
- 13
- 14
- 15
- 16
- 17
- 18
- 19
- 20
- 21
- 22
- 23
- 24
- 25
- 26
- 27
- 28
- 29
- 30
- 31
- 32
2.3 结果展示
在你的控制台可以看到一个一个点的输出,如下,那么姿态估计就完成了第一步。
landmark {
  x: 0.7439931035041809
  y: 3.0562074184417725
  z: -0.25115278363227844
  visibility: 0.00022187501599546522
}
landmark {
  x: 0.5690034627914429
  y: 3.0262765884399414
  z: -0.44416818022727966
  visibility: 0.00034665243583731353
}
......
- 1
- 2
- 3
- 4
- 5
- 6
- 7
- 8
- 9
- 10
- 11
- 12
- 13
2.4 结果分析
下面我们来分析一下这些点的坐标到底代表了什么。
每一张图片都会产生一组坐标,每组坐标包含32个坐标点。
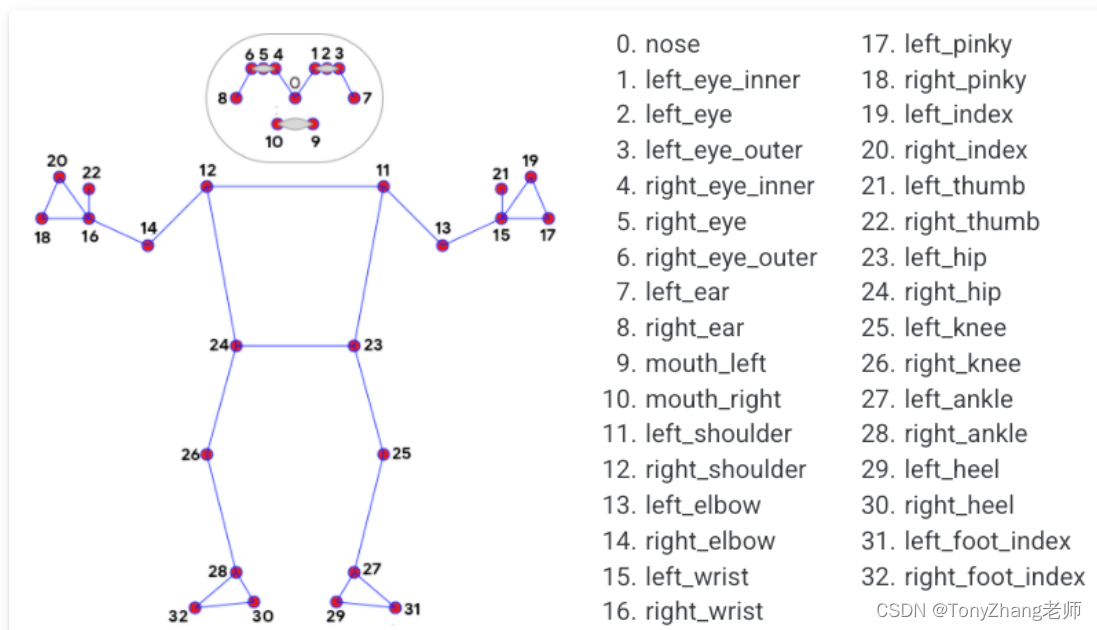
每个地标包括以下内容:
- x和y:通过图像宽度和高度分别归一化为[0.0, 1.0],通俗点说是,真实的x,y坐标,分别除以图像的宽度跟高度。
- z: 代表坐标的深度,臀部中点的深度为原点,数值越小,地标就越靠近摄像机。z的大小使用与x大致相同的比例。
- visibility:一个[0.0, 1.0]的值,表示坐标在图像中可见(存在且不被遮挡)的可能性。
2.5 本章总结
我们通过使用opencv库,打开摄像头采集照片,将照片传递给Mediapipe进行姿态坐标估计,后续我们将坐标放到Unity中进行展示就可以了。
3. 基于Unity的人体姿态展示
博主假设你已经掌握了unity的基础知识。
3.1 Unity 人体骨骼动画
我们可以从Unity商店中或者在此网站https://www.mixamo.com选择任意一个3D的人物模型导入到工程中。
3.2 Mediapipe坐标到Unity的映射
具体转换细节会专门写一篇文件来解释,数据是驱动骨骼运动的。整体的实现参考了开源的解决方案。
参考:
https://github.com/digital-standard/ThreeDPoseTracker
VNectModel.cs 文件实现了从预测坐标到Unity骨骼坐标的转换。
4. 从Mediapipe到Unity的数据传递
姿态预测跟unity的姿态展示毕竟属于不同的进程,对于进程之间的通讯有不同的实现方式。本文选择网络通讯中的UDP通讯,因为UDP通讯具有延迟小的特点,同时我们对于数据的丢失存在一定的容忍性。
4.1 使用Python发送数据
#代码片段示例:
json_data = json.dumps(pose_data)
udp_socket = socket.socket(socket.AF_INET, socket.SOCK_DGRAM)
dest_addr = ('127.0.0.1', 5052)
text = json_data.encode('utf-8')
udp_socket.sendto(text, dest_addr)
- 1
- 2
- 3
- 4
- 5
- 6
4.2 使用C#接收数据
此代码片段借鉴了此博主的文章(如有侵权,联系删除)。
Link
using System.Collections;
using System.Collections.Generic;
using UnityEngine;
using System;
using System.Text;
using System.Net;
using System.Net.Sockets;
using System.Threading;

public class UDPRecive : MonoBehaviour
{
    Thread receiveThread;
    UdpClient client;
    public int port = 5052;
    public bool startRecieving = true;
    public string data;
    // Start is called before the first frame update
    void Start()
    {
        receiveThread = new Thread(
            new ThreadStart(ReceiveData));
        receiveThread.IsBackground = true;
        receiveThread.Start();

    }

    // Update is called once per frame
    void Update()
    {

    }

    private void ReceiveData()
    {
        client = new UdpClient(port);
        while (startRecieving)
        {
             Debug.Log("startRecieving");
            try
            {
                IPEndPoint anyIP = new IPEndPoint(IPAddress.Any, 0);
                byte[] dataByte = client.Receive(ref anyIP);
                data = Encoding.UTF8.GetString(dataByte);
                Debug.Log(data);
            }
            catch (Exception err)
            {
                print(err.ToString());
            }
        }
    }
}
- 1
- 2
- 3
- 4
- 5
- 6
- 7
- 8
- 9
- 10
- 11
- 12
- 13
- 14
- 15
- 16
- 17
- 18
- 19
- 20
- 21
- 22
- 23
- 24
- 25
- 26
- 27
- 28
- 29
- 30
- 31
- 32
- 33
- 34
- 35
- 36
- 37
- 38
- 39
- 40
- 41
- 42
- 43
- 44
- 45
- 46
- 47
- 48
- 49
- 50
- 51
- 52
- 53
5. 成果展示
从姿态预测到3D展示就完成了,那么我们来看一下效果吧。
11月25日
6. 后续展望
后续会根据需求,出一个对全部代码的讲解,可以帮助读者一步步实现自己的工程。
欢迎提出意见或建议。
7.联系方式
欢迎私信加我。


